Managing financial transactions across multiple subsidiaries can quickly become complex, especially as businesses expand into new regions or operate through separate legal entities. Without a centralized system, finance teams often struggle with mismatched records, manual reconciliations, and compliance challenges.
This is where Oracle NetSuite simplifies the process. It provides built-in capabilities to handle intercompany transactions with accuracy and real-time visibility. Instead of relying on disconnected systems or spreadsheets, organizations can streamline how subsidiaries transact with each other. This not only improves financial control but also ensures clean consolidation at the group level. Understanding how intercompany transactions work in NetSuite is essential for maintaining accurate financial reporting.
NetSuite OneWorld and Intercompany Transactions
NetSuite – OneWorld lands with functionality that is known as Intercompany Transactions, in which a single account is responsible for managing all the transactions between hierarchical(Parent-Child Relationship) subsidiaries along with the support of multiple taxes and multiple currencies in business. Note that subsidiaries could be either domestic or International.
Please consider the image below for a High-Level Abstraction of Intercompany Sales/Purchase Transactions.
All the transactions will be created in the mentioned sequence, in which the requestor subsidiary will be managing the Purchase Flow while the Provider subsidiary will be managing Sales Side.

In this Blog Series, we will learn how one could generate intercompany transactions within NetSuite by considering all possible scenarios.
Prior to starting any intercompany transaction, there are certain preferences and account configurations that we need to make sure are configured and set accordingly.
What are Intercompany Transactions in NetSuite?
Intercompany transactions in NetSuite are financial activities that take place between subsidiaries under the same parent company. These transactions ensure that both entities involved record the financial impact correctly and stay aligned for reporting and consolidation.
They are commonly used when different business units interact internally instead of with external customers or vendors.
- Transfer of goods or inventory between subsidiaries
- Sharing of operational or administrative expenses
- Internal billing for services provided by one entity to another
- Loans or fund transfers within the organization
- Allocation of costs across multiple subsidiaries
These transactions help maintain financial accuracy and simplify group-level reporting.
When we do Intercompany Transactions in NetSuite, NetSuite always expects the subsidiary to act like an Entity, I.e. In the Sales Order, the Subsidiary will be selected as a Customer in the customer field, while in Purchase Order The Subsidiary will always be selected as a Vendor in the vendor field. So there’ll always be Vendor and Customer representatives of each subsidiary if the subsidiary is involved in intercompany transactions.
We have a couple of ways to generate representing entities, I.e. a manual way and an automated way.
1) Manual Way
Navigate to the subsidiary listing
Setup -> Company -> Subsidiaries
Let’s consider the first record with Subsidiary Name, Trendly, Inc, if you can see columns REPRESENTATIVE VENDOR and REPRESENTATIVE CUSTOMER who are already populated, it’s mean the subsidiary has already generated both representative entities if they are not there, you can hit CTA (Generate Representing Entities) highlighted in GREEN, that will generate entities for each subsidiary which is listed here except for ELIMINATION SUBSIDIARY (You can learn about ELIMINATION SUBSIDIARY in the below section)

-
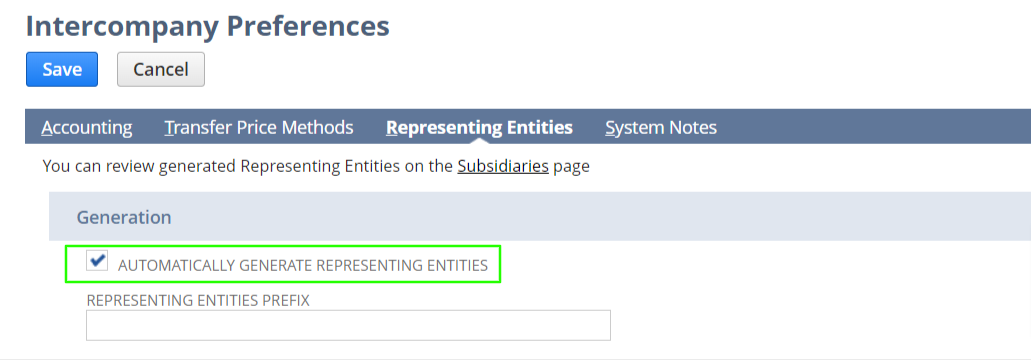
- Automated Way
In an automated way, whenever you create a subsidiary it’ll automatically create both representative entities of a subsidiary, I.e. Vendor and Customer of the Subsidiary for that, you need to make sure the following checkbox of AUTOMATICALLY GENERATE REPRESENTING ENTITIES should be checked.
You can navigate,
Setup -> Accounting -> Intercompany Preferences and select tab (Representing Entities
Elimination Subsidiary:
A little explanation about Elimination Subsidiary, Why we create it for each parent-subsidiary
When you have done the transaction between the two subsidiaries, you need to eliminate the expense and revenue effect from that subsidiary at the consolidated level.
You have to create a one-elimination subsidiary on the child level for every parent subsidiary. You have to create a normal subsidiary with the name “ELIMINATION” and need to check the “Elimination” check box.
When we create the following transaction between the two subsidiaries, Intercompany functionality eliminates these transactions in the consolidation report.
-
- Sales and purchase
-
- Journal entries
- Inventory transfer
Intercompany Elimination Account
You must create the Inter-company Elimination account before setting the preferences, you can select the Intercompany elimination account as default on the item level.
-
- Go to List >> Accounting >> List >>New and create a New GL account.
-
- Check the Elimination Intercompany transaction checkbox
-
- Select the parent-subsidiary and Check Include children check box.
-
- Hit Save
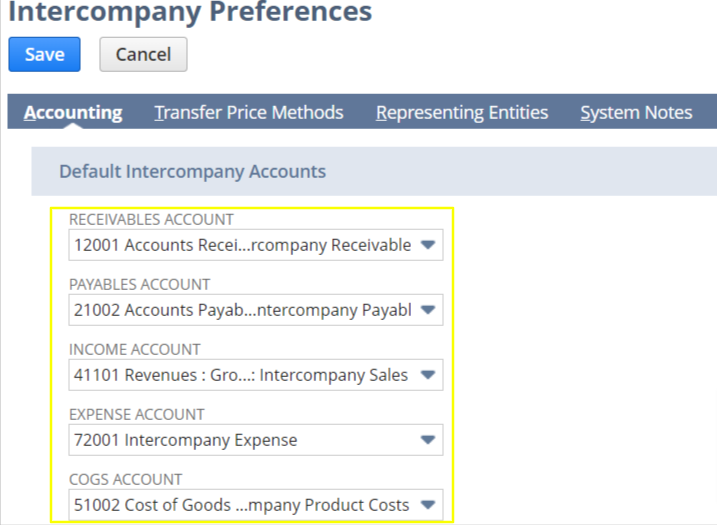
DEFAULT INTERCOMPANY ACCOUNTS
After done with the subsidiary representing entities you need to set the default accounts for intercompany transactions the set accounts will reflect in transactions please consider the below screenshot
You can navigate to the screen for default Intercompany Accounts
Setup -> Accounting -> Intercompany Preferences and select (Accounting Tab)
After setting up all the preferences mentioned above and configurations, finally, we are ready to create the Intercompany Sales/Purchase Transaction.
We’ll be covering the creation of transactions that are essential for intercompany transactions in our next blog.