
In Oracle NetSuite, sublists allow you to display related data directly within a record, giving users a clear view of associated transactions, activities, or custom data. While NetSuite provides built-in sublists for standard records, there are situations where these aren’t enough.
Custom sublists give you full control over which data is shown, how fields are arranged, and how users interact with the list. Saved search sublists, on the other hand, let you display filtered, dynamic data without coding. Understanding the difference helps you choose the right approach for your business needs, whether it’s simple reporting, interactive forms, or complex production workflows.
In this blog, we look at the methods to create a sublist in NetSuite easily. Let’s get to it.
What Is a Sublist in NetSuite?
A sublist in Oracle NetSuite is a list of data that is directly related to a specific record. It acts as a secondary table area within a record form, providing users with a quick view of associated information without navigating away from the main record.
Sublists are commonly used to display related data such as child records, saved search results, or linked transactions. They make it easier to see all relevant details in one place and help users manage data efficiently.
Examples of Sublists in NetSuite:
- Sales Orders on a Customer record – Shows all orders placed by a customer.
- Activities on an Employee record – Displays tasks, meetings, or calls associated with an employee.
- Custom transactions on a custom record – Lists related custom data, such as project tasks linked to a project record.
By providing a structured view of related data, sublists enhance productivity and streamline navigation across NetSuite records.
Types of Sublists in NetSuite
Sublists in Oracle NetSuite can appear in several ways, depending on how they are created and used. Understanding the types helps you choose the right approach for your business needs.
1. System‑Generated Sublists
These are standard sublists automatically provided by NetSuite on most record types. They display related data without any configuration or scripting.
Examples include:
- Transactions – Shows all financial transactions linked to a customer or vendor
- Communications – Emails, calls, and messages associated with a record
- Activities – Tasks, events, or meetings tied to a record
System-generated sublists are quick to use but offer limited customization.
2. Custom Sublists Added by Configuration
Custom sublists can be added through NetSuite’s form customization or custom record UI. They allow you to display additional data related to a record without writing code.
- Created by linking a custom record to a parent record
- Added via the Sublists tab in record form customization
- Ideal for showing related data in a structured table
This method is suitable when you need a tailored view but don’t require dynamic scripting or interactivity.
3. Scripted Sublists (SuiteScript)
Scripted sublists are built using NetSuite’s SuiteScript API, offering full flexibility and interactivity. Developers can create sublists that pull data dynamically, include buttons or actions, and respond to user input.
We will also be looking at creating sublists using SuiteScript.
Examples include:
- Suitelets that display custom sublists with interactive actions
- Inline HTML sublists for complex data presentation
Scripted sublists are powerful but require development skills and careful deployment to avoid performance issues.
When Should You Create a Custom Sublist?
Custom sublists are ideal when the default NetSuite sublists don’t meet your business needs. They give you the flexibility to display additional related data, tailor the interface, and even add interactivity. Knowing when to create a custom sublist ensures your users have the right information in the right format.
Common scenarios include:
- Displaying related records not shown by default
Sometimes the standard sublists do not include all the child records or transactions you need to see. A custom sublist allows you to surface that missing data directly on the parent record. - Tailored UI showing specific fields
If you want to show only certain fields from related records, a custom sublist gives you control over layout and visibility. This makes forms cleaner and easier for users to navigate. - Interactive sublists with buttons or actions
When you need users to take actions directly from the sublist, such as opening related records, updating values, or triggering scripts, a scripted custom sublist provides that interactivity.
By creating custom sublists in these scenarios, you can enhance usability, improve efficiency, and provide a better experience for your team.
Two Main Methods to Create a Sublist in NetSuite
In NetSuite, you can create sublists either through configuration without coding or by using SuiteScript for more advanced, interactive functionality. Choosing the right method depends on your business requirements, complexity, and technical expertise.
Method 1: Using Custom Records and UI Configuration (No Code)
This is the simplest and most common approach for creating sublists. It requires no scripting and is ideal for admins who want to link related records directly on a parent form.
Step-by-Step Guide:
- Create a Custom Record
- Navigate to: Customization → Lists, Records, & Fields → Record Types → New
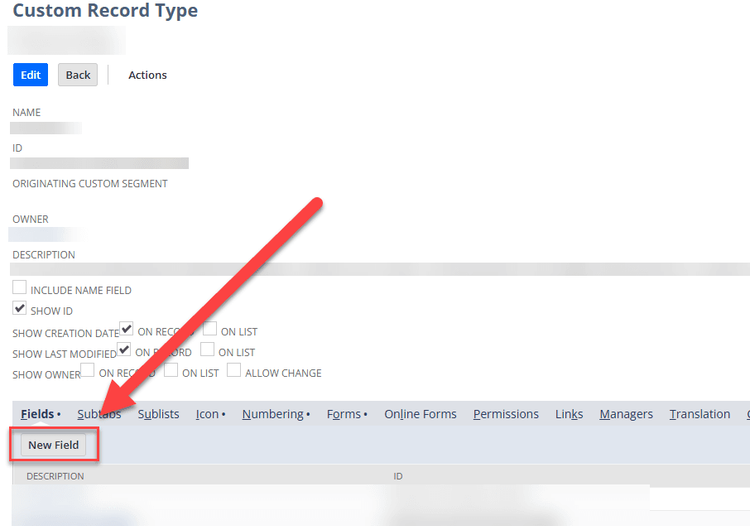
- Define the custom record name, ID, and other settings
- Ensure it has a parent field (List/Record type) linking it to the parent record
- Add Fields to the Custom Record
- Include all fields you want displayed in the sublist
- Set appropriate field types and validations
- Save the Custom Record
- Ensure permissions and audience settings allow the intended users to view the record
- Customize the Parent Record Form
- Go to: Customization → Forms → Record Forms → Customize
- Select the parent record form where you want the sublist
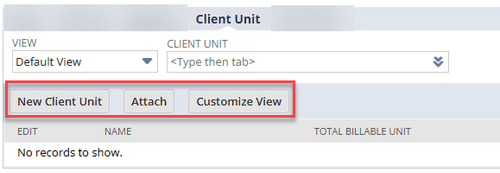
- Add the Custom Record as a Sublist
- In the Sublists tab, add the new custom record
- Arrange the order of columns and define display settings
- Save and Test the Form
- Make sure the sublist appears correctly on the parent record
- Verify user access and visibility
Notes & Best Practices:
- Always include a parent field to link the child record to the parent
- Set permissions carefully to control who can view or edit the sublist
- Test in a sandbox environment before deploying
Method 2: Using SuiteScript (Scripted Sublists)
Scripted sublists provide full customization and interactivity. Developers can create sublists dynamically, populate them programmatically, and add buttons or actions for users. This method uses SuiteScript 2.x APIs.
Step-by-Step Guide:
- Create a Script File
- Use a Client Script or Suitelet, depending on your requirement
- Upload the file to the NetSuite File Cabinet
- Load the Current Record
- Use nlapiGetNewRecord() in 1.0 or currentRecord in 2.x
- This provides access to the parent record for adding sublist data
- Create the Sublist Object
- Example in SuiteScript 2.x:
var sublist = form.addSublist({
id: ‘custpage_sublist’,
type: serverWidget.SublistType.LIST,
label: ‘My Custom Sublist’
});
- Example in SuiteScript 2.x:
- Add Fields to the Sublist
- Example:
sublist.addField({ id: ‘custpage_field1’, type: serverWidget.FieldType.TEXT, label: ‘Field 1’ });
sublist.addField({ id: ‘custpage_field2’, type: serverWidget.FieldType.DATE, label: ‘Date’ });
- Example:
- Populate Sublist Lines Programmatically
- Loop through your dataset and use sublist.setSublistValue({ id: ‘custpage_field1’, line: i, value: ‘…’ });
- Deploy the Script
- Create a Script record in NetSuite
- Deploy it on the target record type or as a Suitelet
- Decide the execution context: beforeLoad, beforeSubmit, afterSubmit
Notes & Best Practices:
- Use SuiteScript 2.x for new implementations, as 1.0 is deprecated
- Test thoroughly in a sandbox to avoid performance issues
- Scripted sublists are ideal when you need dynamic data or interactivity (buttons, links, actions)
By using custom records, you get a simple, no-code sublist that works for most scenarios. Scripted sublists give you full flexibility for complex use cases, but require developer expertise.
Troubleshooting Common Issues with Sublists
Even after following the correct steps, you may encounter issues when creating or displaying sublists in NetSuite. Understanding the common problems and how to fix them can save time and prevent user frustration.
1. Sublists Not Appearing on Forms
- Check if the sublist is added to the correct tab in the form customization.
- Verify that the form you’re viewing is the customized version. Sometimes the default form is still active.
- Ensure the parent field exists on the child record if it’s a custom record sublist.
2. Permission Errors
- Make sure the user role has access to both the parent and child records.
- Check field-level permissions on the custom record or sublist fields.
- Adjust permissions for scripted sublists if they reference records restricted to certain roles.
3. Data Not Populating
- For custom record sublists, verify that the parent-child relationship is correctly set.
- For scripted sublists, confirm that the data-fetching function is returning the expected results.
- Check that filters, saved searches, or SuiteScript logic are correct and match the current record context.
4. Script Errors in Logs
- Review Execution Logs and Script Deployment logs for errors.
- Ensure SuiteScript 2.x syntax is correct if using scripted sublists.
- Validate that all fields referenced in addField() or setSublistValue() exist and have the correct IDs.
Pro Tip: Always test sublists in a sandbox environment before deploying to production. This prevents accidental data issues and allows safe troubleshooting.
Stuck on a Step?
If you get stuck while following this guide, don’t worry! NetSuite has many configurable options, and sometimes a field, permission, or setting may need adjustment. We regularly update our blogs to make sure they provide clear, actionable guidance.
If this article didn’t fully resolve your issue, reach out to us via chat or contact form. Let us know where you got stuck, and we’ll update the instructions to make them even more helpful.
Need Expert Help with NetSuite?
Our team at Folio3 is a certified Oracle NetSuite Alliance Partner. We handle everything from small customizations to full-scale SuiteCommerce and ERP implementations.
Contact us today to see how we can help your business get the most out of NetSuite.


