
OAuth 1.0 has been utilized by legacy integrations within NetSuite for many years, requiring you to cryptographically sign every single request with consumer keys, secrets, tokens, and token secrets.
OAuth 2.0 eliminates the need to sign each request because OAuth 2.0 utilizes bearer tokens that eliminate the hassle of re-signing your request each time. Get your access token once, and you are good-to-go, no need to sign each request for authentication.
If you have been struggling with authentication issues and are ready to embrace OAuth 2.0, this blog equips you with the knowledge and a step-by-step guide on how to set up OAuth 2.0.
Grant Types
NetSuite’s OAuth 2.0 supports two grant types, each with its own use case. Make sure to choose the option depending on how resources are to be shared and between what entities:
1. Authorization Code Grant
This is best suited for when your web application needs to access resources on behalf of a user. Think of it as the “with great power comes great responsibility” option. Here, your app acts as a trusted intermediary for your users.
A common scenario to imagine is when you visit a website that asks you to log in using Google, Facebook, GitHub, or similar platforms.
Reference: OAuth 2.0 Authorization Code Grant Flow
2. Client Credentials (M2M) Grant
This is the machine-to-machine champion. No users involved, just pure backend service magic. Your application authenticates itself and gets down to business. Ideal for automated workflows, scheduled tasks, and any scenario where robots do the talking.
In contrast to the previous scenario, imagine if you have another platform that communicates to your application without the requirement of user intervention. In such cases, the application authenticates itself and runs automated or scheduled tasks in the background.
Reference: OAuth 2.0 Client Credentials Flow
Setting Up OAuth 2.0
Let’s walk through setting up Client Credentials flow, because who does not love a good setup guide that actually works?
Step 1: Create Your Integration Record
An integration record represents an application-level identity that allows an external system to securely interact with another platform’s APIs. In system-to-system scenarios, the integration record acts as the foundation for automated communication.
Navigate to Setup > Integration > Manage Integrations > New.
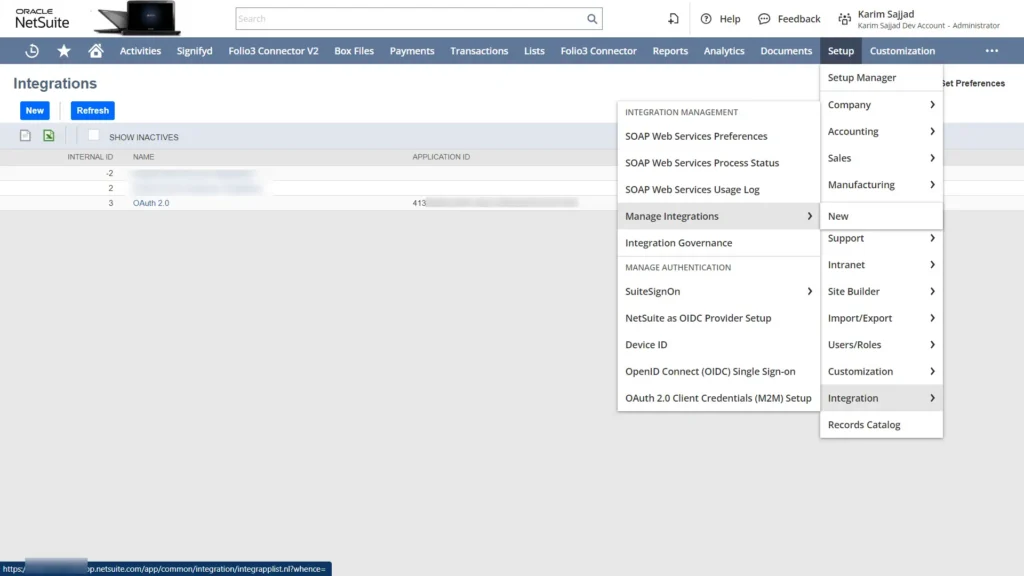
Configure Your Integration:
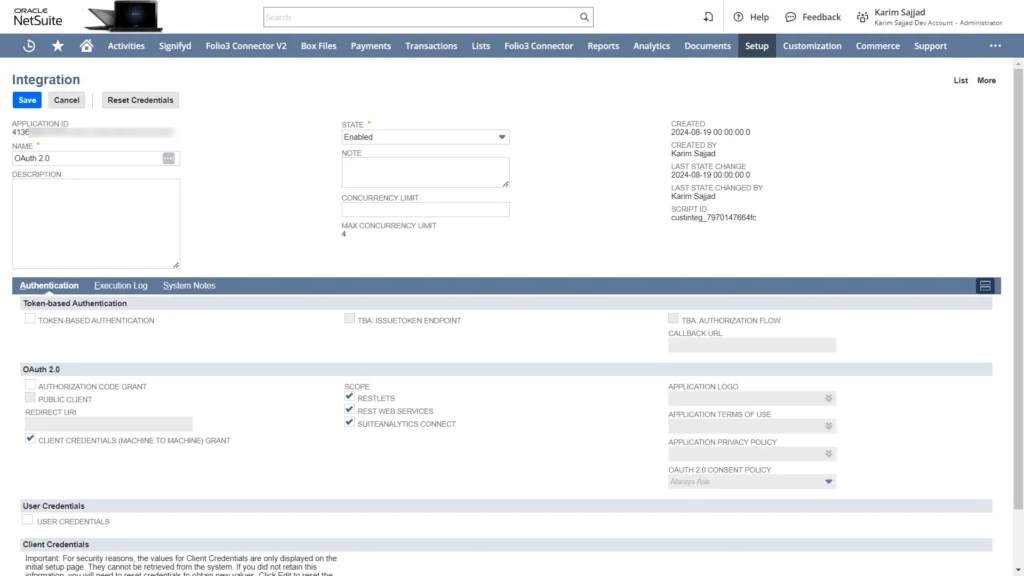
Make sure to fill in the following fields:
- Name: Something memorable like “OAuth 2.0 Integration”. Having a memorable and unique name will help find the integration records easily, especially when working with a long list of integrations.
- State: Set the state to enabled. This should only be disabled if you, by choice, want to prevent the integration from actively authenticating or accessing NetSuite.
- Scope: Select the scopes you need. Make sure to only select the scopes that are required. Having additional scopes than necessary may pose a security threat in certain scenarios.
- Client Credentials Grant: Checking this box ensures that we are provided with the credentials.
Save the record, and NetSuite rewards you with a Client ID and Client Secret. These credentials must be stored safely and never exposed to any unauthorized sources.
Reference: Create Integration Records for Applications to Use OAuth 2.0
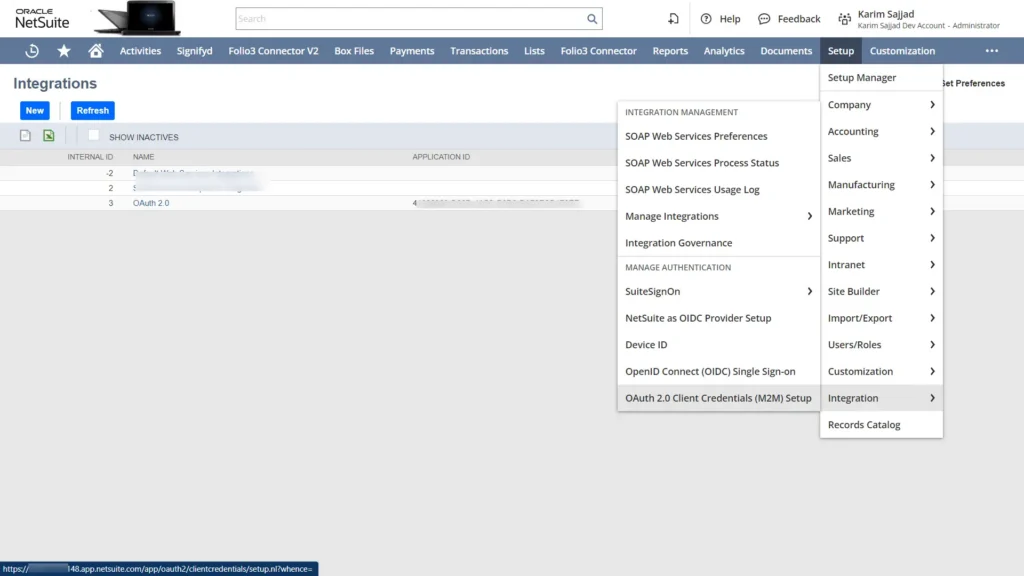
Step 2: Create OAuth 2.0 Client Credentials Record
Head over to Setup > Integration > OAuth 2.0 Client Credentials (M2M) Setup > New
Fill in the details:
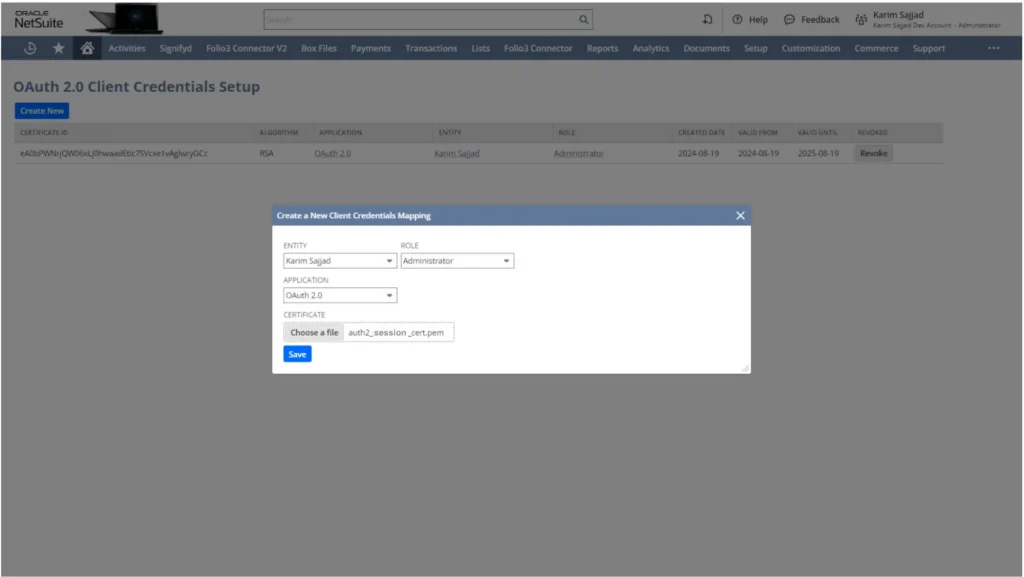
The details that must be filled in include Entity (your NetSuite user), Role (appropriate NetSuite role), Application (the integration record you created), and finally Certificate (a self-signed certificate—we will create this next).
Save it, and you’ll get your Certificate ID. Keep this safe, too!
Reference: OAuth 2.0 Client Credentials Setup
Step 3: Generate Your Self-Signed Certificate
A simple way to understand the cryptography involved here is to think in layers:
- Formats like PKCS and X.509 define how keys and certificates are structured and stored
- Algorithms like RSA or EC define the type of key pair
- Signature schemes (e.g., RS256, ECDSA) define how data is signed
- Hashing algorithms like SHA-256 define how the data is digested before signing
In NetSuite’s OAuth 2.0 Client Credentials flow, these layers come together through a certificate-based authentication model.
At a practical level, your certificate consists of two parts:
- Public key (X.509 certificate): uploaded to NetSuite during setup
- Private key: kept securely on your server and used to sign the JWT assertion
NetSuite uses the public key to verify that the JWT you send is genuinely signed by your private key.
Fire up your terminal and run this command to acquire the certificate and key:
openssl req -x509 -newkey rsa:4096 -sha256 -days 730 -nodes \
-keyout auth2_session_key.pem -out auth2_session_cert.pem
This generates two files: auth2_session_cert.pem and auth2_session_key.pem. The certificate goes into NetSuite, the key stays with you.

Reference: Certificate Conditions
Making the Token Request
Now for the exciting part—actually getting a token! Here is what your request looks like:
Method: POST
URL: https://[your-account-id].suitetalk.api.netsuite.com/services/rest/auth/oauth2/v1/token
Content-Type: application/x-www-form-urlencoded
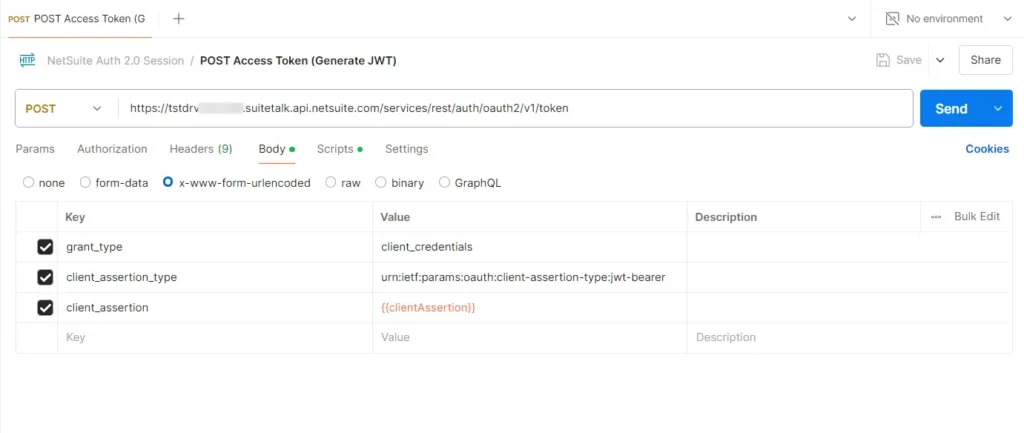
Request Body:
- grant_type: client_credentials
- client_assertion_type: urn:ietf:params:oauth:client-assertion-type:jwt-bearer
- client_assertion: Your signed JWT (the secret sauce)
Reference: POST Request to the Token Endpoint and the Access Token Response
Creating the Client Assertion
The client assertion is a JWT (JSON Web Token) that proves you are who you say you are. Here is a Node.js example using the jsrsasign library:
const express = require('express');
const { KJUR } = require('jsrsasign');
require('dotenv').config();

const app = express();
app.use(express.json()); // For parsing application/json
app.use(express.urlencoded({ extended: true })); // For parsing application/x-www-form-urlencoded

// JWT generation
function generateJWT() {
    const jwtHeader = {
        alg: 'PS256',
        typ: 'JWT',
        kid: process.env.CERTIFICATE_ID,
    };

    const jwtPayload = {
        iss: process.env.CONSUMER_KEY, scope: ['restlets', 'rest_webservices'],  iat: Math.floor(Date.now() / 1000),
       exp: Math.floor(Date.now() / 1000) + 3600,  aud: process.env.URL
    };

    const stringifiedJwtHeader = JSON.stringify(jwtHeader);
    const stringifiedJwtPayload = JSON.stringify(jwtPayload);

    const signedJWT = KJUR.jws.JWS.sign('PS256', stringifiedJwtHeader, stringifiedJwtPayload, process.env.SECRET_KEY);

    return signedJWT;
}
Testing with Postman
Want to test your OAuth 2.0 setup before writing code? Postman can assist with that! In case you do not have any prior knowledge of Postman, feel free to explore the Postman documentation overview.
Here is a quick walkthrough for testing with Postman:
Setting Up the Request
Configure your POST request to the token endpoint with the proper headers and body parameters.
The Request Body
Remember to include all three required parameters in your form-urlencoded body.
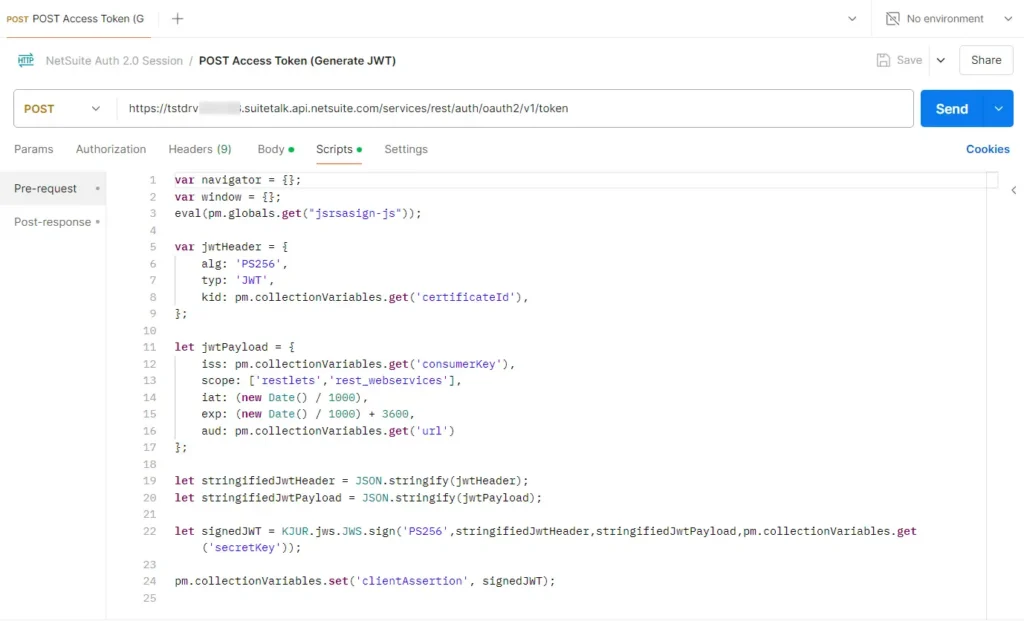
Pre-request Script Magic
Use Postman’s pre-request script feature to dynamically generate your JWT. This saves you from manually creating tokens every time.
Reference: The Request Token Structure
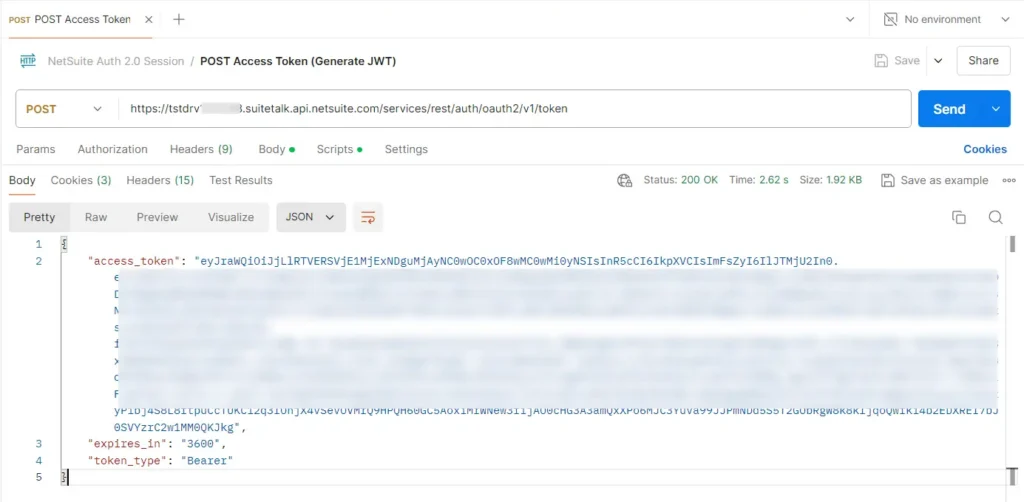
Access Token Granted:
When everything works, you’ll get a JSON response with your access token. Now this access token can be utilized to eliminate the need for constant signing of requests.
Want to try it yourself? Download the complete Postman collection from this Google Drive folder.
Probable Errors and their Fixes
| Error | Probable Cause | Probable Fix |
| unsupported_grant_type | You are trying to use a grant type that NetSuite does not recognize. | Double-check your integration settings. |
| invalid_request | Your request is malformed or missing required parameters. | Time to review that request body. Check for any parameters you may have missed defining. |
| 401 Unauthorized | Your credentials are not valid. | Check your Client ID, Client Secret, and JWT signature. |
| 403 Forbidden | You are authenticated, but do not have permission. | Review your role permissions and scopes. |
Conclusion
OAuth 2.0 in NetSuite is simpler, more secure, and aligns with modern security practices. NetSuite is actively encouraging developers to adopt it for new integrations, and for good reason.
Bearer tokens mean less complexity in your code. Multiple grant types mean flexibility for different use cases. And the entire flow is easier to implement and maintain than its predecessor.
Ready to Dive Deeper?
For those who want to go full ninja mode, check out additional blogs for further technical insights to automate your workflows. Because why do things manually when you can automate?
Getting Started
-
- A Complete Setup Guide for NetSuite AI Connector
-
- A Setup Guide for NetSuite AI Connector with Postman: API Integration Tutorial
- Getting Started with NetSuite SuiteTalk REST API in Postman
- NetSuite MCP OAuth 2.0 Token Generator Tool
- SuiteScript Essentials: A Developer’s Getting Started Guide
MCP + Client Integrations
-
- IDE Integration Guide for NetSuite MCP Tools in Cursor & VS Code
-
- Connecting MCP with ChatGPT: A Complete Guide
- Connecting MCP Tools with Qwen
- Connecting ChatGPT Business with NetSuite via MCP: The Future of Enterprise AI Integration
Advanced & Architecture
-
- A Development Guide to Build Custom Tools for NetSuite AI Connector
-
- Dual API Integration: Using NetSuite MCP Tools with OpenAI and Anthropic
- NetSuite MCP Challenge: Implementation Case Study & Results
- MCP Input Formats Compared: Token Usage Analysis for NetSuite MCP Tools
- Integrating NetSuite MCP Tools with AI-Powered CLI Tools
Together, these resources form a solid foundation, walking you through everything from initial configuration and authentication to advanced deployment, so you can integrate AI with NetSuite smoothly and without any issues.


