
Introduction:
With the evolution of AI, traditional API integration is fading away, and now AI systems need to connect with other AI systems. This is made possible by the Model Context Protocol. On top of this protocol, NetSuite has launched its NetSuite AI Connector Service. We have published several blogs on this topic, explaining from concept to integration with AI tools like ChatGPT and Claude, as well as IDEs (Cursor, VS Code). We stepped forward and created an amazing tool to connect your IDE and let you use this service within your IDE chat box. In this blog, we will explore this tool to integrate your IDEs (Cursor, VS Code) seamlessly within a minute. Please first read the following two must-read articles, then follow this blog.
Prerequisites
- A Complete Setup Guide for NetSuite AI Connector
- A Setup Guide for NetSuite AI Connector with Postman: API Integration Tutorial
- Claude AI Pro Plan (this subscription is required for Pre-built and Custom MCP connectors)
- Cursor IDE Installation on your system (MCP Server is built-in with a UI)
- You have installed the latest version of Visual Studio Code (MCP support in VS Code is generally available starting from VS Code 1.102). No UI is built in for the MCP servers. You need to use the mcp.json file to start/stop the servers. Access to Copilot and GitHub Copilot Extension is Installed. You can explore the GitHub Student Developer Pack (Optional but recommended for students) for free access to GitHub Copilot and other useful developer tools.
Developers’ Life Made Easier:
If you have read the above Prerequisite blogs, you agree with me that the process is lengthy, hectic, and troublesome. To facilitate developers and simplify the integration process with your IDE, we have built a tool 🚀 NetSuite MCP OAuth 2.0 Token Generator Tool, that lets you set up the integration seamlessly with an amazing user-friendly interface and removes the need for any manual setup. This tool currently supports Cursor and VS Code IDEs (Webstorm is not supported due to a reported issue) over multiple environments: Windows, Linux, and Mac. You don’t need to worry about the environment; whether you are on Windows, Linux, or Mac, it will auto-detect it and find the designated mcp.json file path. The mcp.json file is where mcp server configurations are listed with the access token, and your IDE uses it to interact with NetSuite.
Traditional/Manual Method Steps:
The traditional/manual method to connect your IDE with NetSuite involves:
- Generating an Access token by Manual OAuth Flow using Postman or a similar tool
- Extract the Authorization Code from the Callback URL and then make a POST call to the token issue endpoint to get the Access Token in exchange
- Manually editing the mcp.json File (You may make mistakes, which can lead to hours of troubleshooting)
- The mcp.json file is environment-specific, i.e. on Windows it may have a different path than on Linux. You need to find it yourself for your IDE.
- Repeat the same process for multiple IDEs (Cursor, VS Code)
Automatic Method using Our Tool:
This tool will save you from doing the above hectic steps by enabling you with the following features:
- Automatically detects the environment and handles the config file path for your IDE
- An amazing user interface to interact with instead of Postman
- Auto creates/updates the mcp.json file for you
- Auto-fetches the access token and saves it in the config file, and also allows you to copy it to the clipboard
- Enables multiple IDEs (Cursor and VS Code) integration at once, and no need to repeat the steps for each IDE
How to use the Tool:
You just need to follow 6 simple steps with an amazing User Interface to integrate the IDEs with NetSuite.
Steps to Follow:
Step 1 – Clone the Repo:
Clone the repo netsuite-mcp-connector-tool and run the app. If you need any help in running the app on your machine, please refer to the setup guide README.md file listed in the repo.
Step 2 – Select your integration Type:
Pre-configured Anthropic Claude or Custom Integration. If you have followed the prerequisites articles, you will know that when you install the SuiteApp in NetSuite, an integration Record will be auto-created on first interaction, either from LLM UI, Postman, or any Custom MCP (remote server) supported client. For Custom Integration, you will need to create the integration record yourself.
Step 3 – Choose your IDEs:
Select the IDE by clicking on the check box available on the IDE card, and enter your NetSuite account ID. e.g
❌: 1234567_SB1
✅: 1234567-sb1
Step 4 – Approve the OAuth Access:
Just click the continue button in the NetSuite consent screen when prompted for confirmation.
Step 5 – Generate the token:
For Anthropic Claude, you need to copy and paste the redirect URL (the URL the browser is redirected to when you approve the access), and it will parse and fetch the token. For Custom Integration, it will fetch the token
Step 6 – You’re done:
automatically uses the token and generates the configuration in your mcp.json file(s).
A Complete Walkthrough of How to Use Our Tool:
To use the tool, let me walk you through it. The tool provides three integration types that we can be used to connect your IDE with NetSuite, but one option is not supported at the moment.
Integration Types:
- Pre-configured Anthropic Claude
- The Pre-configured OpenAI ChatGPT option is currently not supported due to a Redirect URL routing limitation on ChatGPT’s side. Since this integration is pre-configured in NetSuite, the Redirect URL on the integration record cannot be changed. The default Redirect URL points to ChatGPT (https://chatgpt.com/connector_platform_oauth_redirect), but when NetSuite redirects to this address, ChatGPT’s router intercepts the request and sends it to the dashboard. As a result, the Redirect URL containing the Authorization Code cannot be captured because ChatGPT immediately redirects it
- Custom Integration
Let me first explain the Pre-configured Anthropic Claude integration step by step, then we will move to Custom Integration.
Anthropic Claude:
Step 1 – Integration Selection:
When you run the app on your local machine by running npm run dev, you will be shown the following screen, and you need to select the integration type as Anthropic Claude

On this screen, select Anthropic Claude by clicking on its card. Once you select it (as highlighted in the red rectangle in the above image), the Continue button will be enabled.
Step 2 – Select IDE & Enter NetSuite Account ID:
Next, click the Continue button, and it will direct you to the next screen, as shown below.

On this screen, it shows the following three IDEs for connection. WebStorm is currently not supported. Please make sure the IDEs are installed on your machine.
- Cursor / VS Code – If the config file is found on your machine at the IDE path, it shows the Found label; otherwise, it shows +New, which means it will create a fresh config file if the IDE is selected.
- WebStorm – It is currently not supported due to an internal bug in the MCP server provided by this IDE.
You need to select at least one IDE by clicking on the IDE card, or click on the Select All button to select all the supported IDEs. Once you select at least one IDE, next you need to enter the NetSuite Account Number – the account to which you want your IDE(s) to connect, as shown in the image above. Once you have selected the IDE(s) and entered the NetSuite Account Number, it will enable the Continue button.
Step 3 – Request Access to NetSuite Account :
Next, click on the Continue button. It will use the provided account number and open a pop-up to request permission to access your account. On this pop-up, click on Continue to allow the integration to connect with your NetSuite account.

Once you click on the Continue button, it will redirect you to the Claude Redirect URL https://claude.ai/api/mcp/auth_callback defined on the Integration Record in NetSuite. This URL is fixed and can’t be changed.

Step 4 – Copy the Redirect URL:
Copy the redirected URL and paste it in the Paste Redirect URL section box, and then click on the Generate Token button.
Sample Redirect URL: https://claude.ai/api/mcp/auth_callback?state=tRdV8Z2m-12346CVnmy924&role=123&entity=2&company=TSTDRV1234&code=67406342cae59abcd9fc187167ac44406b536f8976a61a5b3783a2752324c

Step 5 – Generate Token:
When you click on Generate Token button, the app will parse the URL and fetch the access token and also create/update the config file at your selected IDE’s path. It also lets you copy the access token so you may use it in Postman or any other related tool.

With this step, the process is completed, and you have successfully integrated your IDE with NetSuite.
Step 6 – Verify the MCP Connection:
For Cursor, go to the Settings and navigate to Tools & MCP, and you will find the MCP tool listed there, as shown below

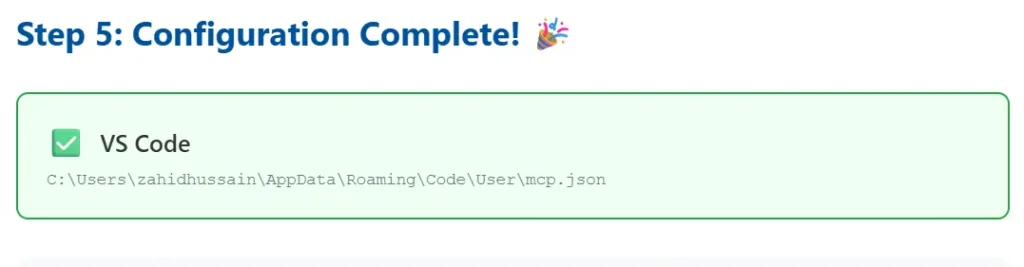
In VS Code, there is no built-in UI for MCP servers, and it doesn’t start the server automatically. The tool shows the mcp.json file path on the final step if you have selected VS Code integration in the IDE selection page. Navigate to the displayed path and open the mcp.json file in VS Code. You need to start/stop the server from the mcp.json file, as VS Code doesn’t provide any UI. The start action is highlighted in the image below.

Please refer to the MCP Support in IDEs blog for a complete guide for VS Code.
For VS Code troubleshooting, please refer to the VS Code Troubleshooting section.
Custom Integration:
Step 1 – Integration Selection:
On the startup screen, select Custom Integration by clicking on the Custom Integration card. Once you select it, it will show you instructions to create the Integration in NetSuite. This option is different from Anthropic Claude because this option enables you to create your own integration record in NetSuite and use it for the MCP connection.
📝 Setup Instructions
Create Integration in NetSuite:
- Go to Setup → Integration → Manage Integrations → New
- Name: MCP Cursor or Any Name of your choice
- Authorization Code Grant: Check this checkbox field
- Public Client: Check this checkbox field
- NetSuite AI Connector Service: Check this checkbox field
- Redirect URI: http://localhost:3000
- Scope: mcp
- Save and copy the Client ID
Follow the above instructions and create an Integration Record in NetSuite as shown in the Image below.

Once the Integration record is created, and you have copied the Client ID, paste it in the Client ID box. Once you paste it, it will enable the Continue button.

Next, click the Continue button, and it will direct you to the next screen, and the next steps are similar to Anthropic Claude section. The only difference in Custom Integration is that you don’t need to care and copy the Redirect URL anymore. In the Integration Record, we already provided the Redirect URL to http://localhost:3000, so NetSuite will redirect to our app, and our app will extract the token info automatically and set up the MCP connection for the selected IDEs.
With this step, the process is completed, and you have successfully integrated your IDE with NetSuite.
Step 2 – Verify the MCP Connection:
For Cursor, go to the Settings and navigate to Tools & MCP, and you will find the MCP tool listed there, as shown below. You can clearly see that in the tool name custom word is present, as we created it using Custom Integration.

As stated in Anthropic Claude tutorial that in VS Code, there is no built-in UI for MCP servers, and it doesn’t start the server automatically. You will need the mcp.json file to start/stop the server.

For VS Code troubleshooting, please refer to the VS Code Troubleshooting section.
VS Code Troubleshooting:
For any reason, if the action buttons like start/stop don’t appear in the mcp.json file tool node under the servers key, then you can follow the following steps to start/stop the server.
Step 1 – Open the Command Palette:
- Windows/Linux: Ctrl + Shift + P
- macOS: Cmd + Shift + P
Then type > mcp: List servers in the command Palette and select the MCP: List Servers option from the list, as shown below

Step 2 – Tool Selection:
Once you have selected the MCP: List Server option, it will show the following menu and list our registered tools in the list. I am using ns-mcp-tools-claude as an example here.

Step 3 – Start the Tool:
Once you select the tool, it will show the Start Server option in the menu.

Click on the Start Server option, and it will start the server for you and show the running log in the output tab in the terminal. You can also verify it by chatting in the Copilot chat box.
Step 4 – Tool Running Status Verification In Console:

Step 5 – Tool Running Status Verification In Copilot:
Type the following prompt in the Copilot chat, and it will list the tool details if the tool is connected.
any mcp tool is registered with NetSuite?

Step 6 – Stop the tool:
Follow the same steps we followed for starting the tool; it will show you the Stop Server option, and once this option is selected, the tool will be stopped.
Conclusion:
Setting up a NetSuite MCP server inside an IDE like Cursor or VS Code can be technical and time-consuming, especially for developers who just want to get started quickly. To simplify this process, we have developed a custom tool that handles all the complex MCP configuration steps behind the scenes. With a clean and elegant UI, the tool guides developers through a few easy steps and sets up the connection automatically. It removes the usual complexity, saves a lot of setup time, and makes connecting your IDE to NetSuite feel effortless.
Important:
While connecting NetSuite MCP Tools with WebStorm 2025.2.4 (with AI Assistant and Junie), the following MCP connection error occurs:
“Error due to MCP Protocol Version mismatch:
– AI Assistant: 2024-11-05
– Junie: 2025-03-26
MCP Protocol, current version 2025-06-18”
We have raised this issue with JetBrains for resolution.
Related Reads:
Before exploring advanced custom AI integrations, ensure you’ve completed the essential setup steps covered in our previous guides:
- A Complete Setup Guide for NetSuite AI Connector
- A Development Guide to Build Custom Tools for NetSuite AI Connector
- A Setup Guide for NetSuite AI Connector with Postman: API Integration Tutorial
- Dual API Integration: Using NetSuite MCP Tools with OpenAI and Anthropic
- Connecting MCP with ChatGPT: A Complete Guide
- IDE Integration Guide for NetSuite MCP Tools in Cursor & VS Code
- NetSuite MCP Challenge: Implementation Case Study & Results
- Getting Started with NetSuite SuiteTalk REST API in Postman
- Connecting MCP Tools with Qwen


