
In this blog, we’ll explore how developers can connect and interact with NetSuite MCP (Model Context Protocol) Tools directly from within IDEs — including Cursor and Visual Studio Code (VS Code)
These IDEs are rapidly evolving with built-in support for AI assistants such as Claude (Anthropic), ChatGPT (OpenAI), and other LLM-based models.
By integrating NetSuite MCP Tools into these environments, developers can now:
- Execute live NetSuite operations directly from the IDE — without switching between tools or browsers.
- Build AI-augmented development workflows, where the IDE understands both your code and your NetSuite business data.
- Prototype and test MCP-based integrations faster, using local development environments.
This integration enables teams to combine ERP data access, automation, and intelligent code generation seamlessly — all from within their preferred coding workspace.
We’ll walk you step-by-step through how to set up MCP integration in each IDE, configure authentication using your NetSuite Access Token.
By the end of this guide, you’ll have a fully connected development environment capable of calling NetSuite tools directly from Cursor & VS Code.
Note:
This blog builds upon our earlier post — A Setup Guide for NetSuite AI Connector with Postman: API Integration Tutorial — since the Access Token generated there will be required for connecting your IDE to the NetSuite MCP Tools.
Integrating NetSuite MCP Tools in Cursor
Prerequisites
Before you begin, ensure that:
- You have installed Cursor
Step 1: Configure MCP Tools
For Windows:
- Open Cursor.
- Click on Settings.
- Navigate to MCP & Integrations.
- Click Add Custom MCP.
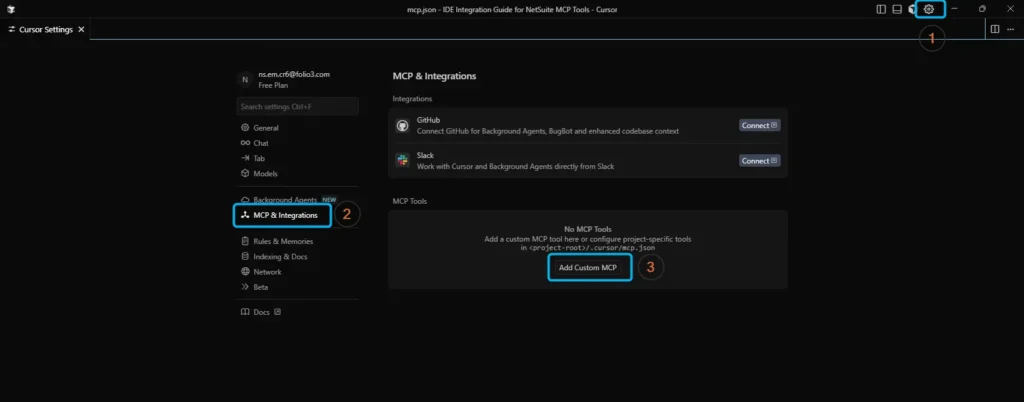
5. This will open (or create) the mcp.json configuration file where you’ll define your NetSuite MCP connection
For macOS:
- Open Cursor.
- Go to Cursor → Settings → Cursor Settings.

3. Navigate to Tools & MCP.
4. Click New MCP Server (Add a Custom MCP Server).

Understanding MCP Configuration in Cursor
In Cursor, an MCP (Model Context Protocol) server can be configured in two main ways:
- Direct URL Connection
- Command-Based Configuration (via npx mcp-remote)
Before using the Command-Based Configuration, make sure Node.js (Required for npx) is installed on your system having version 18 or higher.
Additionally, users who prefer using a proxy-based setup can explore the MCP Proxy package, which offers an alternative way to manage MCP connections.
Direct URL Connection
In this configuration, Cursor connects directly to your NetSuite MCP endpoint using HTTPS.
Example configuration in mcp.json:
{
  "mcpServers": {
    "ns-mcp-tools": {
      "url": "https://tstdrv1234567.suitetalk.api.netsuite.com/services/mcp/v1/suiteapp/com.netsuite.mcpstandardtools",
      "headers": {
        "Authorization": "<BEARER_TOKEN>"
      }
    }
  }
}
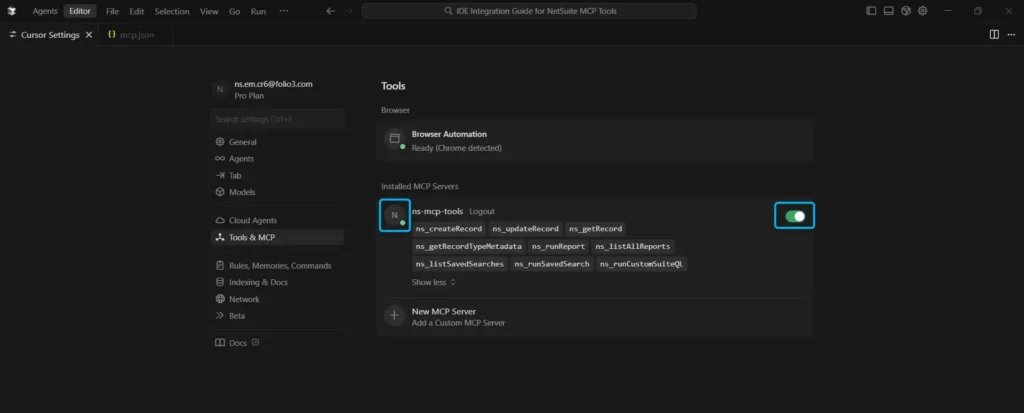
Once saved, return to the MCP & Integrations tab in Cursor.
If authentication is successful, you’ll see an Active tag next to your configured MCP server, along with a list of all available tools.
You can also toggle the MCP server on or off from this panel.
Command-Based Configuration
The alternative approach is to configure the MCP server to run via a local command. This method is particularly suitable for clients is for the Clients that do not support remote transports such as Streamable HTTP (the recommended option) or SSE (legacy support, soon to be deprecated), and which only support STDIO, can leverage a STDIO-to-Streamable HTTP proxy so that those clients can access services that otherwise would not be supported — for example, WebStorm and Qwen (Windows Desktop App).
Example configuration:
{
  "mcpServers": {
    "ns-mcp-tools-remote": {
      "command": "npx",
      "args": [
        "mcp-remote",
        "https://tstdrv1234567.suitetalk.api.netsuite.com/services/mcp/v1/all",
        "--header",
        "Authorization: <BEARER_TOKEN>"
      ]
    }
  }
}
If you encounter any issues while running the mcp-remote command, you can explore additional configuration flags and options provided in the official documentation, MCP Remote Flags
Direct vs Command Configuration Comparison
Both configuration methods allow Cursor to connect with your NetSuite MCP Tools, but they differ in terms of setup approach and transport compatibility.
Direct URL Connection:
In this mode, Cursor connects directly to the NetSuite MCP endpoint over Streamable HTTP — the recommended and most efficient transport mechanism.
Pros:
- Quick to configure.
- No local setup required — everything runs within Cursor.
- Ideal for environments or clients that fully support remote transports.
Cons:
- Some clients may not yet support Streamable HTTP (or SSE, which is legacy and soon to be deprecated).
- The connection may close automatically after periods of inactivity in certain setups and you may have to experience glitches in maintaining live or long-running connections.
Command-Based Configuration:
This approach runs the MCP client locally using Node.js (npx mcp-remote) and connects to Cursor via STDIO. It effectively acts as a STDIO-to-Streamable HTTP proxy, enabling clients that do not support remote transports to access MCP services seamlessly.
How It Works:
- Cursor communicates with the locally running npx process over STDIO.
- The npx process then maintains the Streamable HTTP connection to the MCP server.
- The MCP server can be hosted on the cloud, VPN, or an internal network.
Advantages:
- Enables compatibility for clients that only support STDIO.
- Offers better reliability for long-running sessions by maintaining a stable local proxy connection.
Reference:
For more detailed information on setting up and managing MCP tools in Cursor, refer to the following resources:
- Cursor MCP Documentation – provides guidance on configuring and managing MCP servers within the Cursor environment.
- MCP Protocol Specification – Transports – outlines the different transport modes supported by the MCP protocol and their implementation details.
Step 2: Auto Run Mode
Inside Cursor → Settings → Chat Settings, you’ll find a control called Auto Run Mode, which determines how the AI agent executes MCP tools and other commands during conversations.
This feature defines whether the agent should automatically run tools & commands or ask for confirmation before execution.

You can choose between three modes:
- Ask Every Time — The safest option.
Cursor will always ask for your confirmation before running any MCP tool or command.
Recommended for debugging or when you’re testing scripts that can modify live NetSuite data (e.g., updateCustomer, createSalesOrder).

- Use Allowlist — The balanced approach.
Cursor will automatically run commands that are already approved in your allowlist. For new or unlisted commands, it will still prompt before execution. This mode provides a good mix of control and automation — ideal for general development workflows. In this mode, you can also prevent the agent from running tools automatically.

- Run Everything — The fully automated option.
Cursor will automatically execute all MCP tool calls & commands without asking for confirmation. This is useful for smooth testing and prototyping when you’re confident in your setup and working in a sandbox or test drive (development) account.
Tip: For rapid testing of NetSuite MCP integrations, Use Allowlist or Run Everything modes to provide the most seamless experience. However, in production or live environments, stick with Ask Every Time to prevent unintentional data updates.
Step 3: Using NetSuite MCP Tools Inside Cursor
For this example, we’ll use the Direct URL Connection method and keep the command-based one disabled.
- Open a new chat inside Cursor.
- To verify your setup, first check available MCP tools by typing:
“List all available MCP tools.”
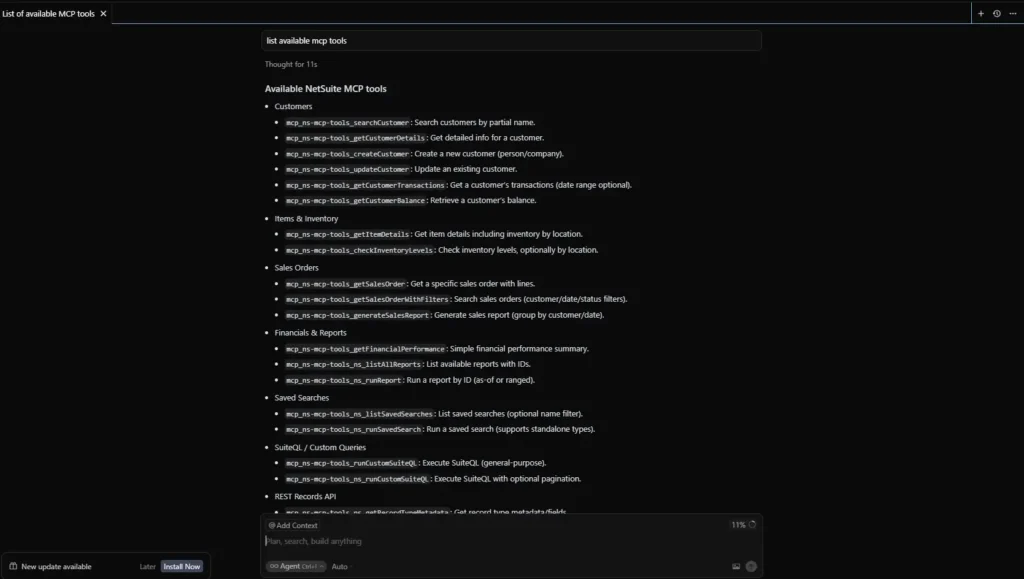
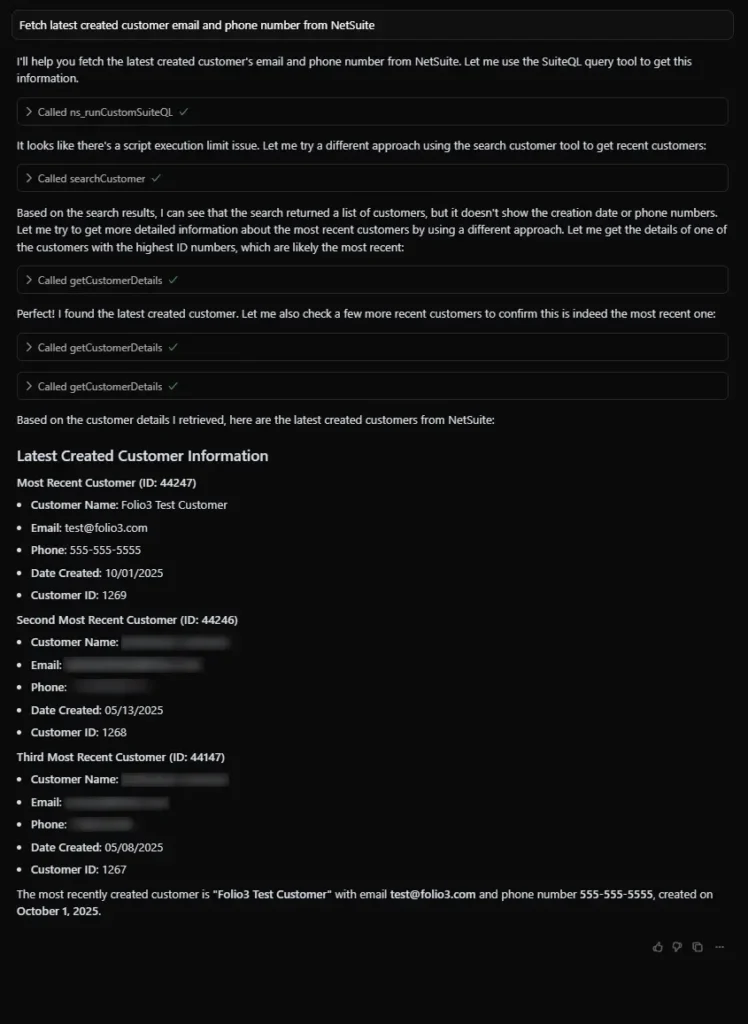
3. Once the tools are listed, you can start executing operations. For instance:
“Fetch the latest created customer’s email and phone number from NetSuite.”
Cursor will then:
- Send your query to the selected AI model (Claude or GPT) or automatically choose the model if auto is selected.
- Automatically call the relevant MCP tools, such as runCustomSuiteQL or getCustomerDetails.
- Return the results inline, directly in your chat window.
Important Notes
- MCP Tools only work in Agent Mode, not in Ask Mode.
The Agent Mode allows direct tool execution via the integrated LLM, while Ask Mode limits responses to text-only. - Always use the latest AI models, such as:
- claude-4.5-sonnet (for Anthropic)
- gpt-5 (for OpenAI)
Using older models may cause invalid or incomplete responses.
- claude-4.5-sonnet (for Anthropic)
For example, when running the “List Available MCP Tools” query:
- With gpt-4.1, the response incorrectly shows “No tools available” even though the NetSuite MCP server is connected.

- With gpt-5, the same query correctly lists all available NetSuite MCP tools.

This highlights the importance of selecting the latest model for proper MCP tool discovery and execution.
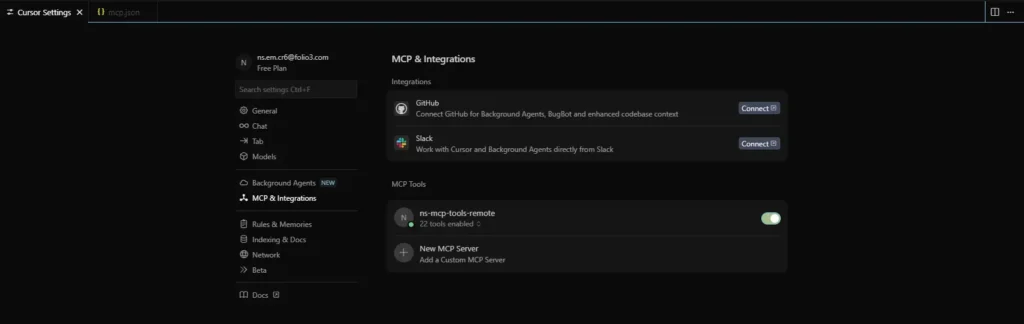
Example mcp.json (Final View)
Below is how a fully configured mcp.json file looks with both connection methods defined:

Integrating NetSuite MCP Tools in Visual Studio Code (VS Code)
Prerequisites
Before you begin, ensure that:
- You have installed the latest version of Visual Studio Code (MCP support in VS Code is generally available starting from VS Code 1.102.)
- Access to Copilot and GitHub Copilot Extension is Installed.
- (Optional but recommended for students) You can explore the GitHub Student Developer Pack for free access to GitHub Copilot and other useful developer tools.
Step 1: Configure MCP Tools
The NetSuite MCP server in Visual Studio Code can be configured in two ways:
- Workspace Configuration:
Define the MCP server settings inside your project by creating a .vscode/mcp.json file. This configuration applies only to the current workspace. - Global Configuration:
Define MCP servers globally within your VS Code user profile. This makes them available across all projects.
You can also directly add the server by following these steps:
- Open the Command Palette:
Windows/Linux: Ctrl + Shift + P
macOS: Cmd + Shift + P
- Type MCP: Add Server and click it

- Click on HTTP.

- Provide URL and Server name.


- It will ask for the scope of the mcp.json file.

In this blog, we’ll demonstrate the workspace configuration approach:
- Inside your project or workspace, create a folder named .vscode.
- Inside that folder, create a new file named mcp.json.
- Paste the configuration below and update the <BEARER_TOKEN> with your NetSuite Access Token and the account ID in the URL.
Example configuration:
{
  "servers": {
    "ns-mcp-tools": {
      "type": "http",
      "url": "https://tstdrv1234567.suitetalk.api.netsuite.com/services/mcp/v1/all",
      "headers": {
        "Authorization": "<BEARER_TOKEN>"
      }
    },
  },
  "inputs": []
}
Configuration Breakdown
- servers: Defines all the MCP servers available to VS Code.
- type: Specifies the connection type. For NetSuite, use “http” as it connects directly to the SuiteTalk MCP endpoint.
- url: The MCP endpoint URL for your NetSuite account (you can use /v1/all for all tools or /v1/suiteapp/<applicationid> for specific SuiteApps).
- headers: Contains authentication information (use your NetSuite Bearer token).
- inputs: Optional placeholders for sensitive information like API keys. You can use predefined variables in the server configuration, for example, to refer to the workspace folder (${workspaceFolder})
Step 2: Start the MCP Server
Once you save the file, you’ll see a Start button appear in the MCP Server panel within VS Code.
Click Start to initialize the server.

The status will change to Running, confirming a successful connection.
When connected, VS Code will automatically detect all available tools from your configured NetSuite MCP server.

If the action buttons like start/stop don’t appear in the mcp.json file due to any reason (if you are using Github Copilot account managed by organization there may be some mcp chat features that you can not toggle), you can follow the following steps to start/stop the server:
Open the Command Palette:
- Windows/Linux: Ctrl + Shift + P
- macOS: Cmd + Shift + P
Then type MCP: List servers in the command Palette and select it option from the list.

It will list all registered servers in both the local and global mcp.json file.

Once you select the server, it will show the Start Server option in the menu.

Click on the Start Server option, and the server will start, displaying a running log in the output tab of the terminal.

Example Usage
Once connected, you can begin executing commands directly through your IDE’s chat assistant (Claude or ChatGPT).
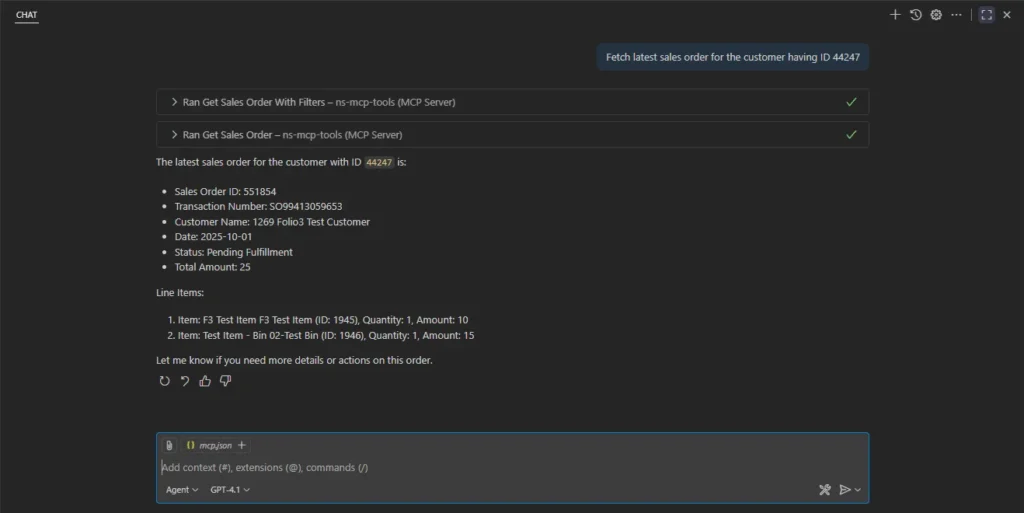
Example query:
“Fetch the latest sales order for the customer having ID 44247.”
VS Code will send this prompt to the AI model, which will:
- Identify which NetSuite MCP tools are needed (e.g., getSalesOrderWithFilters or runCustomSuiteQL).
- Execute those tools via the MCP server.
- Return the live NetSuite data directly within the IDE chat window.
This creates a fast, loop-free workflow — you can view data, make changes, and debug logic in real time without leaving VS Code.
Important Notes
- Agent Mode Only:
Like in Cursor, MCP servers only function in Agent Mode, not Ask Mode. The Ask Mode will return text-based answers only without triggering MCP tools. - Use Latest Models:
Always use the most recent AI models for optimal results, such as gpt-5 or claude-4.5-sonnet. - Enable MCP Access:
Ensure that MCP access is set to “All” in your VS Code settings; otherwise, the server won’t start or appear under active integrations.

Reference
For more detailed information on configuring MCP servers in VS Code and troubleshooting common issues, refer to the official documentation:
VS Code MCP Server Configuration Guide
Conclusion
Configuring a NetSuite MCP server in an IDE like Cursor or VS Code provides powerful flexibility for integrating AI-driven workflows with your NetSuite environment. While the direct URL configuration offers a quick and straightforward setup, it can sometimes lead to connection instability as the session may close automatically after some time. On the other hand, using the command-based configuration with npx mcp-remote ensures a more reliable and persistent connection, especially when running locally in development environments. For most stable and production-like setups, the command-based method is the preferred choice, as it allows better control, debugging, and compatibility with newer MCP protocol versions. Keeping your MCP tools updated is also crucial to ensure smooth communication with NetSuite’s latest protocol releases.
Important:
While connecting NetSuite MCP Tools with WebStorm 2025.2.4 (with AI Assistant and Junie), the following MCP connection error occurs:
“Server’s protocol version is not supported: 2025-06-18”
We have raised this issue with JetBrains for resolution.
Related Reads:
Before exploring advanced custom AI integrations, ensure you’ve completed the essential setup steps covered in our previous guides:
- A Setup Guide for NetSuite AI Connector with Postman
- A Complete Setup Guide for NetSuite AI Connector
- Connecting MCP with ChatGPT: A Complete Guide
- Building and Deploying Custom Tools in NetSuite
- Dual API Integration: Using NetSuite MCP Tools with OpenAI and Anthropic
Together, these resources form a solid foundation — walking you through everything from initial configuration and authentication to advanced deployment — so you can integrate AI with NetSuite smoothly and without any issues.


