
In our previous blog about the complete setup guide for NetSuite AI Connector, we covered how to set up the NetSuite AI Connector from scratch. Before we move forward and explore how you can build your first custom tool, it’s critical to be aware of two official NetSuite resources that outline the foundations you’ll need:
Now, let’s take things a step further and learn to build custom tools that extend the connector’s functionality.
Custom tools let you expose business-specific operations to the AI Connector. For example, retrieving detailed sales orders, emailing PDFs of transactions, or sending tailored emails.
Here’s the project structure we’ll use throughout this guide:
mcp-custom-tools/
├── src/
│   ├── FileCabinet/
│   │   └── SuiteApps/com.foliothree.f3mcptools/
│   │       ├── f3_salesorders_ct_schema.json
│   │       ├── f3_salesorders_ct.js
│   ├── Objects/CustomTools/
│   │   └── customtool_f3_salesorders_ct.xml
│   ├── deploy.xml
│   ├── manifest.xml
├── package.json
├── project.json
├── suitecloud.config.js
This folder structure keeps schemas, scripts, and XML configurations organized and ready for SuiteCloud deployment.
Step 1: Define Custom Tool Schema
Every tool begins with a schema definition (.json) that tells the AI Connector what the tool does, what input it expects, and how it behaves.
Here’s a snippet from our f3_salesorders_ct_schema.json:
{
    "tools": [
        {
            "name": "getSalesOrderInfo",
            "description": "Retrieve comprehensive information about a specific sales order, including header fields, line items with expected ship dates, tax details, and additional metadata like department and location. Each line item includes expected ship date from the line or falls back to header ship date",
            "inputSchema": {
                "type": "object",
                "properties": {
                    "orderId": {
                        "type": "string",
                        "description": "The internal ID of the sales order to retrieve detailed information for"
                    }
                },
                "required": ["orderId"],
                "nullable": []
            },
            "outputSchema": {
                "type": "object",
                "properties": {
                    "result": {
                        "type": "string",
                        "description": "JSON stringified sales order data containing comprehensive details, or empty string if error occurred"
                    },
                    "error": {
                        "type": "string",
                        "description": "Error message if execution fails, or empty string if successful"
                    }
                },
                "required": ["result"],
                "nullable": ["error"]
            },
            "annotations": {
                "title": "Get Sales Order Information",
                "readOnlyHint": true,
                "idempotentHint": true,
                "openWorldHint": false
            }
        }
    ]
}
Key points in the above schema are:
- name → Function name to be exposed.
- description → Human-readable explanation of what the tool does.
- inputSchema → Input fields required to run the tool, along with nullable to explicitly define which inputs (if any) can be empty.
- outputSchema → Expected response structure (result, error, etc.) so that ChatGPT or any LLM can reliably parse the tool’s output.
- nullable → Ensures compatibility with ChatGPT by specifying which fields may return empty values (avoids schema mismatch errors).
- annotations → Hints for connector behavior (e.g., read-only, idempotent, open-world).
Schemas act as a contract between the AI Connector and your script – without this, the connector won’t know how to interpret or execute the function.
If you’re looking for complete, working reference implementations, Oracle also provides official MCP Custom Tool samples in the SuiteCloud Samples repository. These examples demonstrate full end-to-end implementations, including schemas, SuiteScript logic, and SDF XML configuration for NetSuite 2026.1.
Step 2: Implement Business Logic in JavaScript
With the schema in place, let’s implement the actual functionality in a SuiteScript 2.1 file (f3_salesorders_ct.js).
Here’s an example of getSalesOrderInfo:
/**
* @NApiVersion 2.1
* @NModuleScope Public
*/
define(['N/record'], function (record) {
    return {
        getSalesOrderInfo: function (params) {
            const orderId = params.orderId;
            if (!orderId) {
                return {error: 'Missing order ID'};
            }
            try {
                const salesOrder = record.load({
                    type: record.Type.SALES_ORDER,
                    id: orderId,
                });

                // Get header fields with additional information
                let salesOrderData = {
                    id: orderId,
                    tranId: salesOrder.getValue('tranid'),
                    customerId: salesOrder.getValue('entity'),
                    customerName: salesOrder.getText('entity'),
                    date: salesOrder.getValue('trandate'),
                    dueDate: salesOrder.getValue('duedate'),
                    shipDate: salesOrder.getValue('shipdate'), // Adding ship date from header
                    status: salesOrder.getValue('status'),
                    statusText: salesOrder.getText('status'),
                    poNumber: salesOrder.getValue('otherrefnum'),
                    memo: salesOrder.getValue('memo'),
                    salesRep: salesOrder.getValue('salesrep'),
                    salesRepName: salesOrder.getText('salesrep'),
                    department: salesOrder.getValue('department'),
                    departmentName: salesOrder.getText('department'),
                    location: salesOrder.getValue('location'),
                    locationName: salesOrder.getText('location'),
                    subtotal: salesOrder.getValue('subtotal'),
                    taxtotal: salesOrder.getValue('taxtotal'),
                    total: salesOrder.getValue('total'),
                    currency: salesOrder.getValue('currency'),
                    currencyName: salesOrder.getText('currency'),
                    items: [],
                };

                // Get the header ship date as fallback for line items
                const headerShipDate = salesOrder.getValue('shipdate');

                // Get line items with additional details
                const lineCount = salesOrder.getLineCount({
                    sublistId: 'item',
                });

                for (let i = 0; i < lineCount; i++) {
                    // Get expected ship date from line item, fallback to header ship date
                    const lineExpectedShipDate = salesOrder.getSublistValue({
                        sublistId: 'item',
                        fieldId: 'expectedshipdate',
                        line: i,
                    });

                    // Use line expected ship date if available, otherwise use header ship date
                    const effectiveShipDate = lineExpectedShipDate || headerShipDate;

                    salesOrderData.items.push({
                        line: i + 1,
                        itemId: salesOrder.getSublistValue({
                            sublistId: 'item',
                            fieldId: 'item',
                            line: i,
                        }),
                        itemName: salesOrder.getSublistText({
                            sublistId: 'item',
                            fieldId: 'item',
                            line: i,
                        }),
                        itemType: salesOrder.getSublistValue({
                            sublistId: 'item',
                            fieldId: 'itemtype',
                            line: i,
                        }),
                        quantity: salesOrder.getSublistValue({
                            sublistId: 'item',
                            fieldId: 'quantity',
                            line: i,
                        }),
                        rate: salesOrder.getSublistValue({
                            sublistId: 'item',
                            fieldId: 'rate',
                            line: i,
                        }),
                        amount: salesOrder.getSublistValue({
                            sublistId: 'item',
                            fieldId: 'amount',
                            line: i,
                        }),
                        description: salesOrder.getSublistValue({
                            sublistId: 'item',
                            fieldId: 'description',
                            line: i,
                        }),
                        expectedShipDate: lineExpectedShipDate, // Line-specific expected ship date
                        effectiveShipDate: effectiveShipDate, // Either line expected ship date or header ship date
                        shipDateSource: lineExpectedShipDate ? 'line' : 'header', // Indicator of where the date came from
                        taxCode: salesOrder.getSublistValue({
                            sublistId: 'item',
                            fieldId: 'taxcode',
                            line: i,
                        }),
                        taxAmount: salesOrder.getSublistValue({
                            sublistId: 'item',
                            fieldId: 'tax1amt',
                            line: i,
                        }),
                    });
                }

                return {
                    result: JSON.stringify(salesOrderData),
                    error: ''
                }
            } catch (error) {
                return {
                    result: '',
                    error: `Error getting sales order info ${orderId}: ${error.toString()}`,
                };
            }
        }
    };
});
This function:
- Loads a sales order record by ID.
- Collects header details (transaction ID, customer name, total, etc.).
- Loops through line items and captures quantity, rate, name, etc.
- Returns a JSON payload that the AI Connector can consume.
You can extend this further (as in your full implementation) to include ship dates, tax codes, departments, etc.
Step 3: XML Configuration
NetSuite requires you to register your tool with a .xml file under Objects/CustomTools/.
Here’s the customtool_f3_salesorders_ct.xml:
<tool scriptid="customtool_f3_salesorders_ct">
  <name>Sales Orders Tools Custom Implementation</name>
  <scriptfile>[/SuiteApps/com.foliothree.f3mcptools/f3_salesorders_ct.js]</scriptfile>
  <rpcschema>[/SuiteApps/com.foliothree.f3mcptools/f3_salesorders_ct_schema.json]</rpcschema>
  <exposeto3rdpartyagents>T</exposeto3rdpartyagents>
</tool>
This XML ties together:
- Script file (.js)
- Schema file (.json)
- Exposure flag (T to make available for external AI agents)
Without this step, NetSuite won’t recognize your new tool as part of the SuiteApp.
NetSuite 2026.1 note: Custom Tools can optionally be registered as toolsets instead of tools to enable execution log visibility. Refer to FAQ #11 for details.
Step 4: Deployment Setup
To push everything to NetSuite, we rely on two key XML files:
deploy.xml – defines what gets deployed:
<deploy>
  <files>
    <path>~/FileCabinet/SuiteApps/com.foliothree.f3mcptools/*</path>
  </files>
  <objects>
    <path>~/Objects/CustomTools/*</path>
  </objects>
</deploy>

manifest.xml – describes the SuiteApp project:
<manifest projecttype="SUITEAPP">
  <publisherid>com.foliothree</publisherid>
  <projectid>f3mcptools</projectid>
  <projectname>Folio3 Custom Tools</projectname>
  <projectversion>1.0.0</projectversion>
  <dependencies>
    <features>
      <feature required="true">SERVERSIDESCRIPTING</feature>
    </features>
  </dependencies>
</manifest>
Together, these files tell NetSuite:
- Which files to install.
- Which objects to register.
- What features are required (like server-side scripting).
Step 5: Deploy & Test
Once your files are ready:
- Run deployment using SuiteCloud CLI:
suitecloud project:deploy - Verify the SuiteApp deployment inside NetSuite’s File Cabinet under SuiteApps -> com.foliothree.f3mcptools. (or if its ACP) SuiteScripts -> Customizations -> com.foliothree.f3mcptools
- Test your tool by invoking it through the AI Connector with sample inputs.
Example Test Input for getSalesOrderInfo:
{
  "orderId": "12345"
}
Expected Output:
{
  "id": "12345",
  "tranId": "SO1001",
  "customerName": "ABC Corp",
  "total": "1500.00",
  ...
  "items": [
    {"itemName": "Laptop", "quantity": 2, "rate": 500},
    {"itemName": "Mouse", "quantity": 5, "rate": 50},
    ...
  ]
}
Custom Tool Deployment on Claude.ai:

Example Prompt via Claude.ai:

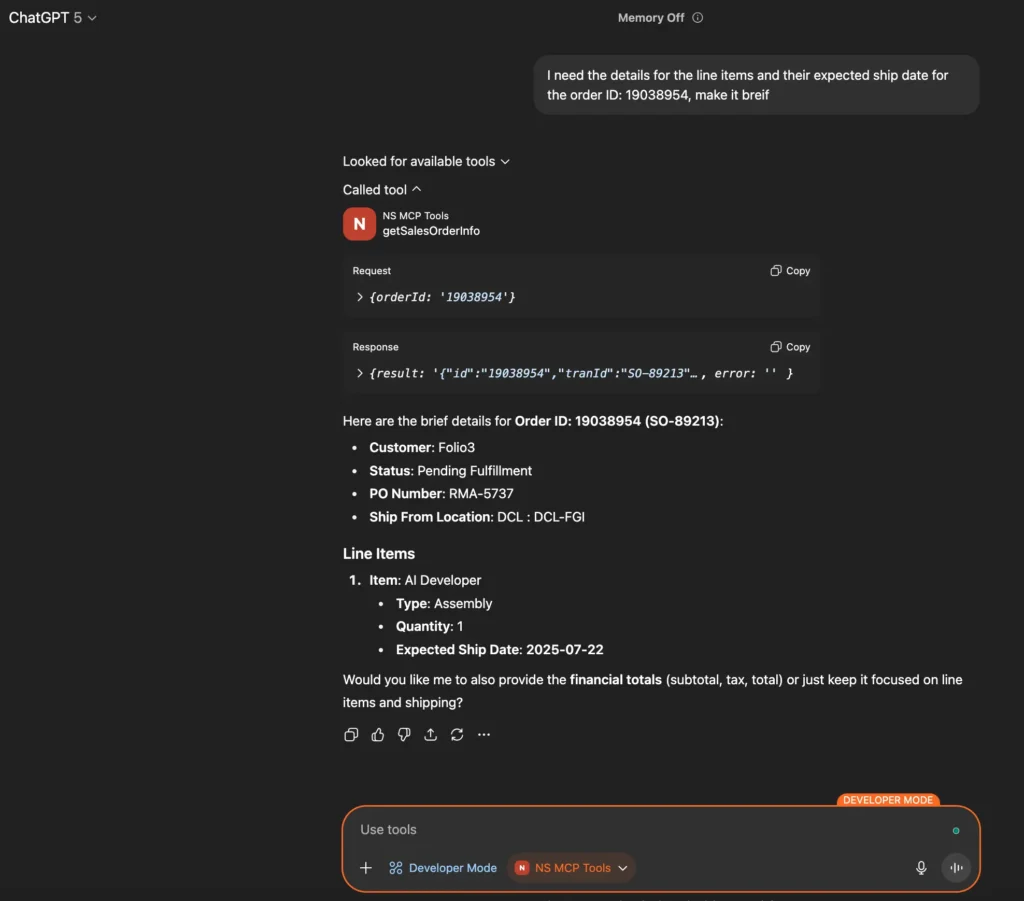
Custom Tool Deployment on ChatGPT:

Example Prompt via ChatGPT:
Wrapping It Up
By now, you’ve seen how to:
- Structure your project for custom NetSuite AI Connector tools.
- Write JSON schemas to define inputs and outputs.
- Implement robust SuiteScript logic for business operations.
- Configure XML to register tools with NetSuite.
- Deploy and test your tools in the SuiteCloud environment.
With this foundation, you can start building a whole ecosystem of AI-driven NetSuite integrations to automate sales order insights and manage vendor communications.
If you need further assistance, you can schedule a call with us and we will show you a practical demo.
FAQs
1. Can I build multiple tools in a single SuiteApp project?
Yes! You can define multiple schemas and JS implementations, then register them in separate XML files under Objects/CustomTools/.
2. Can I connect these tools to external AI systems?
Absolutely. The main purpose of the AI Connector is to let AI agents consume NetSuite data and actions securely.
3. How to un-deploy a custom tool?
- The challenge: Simply setting <exposeto3rdpartyagents>F</exposeto3rdpartyagents> makes the tool invisible to AI clients, but the underlying script, schema, and XML files remain in NetSuite.
- Resolution: If you deploy a SuiteApp and remove objects from the deploy.xml, redeploying can delete those omitted objects from the account (keeping only what remains in deploy.xml).
However, with an Account Customization Project (ACP), simply removing objects from deploy.xml will not delete them in the target account. Unwanted components must be manually removed – the deployment is non-destructive.
4. Can we define outputSchema just like inputSchema?
Yes, outputSchema is supported. The official NetSuite MCP docs confirm that you can (and in some cases should) define an outputSchema for your custom tool, especially if you want better compatibility with AI clients like ChatGPT MCP.
Here’s what to know:
- Without outputSchema – Your tool still works, but the LLM has to “guess” how to interpret the JSON you return. That’s when warnings or misinterpretations happen.
- With outputSchema – You explicitly define the format and types of the response, making it easier for the LLM to consume and reducing hallucinations.
5. What’s supported in inputSchema?
- inputSchema.properties support key-value pairs of type and description for each property. The types supported are: string, number, and boolean.
- Arrays and nested objects may break depending on how the LLM interprets them. Many developers recommend using strings to encode complex structures (e.g., pass a JSON string instead of a raw object).
6. What are the restrictions and limitations of the NetSuite AI Connector?
The N/http and N/https modules are not supported in custom tool scripts.
7. Can I set up a NetSuite AI Connector via SuiteApp?
Yes, if you have a SuiteApp (as set up earlier in this blog) with Custom Tools then you can generate it’s MCP server URL as following:
https://<accountid>.suitetalk.api.netsuite.com/services/mcp/v1/suiteapp/<applicationid> – Returns only the custom tools exposed by the specified SuiteApp. The structure of <applicationid> is: <publisherid>.<projectid> where <publisherid> could be, for example, “com.foliothree”, and <projectid>, for instance, “f3mcptools”.
8. How should I manage the access management of the MCP Tools?
- Grant MCP permission only to users who require it.
- Do not assign MCP permission to users with high privileges. NetSuite does not allow Administrator roles or roles that have full permissions to access NetSuite features to use MCP.
- Using the SuiteApp specific URL to expose only specific set of tools
- Developer Mode (available on ChatGPT Pro/Plus) gives full MCP client support, i.e. both read and write access to connected tools.
In contrast, in Enterprise plans connectors are disabled by default and admins control which connectors (and what operations) users can use.
9. Can I use the NetSuite AI Connector Service in the healthcare Industry?
The NetSuite AI Connector Service can’t be activated for healthcare customers with a signed Business Associate Agreement (BAA), as it has not yet been assessed for its compliance with the US Health Insurance Portability and Accountability Act (HIPAA).
10. What’s new for MCP Custom Tools in NetSuite 2026.1?
NetSuite 2026.1 introduces important improvements that make developing, monitoring, and troubleshooting MCP Custom Tools easier and more transparent, including:
- Better visibility into Custom Tool executions through standard Script Execution Logs
- Support for using the N/log module in Custom Tool scripts, allowing developers to add structured logs for debugging and observability
- UI enhancements for discovering and managing deployed MCP Custom Tools
- A centralized Custom Tools page, providing a consolidated view of all tools organized by toolset
These enhancements make it easier to build, debug, and maintain MCP Custom Tools in real-world implementations.
Reference: NetSuite 2026.1 Release Notes / SuiteAnswers (ID: 1023394)
11: Do I need to migrate existing Custom Tools to “toolsets” in NetSuite 2026.1?
Not immediately.
NetSuite 2026.1 introduces a new “toolset” specification for Custom Tools to enable execution log visibility in the standard Script Execution Logs UI and to improve debugging and observability. Custom Tools built using the older “tool” specification will continue to work as expected, but execution logs will not be available for them.
To take advantage of execution logging and future enhancements introduced in NetSuite 2026.1, the following updates are required:
Old format vs New format (NetSuite 2026.1+)
| Area | Old Format | New Format (NetSuite 2026.1+) |
| Script JSDoc tag | Not required | @NScriptType CustomTool |
| Entry point functions | Can be synchronous or asynchronous | Must be asynchronous (async functions only) |
| SDF custom object type | tool | toolset |
| Script ID prefix | customtool_ | custtoolset_ |
| Root XML tag | <tool> | <toolset> |
| Exposure tag | <exposeto3rdpartyagents> | <exposetoaiconnector> |
Important notes:
- No changes are required to existing JSON schemas or business logic.
- Existing Custom Tools will continue to function but will not produce execution logs unless migrated.
- NetSuite has indicated that older specifications may be deprecated in a future release.
- For new implementations on NetSuite 2026.1 and later, it is recommended to use the toolset format from the start.
Reference: NetSuite 2026.1 Custom Tool Migration Guide / SuiteAnswers (ID: 1024036)
What’s Next? Stay tuned!
Need help with your NetSuite AI integration? Feel free to reach out for additional support and guidance.


