
The Model Context Protocol (MCP) has transformed how enterprise systems like NetSuite communicate with AI platforms such as ChatGPT. Initially, MCP integrations were limited to ChatGPT Plus and Pro users but with the launch of ChatGPT Business, organisations can now securely connect their NetSuite environments at scale with enhanced control, compliance, and performance. The list of all supported AI Clients can be found in the official NetSuite FAQ.
In this blog, we’ll explore how ChatGPT Business integrates with NetSuite through MCP, what makes it ideal for teams and enterprises, and how to set it up in a managed business environment.
Why ChatGPT Business Changes Everything
Previously, connecting NetSuite with ChatGPT required enabling Developer Mode under Plus or Pro subscriptions. While effective, those integrations were user-managed and lacked centralised admin control.
With ChatGPT Business, companies can now:
- Centrally manage MCP integrations and permissions
- Ensure data governance and enterprise-grade security
- Collaborate on shared connectors and tools
- Enable direct access to NetSuite via MCP within the organisational ChatGPT workspace
In short, ChatGPT Business brings structure, visibility, and scalability to AI-powered ERP automation.
SuiteApps for MCP Integration
NetSuite–ChatGPT Business integration, the recommended SuiteApp remains the same:
1. NetSuite Standard Tools (Recommended)
The MCP Standard Tools SuiteApp enables secure, seamless interaction between ChatGPT and NetSuite. It provides ready-to-use tools for:
- Record lookups and updates
- SuiteQL queries
- Transaction and customer data management
With ChatGPT Business, these tools can now be shared across the organisation — allowing multiple users to leverage the same integration securely.
Required Permissions for MCP Integration
To ensure a successful connection, the following permissions must be assigned to your custom MCP Role in NetSuite:
| Tab | Permission | Level |
| Setup | MCP Server Connection | Full |
| Setup | Log In Using OAuth 2.0 Access Tokens | Full |
| Setup | REST Web Services | Full |
| Lists | Perform Search | Full |
Below is the complete permission set recommended for the MCP Standard Tools SuiteApp.
| Permissions | ||
|---|---|---|
| TAB | PERMISSION | LEVEL |
| Transactions | Find Transaction | View |
| Transactions | Invoice | View |
| Transactions | Sales Order | View |
| Reports | Financial Statements | View |
| Reports | Sales Order Reports | View |
| Lists | Contacts | Full |
| Lists | Customers | Full |
| Lists | Employee Record | Full |
| Lists | Employees | View |
| Lists | Financial History | View |
| Lists | Items | View |
| Lists | Perform Search | Full |
| Setup | Log In Using OAuth 2.0 Access Tokens | Full |
| Setup | MCP Server Connection | Full |
| Setup | REST Web Services | Full |
Note: Minimum Permissions for MCP Standard Tools SuiteApp
The new MCP Standard Tools SuiteApp requires assigning two additional permissions: REST Web Services (Full) and Perform Search (Full).
According to the official documentation, only user roles with these permissions can view these tools in the AI client. However, actual record visibility still depends on the specific permissions granted to the user’s NetSuite role.
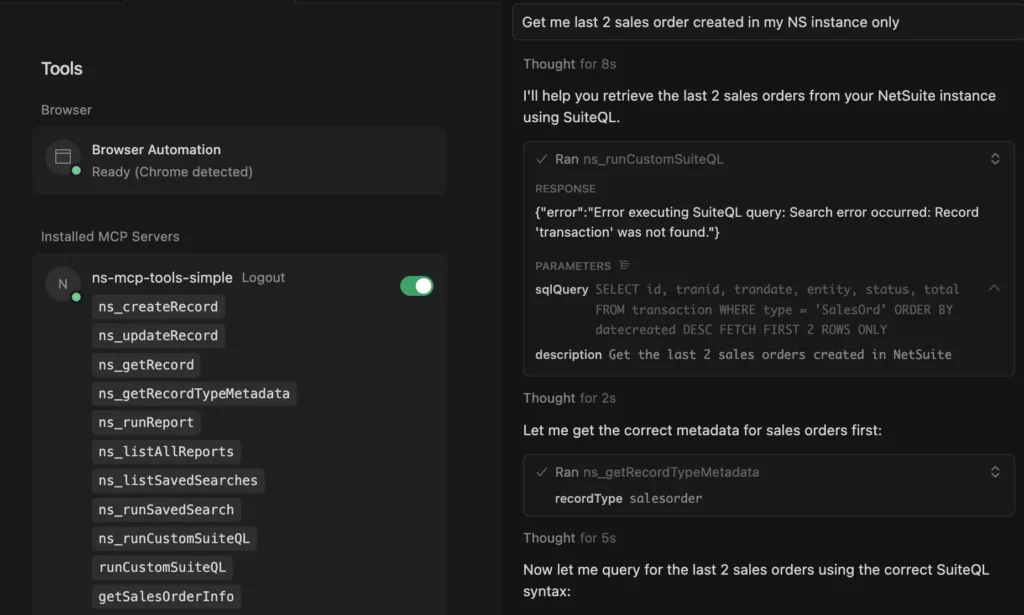
A test was conducted by creating a new role with only the following permissions:
- Lists → Perform Search (Full)
- Setup → Log in using OAuth 2.0 Access Tokens (Full)
- Setup → MCP Server Connection (Full)
- Setup → REST Web Services (Full)
With these four minimal permissions, the system successfully displayed a list of 11 tools (including 2 sample tools without the ns_* prefix) as can be seen in the image attached below.
However, during testing, the Agent failed to produce the expected output because the Transaction table was not accessible in the SuiteQL query, causing it to loop indefinitely.
Lesson learned: All required permissions must be assigned appropriately to ensure full tool functionality.
When a record is created using this tool, the System Notes will show:
Created By: the user who invoked the tool
Script Context: REST Web Services. Therefore, if the user lacks any necessary permissions, the tool call will fail.
⚠️ Tip: Ensure the SuiteApps folder in your File Cabinet is not restricted to specific users. This often causes tools visibility issues during setup as mentioned in the official NetSuite documentation Accessing MCP Standard Tools.
Setting Up the Connection (ChatGPT Business)
Follow these steps to connect your ChatGPT Business account to NetSuite MCP:
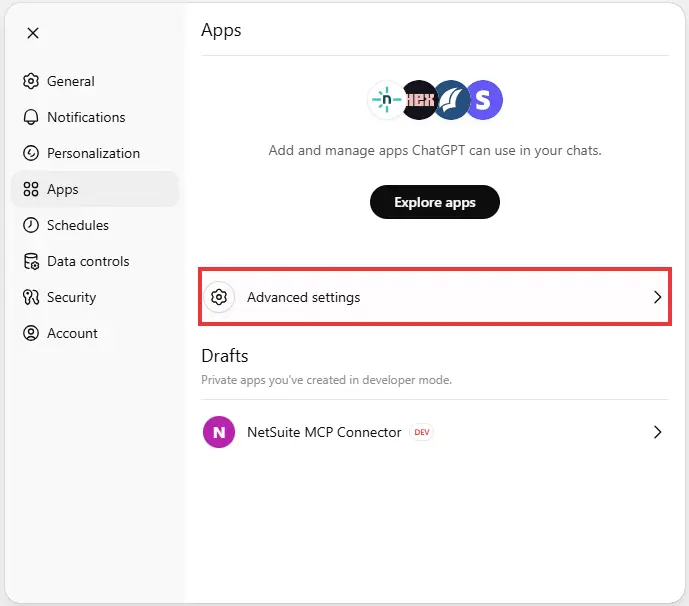
- Open ChatGPT → Settings → Apps


Suppose the developer mode is not enabled. The user will not be able to see a button to create the custom connector.
- Click Advanced Settings.
- Enable Developer Mode in Advanced Settings.

- Once Enabled, Click Back. Now the user will be able to see a button to create a new Connector.
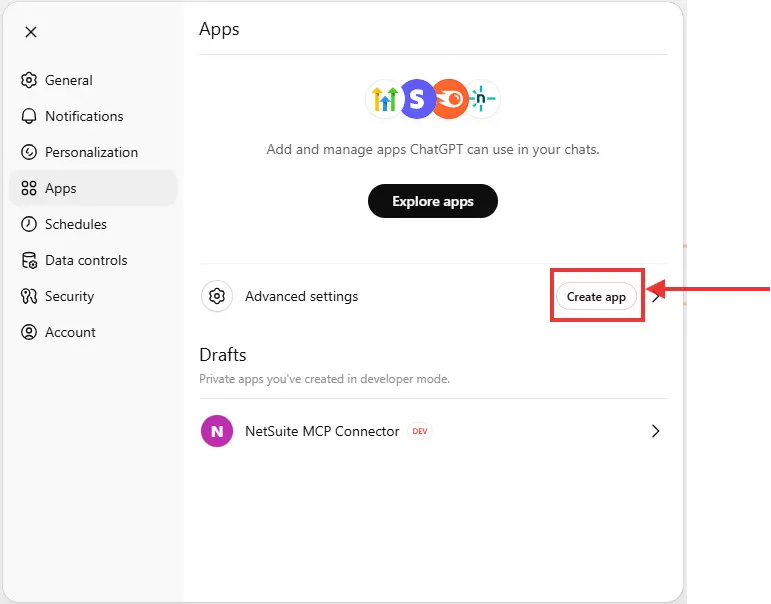
- Click “Create app.”
- Provide a descriptive Name (e.g., NetSuite MCP Connector).
- Enter the MCP URL:
https://<account>.suitetalk.api.netsuite.com/services/mcp/v1/all
Depending on your use case, use one of the following formats:
All tools:
https://<account>.suitetalk.api.netsuite.com/services/mcp/v1/all
Returns all available tools from both SuiteApps and Account Customization Projects (ACP).
Example: https://TD12345678.suitetalk.api.netsuite.com/services/mcp/v1/all
Specific SuiteApp:
https://<account>.suitetalk.api.netsuite.com/services/mcp/v1/suiteapp/<applicationid>
Returns tools from a single SuiteApp.
- Checkmark I understand and want to continue.
- Click Create.

- You’ll be redirected to the authentication page — choose your custom MCP role (not Administrator).
- Click Continue.

- In case the Cancel/Go Back button is clicked, the user will be redirected to the ChatGPT Settings > Apps Screen. In addition, the Connector Will Show up only in the Drafts Section.

- User can authenticate again by navigating to Settings > Apps.
- Locate Your Connector in the available connectors and click on it.

- Click Connect.

- It will redirect to the NetSuite Authorization Screen.
On success, ChatGPT will display the list of available NetSuite MCP Tools.

OAuth 2.0 Token Lifecycle
As part of our proof of concept (PoC), we validated how OAuth 2.0 authentication and token management work when connecting ChatGPT to NetSuite via the MCP connector.
The authentication process follows a standard OAuth 2.0 flow. The user authorizes the connection once, after which the integration relies on access and refresh tokens to remain authenticated without repeated user interaction.
Key observations from the POC:
- The access token has a validity period of 60 minutes
- The refresh token is single-use by default and remains valid for two days
- Each time a refresh token is used, a new refresh token is issued
- Once the refresh token expires, the user must manually re-authorize the integration by completing the OAuth 2.0 authorization flow again
This behavior is important to consider when designing long-running or unattended integrations, as token expiration directly impacts connectivity and automation reliability.
For detailed and up-to-date information on OAuth 2.0 token expiration, refresh behavior, and integration record configuration, refer to the official NetSuite documentation:
Create Integration Records for Applications to Use OAuth 2.0
Publishing the Connector for Organisation-Wide Use
One of the biggest advantages of ChatGPT Business over individual Plus or Pro plans is the ability to publish connectors across the organisation.
In a Business workspace, connectors are not limited to the user who created them. Once a connector is properly configured and published, it becomes available to all members of the workspace, allowing teams to reuse the same integration without repeating setup steps.
Note: Only Admins and Owners can manage connectors; Members can only use them. For a detailed comparison of role permissions, see the official article on roles in my ChatGPT Enterprise workspace: What is the difference between different roles on my ChatGPT Enterprise workspace?
How Publishing Works in ChatGPT Business
After successfully creating and testing your NetSuite MCP connector:
- Open the connector settings and click publish.

- The connector is now published and visible to all the members of the workspace.
Connecting as a Workspace Member
For other users in the Business workspace, the process is simple:
Note: Space Members does not require Dev Mode to be enabled in order to use the MCP Connector.
We here are using a different connector published by Admin. The connector name is NetSuite MCP Connector.
- Open ChatGPT → Settings → Apps
- Locate the published Connector. In our case, it’s NetSuite MCP Connector

3. Click Connect

4. Authenticate with NetSuite using your assigned MCP role
5. Start using NetSuite tools immediately inside ChatGPT
Why This Matters for Enterprise Teams
Publishing connectors transform MCP from an individual experiment into a shared enterprise capability.
Key benefits include:
- Faster onboarding — new team members can start using NetSuite AI tools instantly
- Centralised governance — admins control the connector configuration once
- Reduced maintenance — updates apply to everyone automatically
- True collaboration — finance, operations, sales, and support teams work from the same AI-powered interface
This is where ChatGPT Business truly shines: enabling secure, organisation-wide AI adoption without sacrificing control or compliance.
Using ChatGPT Business with NetSuite
Once connected, your team can perform actions and queries directly within ChatGPT using natural language.
Note: We are executing these examples from a space member’s point of view.
Examples:
- Revenue Report for Past 6 Months
- Prompt: Please provide a report in graph format which shows my revenue, expenses and profit for the past 6 months.

- Bulk Update the Sales Orders
- Prompt: Please Update all the Sales Orders of the Customer 3M (Internal Id 1397). Update the memo field and set the value Test Connector.

Each command uses MCP tools to fetch or modify NetSuite data — no manual SQL or scripting required.
Why ChatGPT Handles Large MCP Workloads More Reliably Than Claude UI
During real-world usage and community discussions, a limitation has been observed when using Claude with NetSuite MCP integrations via the web UI, particularly for data-heavy analytical queries.
In scenarios involving large SuiteQL queries or detailed financial analysis (for example, customer profitability analysis or year-to-date sales reporting), Claude may return the error:
“Claude hit the maximum length for this conversation”
This behaviour is primarily due to a web UI–level conversation length constraint, where the total combined size of the following must remain under a fixed limit (200K):
- User prompts
- Data returned by the MCP connector (e.g., SuiteQL query results)
- The model’s intermediate reasoning and final response
When large datasets are retrieved from NetSuite, this combined payload can exceed the UI limit, causing the conversation to terminate before the analysis completes.
Key observations:
- This is a Claude web UI limitation, not an issue with NetSuite, MCP, or the Standard Tools SuiteApp
- Smaller or well-scoped analyses (for example, monthly income statements) are often completed successfully
- Deep, multi-step analysis involving large result sets is more likely to hit this limit
Important comparison:
This type of conversation length limitation has not been observed when using ChatGPT with NetSuite MCP, including ChatGPT Plus, Pro, and Business accounts. ChatGPT has consistently handled larger MCP responses and multi-step ERP analysis without prematurely terminating the conversation; however, exact token limits and context window sizes can vary depending on the plan and model being used.
Available workaround for Claude users:
While the Claude web UI has conversation length constraints, this limitation does not apply when using the Claude API. For complex, data-intensive, or long-running analytical workflows, using the Claude API provides higher token limits and allows deep ERP analysis to complete successfully.
Enterprise Advantages of ChatGPT Business Integration
| Feature | ChatGPT Plus/Pro | ChatGPT Business |
| MCP Integration | ✅ Supported | ✅ Supported |
| Centralised Admin Control | ❌ No | ✅ Yes |
| Organisation-wide Access | ❌ No | ✅ Yes |
| Compliance & Governance | Basic | Enterprise-grade |
| Custom Connector Sharing | ❌ No | ✅ Yes |
| Data Residency Control | ❌ No | ✅ Yes |
With Business, your company gains the security of enterprise compliance while retaining the flexibility of conversational AI.
The Future of ERP + AI Collaboration
With ChatGPT Business now officially supporting MCP integration, organisations can:
- Empower teams to automate ERP workflows through natural language
- Retrieve live financial and operational data in seconds
- Reduce manual errors and repetitive tasks
- Centralise AI–ERP collaboration securely
This evolution marks a major step toward intelligent enterprise automation, where ERP data, AI, and business teams work together seamlessly.
Conclusion
The arrival of ChatGPT Business MCP integration bridges the gap between enterprise control and AI innovation. Whether you’re performing record lookups, generating reports, or updating transactions, ChatGPT Business provides a secure, scalable, and compliant way to interact with NetSuite through natural language.
With managed connectors, team collaboration, and centralised governance, AI-powered ERP is no longer a concept; it’s here.
Related Reads
Before diving deeper into custom AI integrations, make sure you’ve covered the foundational setup steps explained in our earlier guides:
- A Complete Setup Guide for NetSuite AI Connector
- A Development Guide to Build Custom Tools for NetSuite AI Connector
- A Setup Guide for NetSuite AI Connector with Postman: API Integration Tutorial
- Dual API Integration: Using NetSuite MCP Tools with OpenAI and Anthropic
- Connecting MCP with ChatGPT: A Complete Guide
- IDE Integration Guide for NetSuite MCP Tools in Cursor & VS Code
- NetSuite MCP Challenge: Implementation Case Study & Results
- Getting Started with NetSuite SuiteTalk REST API in Postman
- Connecting MCP Tools with QWEN
- NetSuite MCP OAuth 2.0 Token Generator Tool
These articles collectively provide the complete foundation — from setup and authentication to advanced tool deployment — helping you integrate AI with NetSuite confidently and efficiently.Need help with your NetSuite AI integration? Feel free to reach out for additional support and guidance.


