NetSuite developers often juggle multiple tools (browsers, IDEs, Postman, and dashboards) just to query data or debug integrations. Modern AI-powered CLI tools are changing that.
These CLI tools represent the next evolution in AI-assisted development, offering terminal-native workflows powered by models like Claude (Anthropic) and ChatGPT (OpenAI). Recent updates have significantly improved how these tools manage context. Claude Code now supports a modular rules architecture through .claude/rules/ instead of relying on a single monolithic CLAUDE.md file, enabling scoped loading, path targeting, and easier maintenance. For example, when working on src/components/Button.tsx, it intelligently loads only relevant rules like frontend.md and testing.md rather than a 2000+ line file covering everything. Additionally, conversation compacting automatically summarizes long sessions to free up memory while preserving critical decisions and task state, with developers able to manually trigger /compact at logical breakpoints to keep extended coding sessions sustainable.
By integrating NetSuite MCP Tools into these environments, developers can:
- Stay in the terminal: Execute live NetSuite operations without switching between browsers, IDEs, or database clients.
- Code against real schemas: Claude and Codex can see your actual field IDs, custom fields, and record structures directly from NetSuite.
- Debug with full context: Pull error logs, failed transactions, and record data automatically while troubleshooting integration issues.
- Automate end-to-end workflows: Query NetSuite, write SuiteScript, and test integrations in a single conversational flow.
This integration brings ERP data access, intelligent code generation, and automation together, all from within your terminal.
This guide covers MCP integration setup in Claude Code, Codex CLI, and other CLI tools, configuring authentication using your NetSuite Access Token, and verifying the connection.
By the end of this guide, you’ll have a fully connected CLI environment capable of querying NetSuite data, exploring record schemas, and building integrations faster than ever.
Note: This blog builds upon our earlier post: A Setup Guide for NetSuite AI Connector with Postman: API Integration Tutorial. The Access Token generated there will be required for connecting your IDE to the NetSuite MCP Tools.
Integrating NetSuite MCP Tools in CLI
Prerequisites
-
- You have installed Node.js 20+. (Some tools can work on Node.js 18 as well, but it’s better to have Node.js 20+). If you don’t have it installed yet, you can download it from the official Node.js website.
Claude Code
Prerequisites
-
- Claude.ai or Claude Console account
Step 1: Install Claude Code
Claude Code is now primarily distributed via a native installer, which is the recommended installation method. The npm-based installation is a legacy option.
- Open Command Prompt.
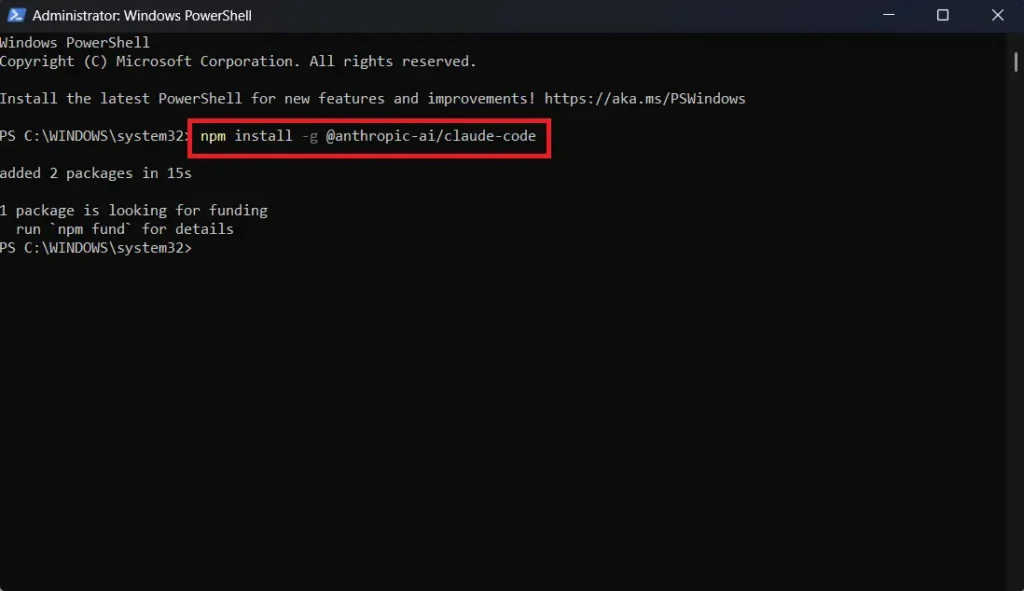
- For the latest and recommended native installation, follow the official Claude Code setup guide; alternatively, if you choose the legacy npm-based CLI installation, use the following command.
npm install -g @anthropic-ai/claude-code
This will install Claude Code on your system. If you prefer not to install the Claude Code CLI, you can use the Claude Desktop app instead, as Claude Code is now available there as well under the Code tab.
Now navigate to your project to start using Claude.
Note:
Always start your CLI tools from your project directory, not globally. Running them globally can expose all your files and sensitive information to the CLI tool.
Step 2: Set up Claude Code
You need to navigate to your project now to start using Claude Code.
cd your-project
Replace your-project with the actual path to your project.
Now log in to Claude for this project using this command.
claude
Follow the instructions now. First, it will ask you for the theme of your Claude Code CLI. I personally prefer dark mode. It’s your choice, though.

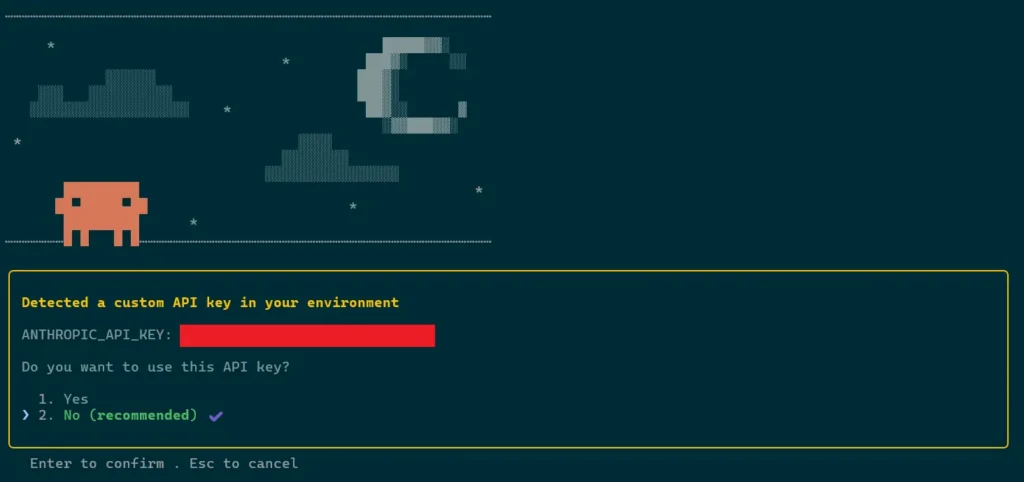
Then, it will show you these 2 options

Now, if you know what to choose, that’s good. But if you don’t, then let me guide you. The first option is for those who have a normal subscription based claude.ai account. If you select this option, it will open a window in your browser and ask you to sign in to your claude.ai account. Once logged in, it will show you this window. Authorize it.
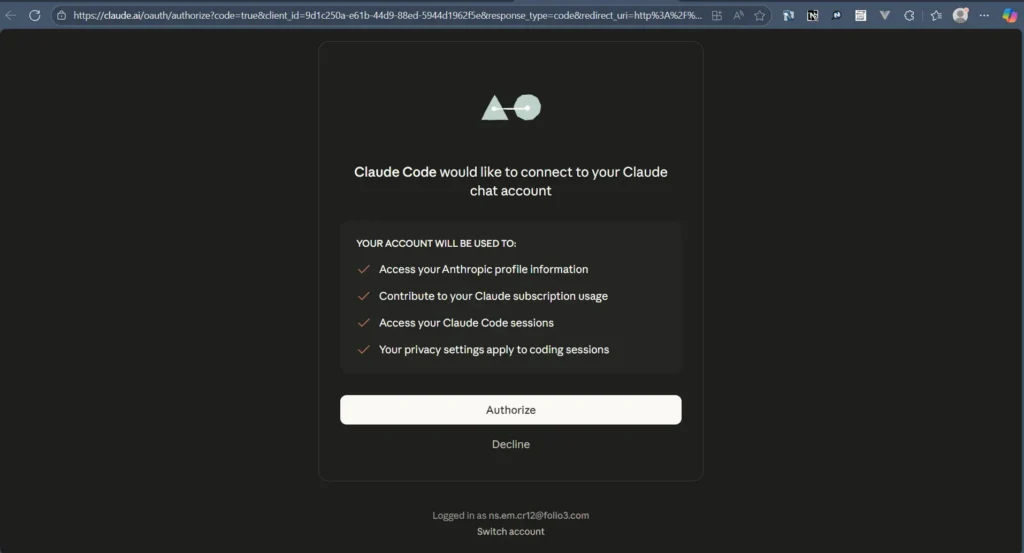
After Authorization, close this window and go back to your command prompt.
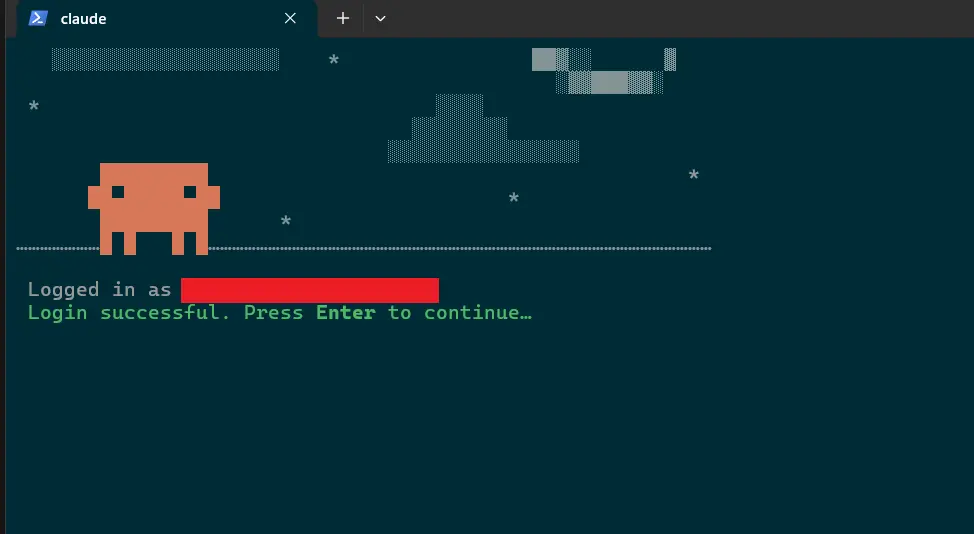
Press Enter, and now you are all set to use Claude Code using your claude.ai account.

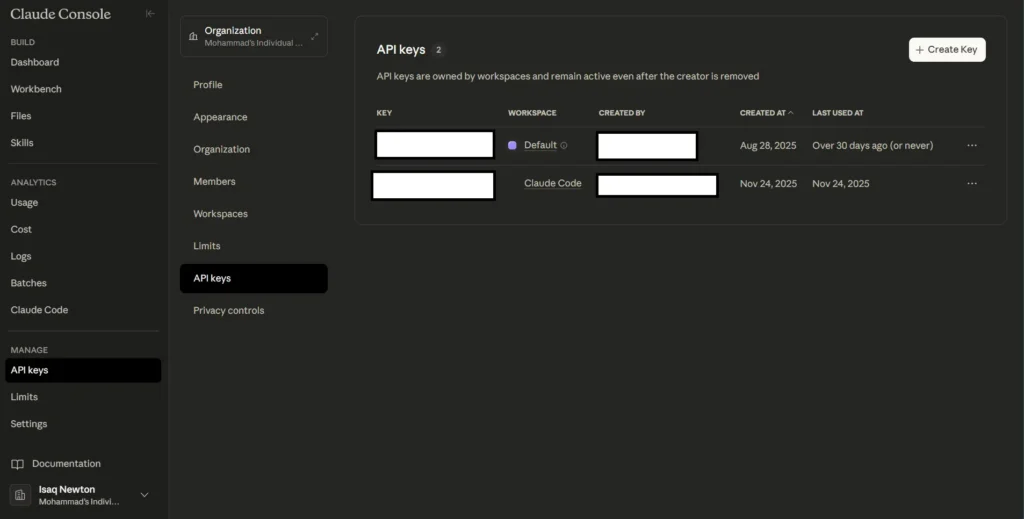
If you have a Claude Console account (formerly Anthropic Console), the login process works the same way. The difference is what happens after authentication—Claude Code automatically generates an API key in your account, prefixed with claude_code_key_ followed by your name and random characters. This key tracks your token usage and bills you accordingly on a pay-per-use (per token) basis.
If you prefer to skip the interactive login process entirely, you can authenticate Claude Code using just an environment variable. First, set your API key:
[System.Environment]::SetEnvironmentVariable("ANTHROPIC_API_KEY", "your-api-key-here", "User")
Note: The above command is for PowerShell, it may differ based on your terminal.
Then, bypass the onboarding prompt by editing ~/.claude.json in your home directory and setting:
{ "hasCompletedOnboarding": true }Save the file and launch claude in a new terminal. Claude Code will use your API key directly, no browser login required. This method is particularly useful for CI/CD pipelines, headless environments, or teams where admins distribute API keys to developers.
One thing to watch out for: if you later want to log in with the conventional login methods, you need to first log out using /logout, then launch claude again. This will set the hasCompletedOnboarding key to false in claude.json file and will prompt you to log in. If ANTHROPIC_API_KEY is still set, Claude Code will detect the conflict and prompt you with a warning to choose between the API key or your subscription-based authentication.
Note that the claude_code_key_* generated during Console login is stored internally by Claude Code, not as an environment variable, so this conflict only arises when you’ve manually set ANTHROPIC_API_KEY yourself.
To remove the environment variable, you can run this command:
[System.Environment]::SetEnvironmentVariable("ANTHROPIC_API_KEY", $null, "User")
Claude Code also offers a third option: connect to third-party providers while using Claude’s agentic capabilities. The login page lists three providers: Amazon Bedrock, Google Vertex AI, and Microsoft Foundry, but these require cloud setup and costs. If you want to run it locally for free using Ollama, refer to this article for a walkthrough. For more details on third-party integrations, see the official Claude Code docs.
So, now Claude Code is ready to be used in your project. Ask it anything about your project. Here is an example: What does this project do?

It will show you detailed information about your project.
Claude Code plugins and extensibility
Claude Code also supports custom plugins, allowing teams to extend it with reusable skills, agents, hooks, and MCP servers. This extensibility layer is important because it enables teams to tailor Claude Code to their own workflows instead of relying only on built-in capabilities.
Now, let’s integrate MCP tools with Claude Code.
Step 3: Connecting Claude Code with MCP Tools
Note:
There are three ways to connect MCP servers with clients: STDIO, Remote HTTP, and Remote SSE. STDIO is used when the client and server run locally. For remote connections, Streamable HTTP is the recommended approach, while Remote SSE exists mainly for legacy compatibility and is being phased out. If a client doesn’t support remote connections, you can use a STDIO-to-HTTP proxy to bridge that gap. We covered STDIO in detail in our previous blog.
Next: connecting Claude Code with MCP tools. The examples below use NetSuite MCP tools. But you can also connect to different popular tech MCP tools too like GitHub, Jira, Vercel etc.
Please refer to our earlier post to generate an Auth token: A Setup Guide for NetSuite AI Connector with Postman: API Integration Tutorial.
You can refer to our earlier blog post on how to configure an MCP server in NetSuite: A Complete Setup Guide for NetSuite AI Connector
First, exit Claude Code, then run this command:
claude mcp add --transport http netsuite https://tstdrv123456.suitetalk.api.netsuite.com/services/mcp/v1/all\
  --header "Authorization: Bearer your-token"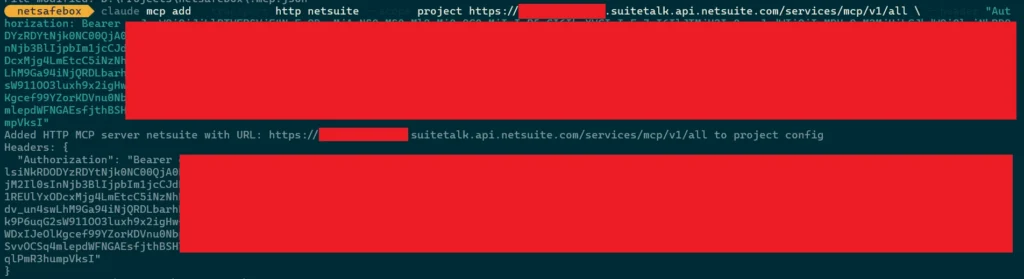
Note:
For this blog, we’ll use this MCP server URL for all CLI tools: https://tstdrv123456.suitetalk.api.netsuite.com/services/mcp/v1/all
This returns all available tools from both SuiteApps and account customization projects in that NetSuite account. If you want tools from a specific SuiteApp only, use: https://tstdrv123456.suitetalk.api.netsuite.com/services/mcp/v1/suiteapp/<applicationid>
For more details on URL formats, refer to our previous blog.
A few possible reasons it might fail:
-
- There is already one added by the same name
- The auth token has expired or is incorrect
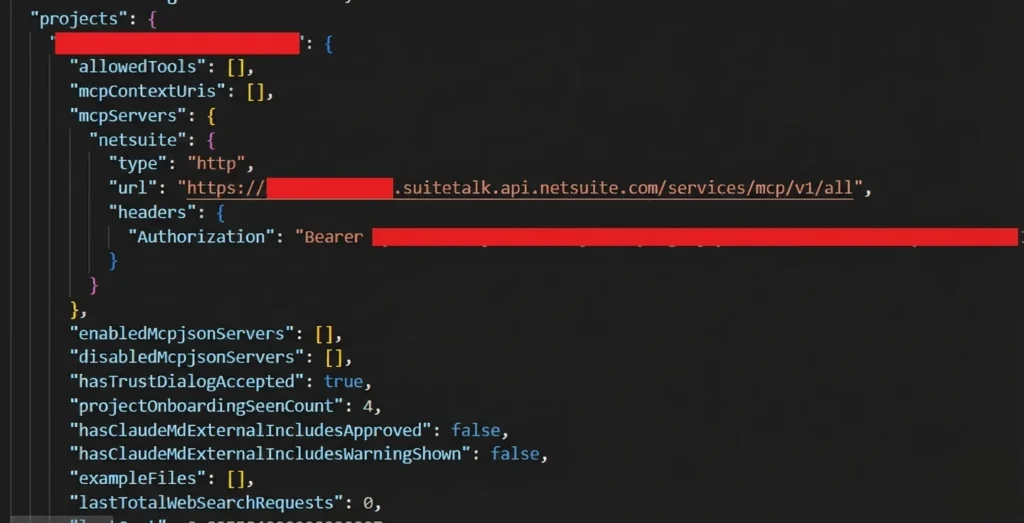
You can also define a scope for your MCP servers. The example above uses local scope (the default), which stores the configuration in ~/.claude.json under your project’s path. Local-scoped servers remain private to you and are only accessible within the current project directory. This is how Claude keeps track of MCP servers that are scoped locally, see the projects key:
If you want to share an MCP server with your team, use project scope:
claude mcp add --transport http netsuite --scope project https://tstdrv123456.suitetalk.api.netsuite.com/services/mcp/v1/all\
  --header "Authorization: Bearer your-token"
Project-scoped servers store their configuration in a .mcp.json file at the project root, making them easy to share with a team.
There’s also a third option, i.e., user-scoped servers (--scope user) which stores their configuration in ~/.claude.json and makes the server available across all your projects. You can find more details about this here.
Now, let’s use this MCP server.
Step 4: Using MCP in Claude Code
First, return to the Claude CLI using the claude command. Then type your desired prompt.
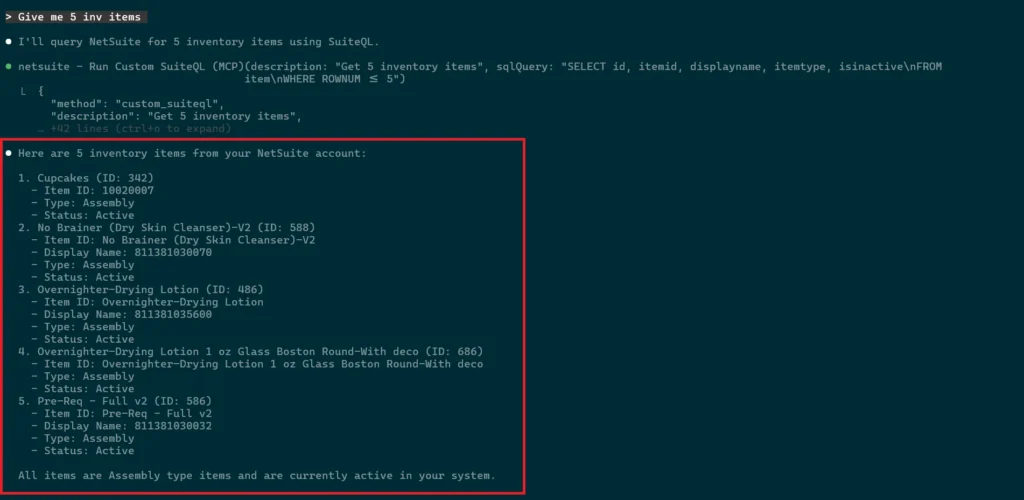
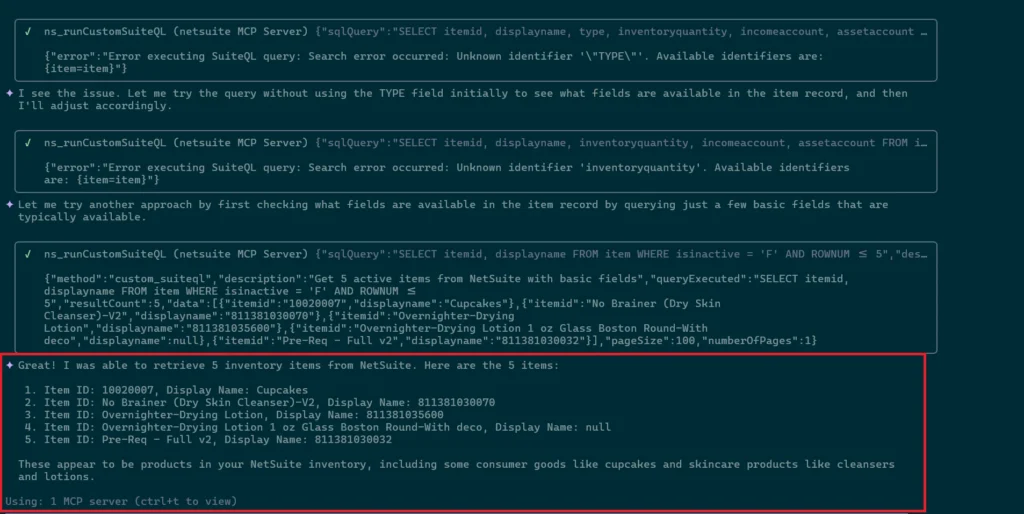
Here’s a simple example: Give me 5 inv items
The system automatically detects the right NetSuite tool and executes it.
You can view more detailed info in the official Claude Code documentation.
Codex
Prerequisites
Step 1: Install Codex
We will install Codex using npm.
- Open Command Prompt.
- Use this command to install Codex.
npm i -g @openai/codex

If you don’t want to install the Codex CLI, you can now use the Codex App too.
Time to set it up.
Step 2: Set up Codex
You need to navigate to your project now to start using Codex.
cd your-project
Now run codex and start using it. If you are not authenticated, you’ll need to authenticate with your OpenAI account. It will automatically redirect you to ChatGPT login page and then log in with your ChatGPT.

Now in browser, login with your ChatGPT account. Once you’ve signed in, you can close the browser window and return to your Terminal.

Now, press enter to start using Codex.
Step 3: Connecting Codex with MCP Tools
Codex uses the mcp_servers configuration in its config.toml file to locate and connect to MCP servers. There are two methods to configure them—both produce the same result, so use whichever you prefer.
i. Through MCP Add Commands
First, exit the CLI, then run:
codex mcp add netsuite --url "https://tstdrv123456.suitetalk.api.netsuite.com/services/mcp/v1/all" --bearer-token-env-var NETSUITE_TOKENBefore running this, you need to set your bearer token as an environment variable:
PowerShell (current session): $env:NETSUITE_TOKEN = "your_token_value_here"
Bash (current session): export NETSUITE_TOKEN="your_token_value_here"
CMD (current session): set NETSUITE_TOKEN=your_token_value_here
C shell (csh or tcsh): setenv NETSUITE_TOKEN“your_token_value_here”
This will set the env for the current terminal session only. To set this variable permanently, you can use:
PowerShell: [System.Environment]::SetEnvironmentVariable("NETSUITE_TOKEN", "your_token_value_here", "User")
Bash: echo 'export NETSUITE_TOKEN="your_token_value_here"' >> ~/.bashrc
CMD: setx NETSUITE_TOKEN "your_token_value_here"
C shell (csh): echo 'setenv NETSUITE_TOKEN "your_token_value_here"' >> ~/.cshrc
If setting it permanently, restart the terminal for changes to take effect.
Here’s what you’ll see after running the command:

ii. Through config.toml
You can configure MCP servers by editing the config.toml file directly. For user-level configuration, this file is located at C:\Users\<your_username>\.codex\config.toml on Windows, or ~/.codex/config.toml on macOS/Linux. For project-level configuration, create a .codex/config.toml file in your project root (trusted projects only).
Add an mcp_servers table with the following structure:
[mcp_servers.netsuite]
url = "https://<accountid>.suitetalk.api.netsuite.com/services/mcp/v1/all"
bearer_token_env_var = "NETSUITE_TOKEN"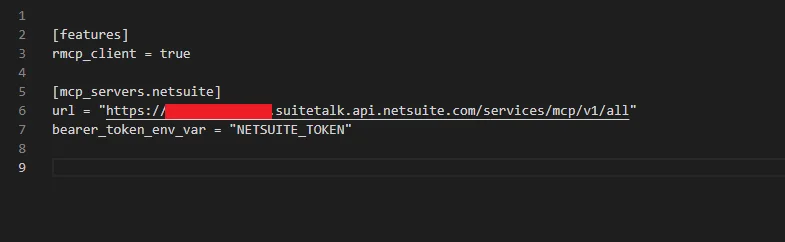
A note on configuration scopes:
Codex offers two scopes for MCP servers:
-
- User-level (default) is stored in
~/.codex/config.toml. The server is accessible across all projects, and thecodex mcp addcommand adds servers at this scope. - Project-level is stored in
.codex/config.tomlwithin your project root. The server is only accessible within that project. Note that this only works for trusted projects and must be configured manually since there’s no CLI flag for it.
Once configured, run codex and it will auto-authenticate with your MCP server. Type /mcp to confirm your servers are connected, you should see all available tools listed.
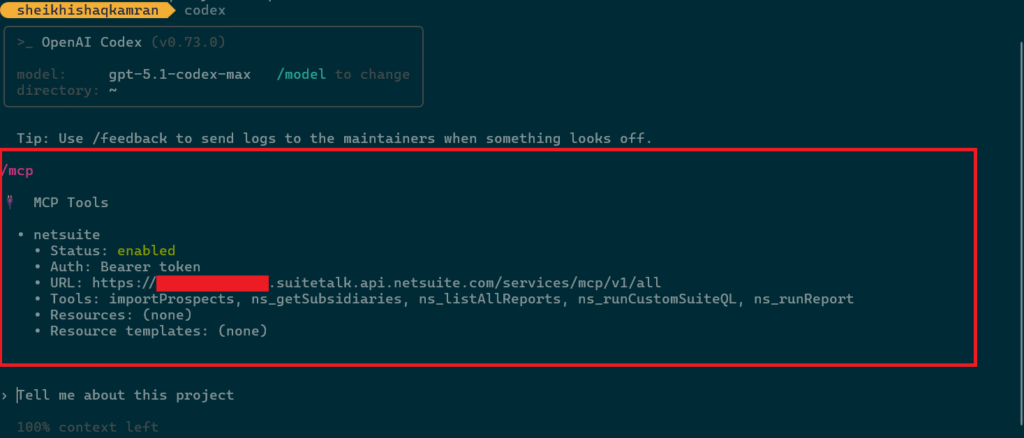
Step 4: Using MCP in Codex
Now type any prompt you want. Here’s a sample prompt: Get 5 active inventory items
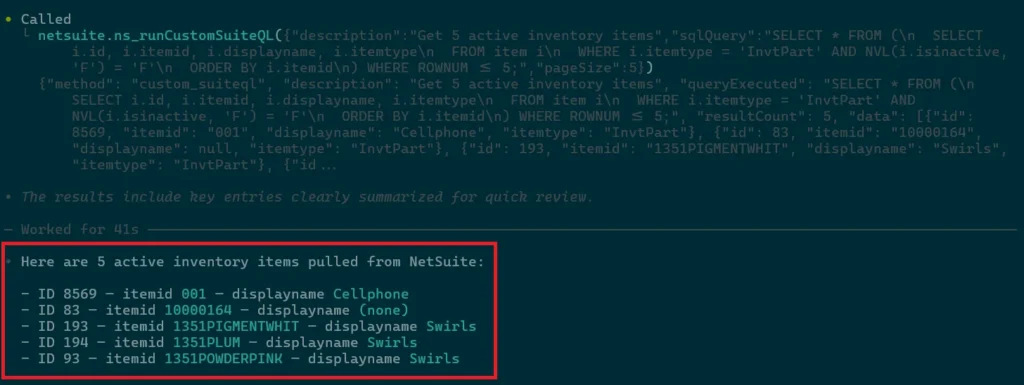
You can find more details in the official Codex documentation.
Qwen Code
Prerequisites
Step 1: Install Qwen
We will install Qwen Code using npm.
- Open Command Prompt.
- Use this command to install Qwen Code.
npm install -g @qwen-code/qwen-code@latest
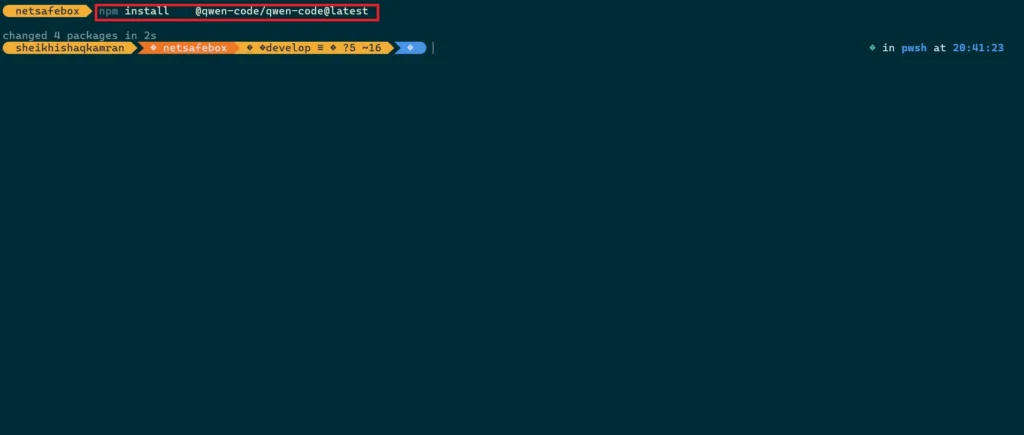
This will install Qwen Code to your system. Now navigate to your project to start using it.
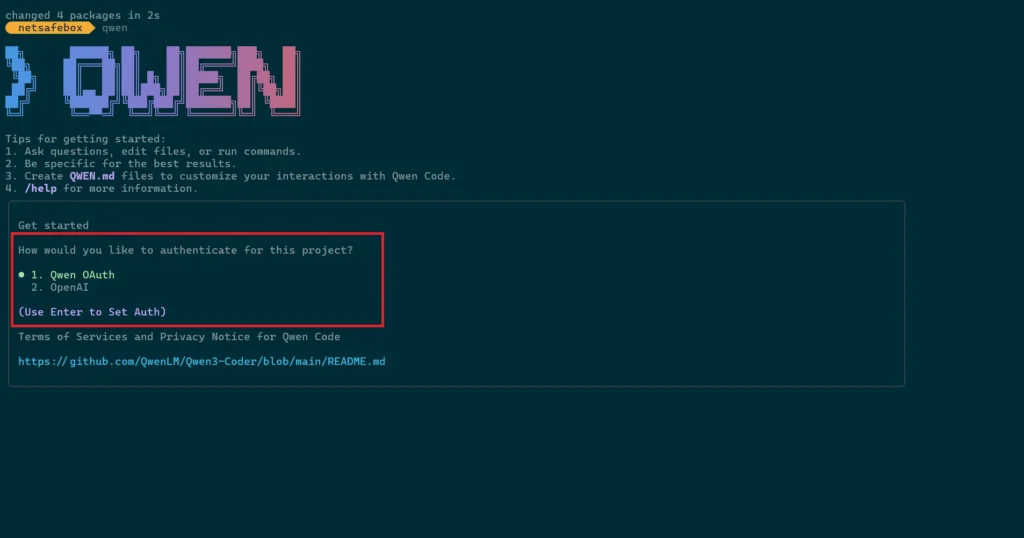
Step 2: Set up Qwen Code
Now run qwen and start using it. If you’re not already authenticated, Qwen Code will prompt you to log in. You have two options: authenticate with your qwen.ai account or use the OpenAI-compatible API configuration. Don’t let the “OpenAI” label confuse you, it refers to the OpenAI-compatible API structure, not an actual OpenAI or ChatGPT account. Since, Alibaba Cloud’s Model Studio exposes an endpoint that follows OpenAI’s API format, so this method requires an API key generated from Alibaba Cloud, not from OpenAI. For this blog, we’ll stick with the qwen.ai account method. So, select Qwen OAuth from the options below:
It will open your browser for authentication.
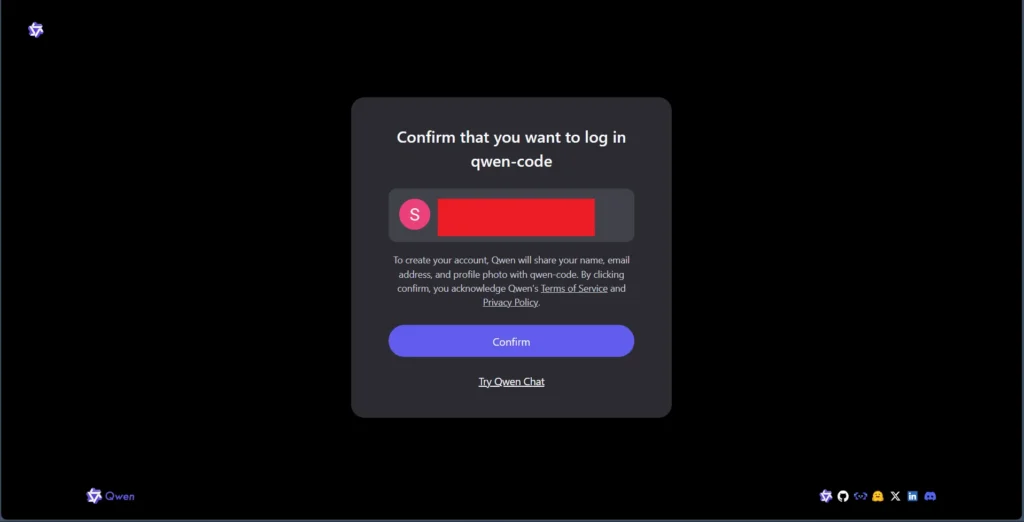
Confirm the login, then return to your command prompt. You’re now authenticated.

Before using it, let’s connect it to our MCP server.
Step 3: Connecting Qwen Code with MCP Tools
Qwen Code uses the mcpServers configuration in its settings.json file to locate and connect to MCP servers. There are two methods to configure them—both produce the same result, so use whichever you prefer.
i. Through MCP Add commands
First, exit the CLI, then run:
qwen mcp add --transport http netsuite https://tstdrv123456.suitetalk.api.netsuite.com/services/mcp/v1/all --header "Authorization: Bearer your-api-token"Here’s what you’ll see after running the command:

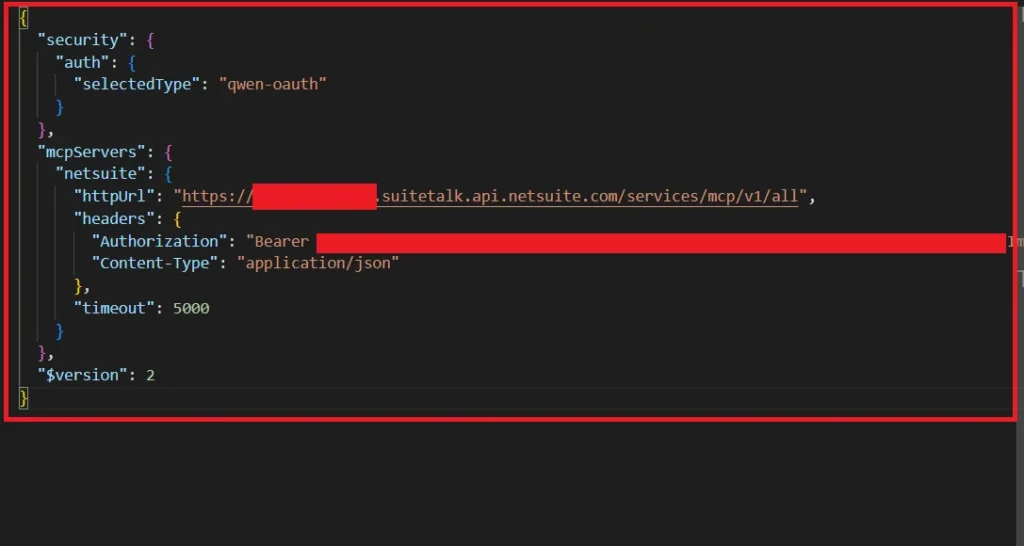
ii. Through settings.json
You can configure MCP servers by editing the settings.json file directly. For user-level configuration, this file is located at C:\Users\<your_username>\.qwen\settings.json on Windows, or ~/.qwen/settings.json on macOS/Linux. For project-level configuration, create or find a .qwen/settings.json file in your project root.
Add an mcpServers object with the following structure:
{ ...file contains other config objects
  "mcpServers": {
    "serverName": {
      "command": "path/to/server",
      "...other args"
    }
  }
}
A note on configuration scopes:
Qwen Code offers two scopes for MCP servers:
-
- Project-level (default) creates a
.qwen/settings.jsonfile in your project root. The server is only accessible within that project, and themcp addcommand we used earlier adds servers at this scope by default. - User-level adds the server to your user-level
settings.json, making it accessible across all projects on your system.
To specify the scope when using the mcp add command, use the -s flag (e.g., -s user or -s project). The same applies when removing a server—if you added it globally, you’ll need the scope flag to remove it:
qwen mcp remove --scope user netsuite
Once configured, save the file and relaunch the Qwen Code. It will auto-authenticate with your MCP server. Run the /mcp command to confirm that your servers are connected, you should see all available tools listed.
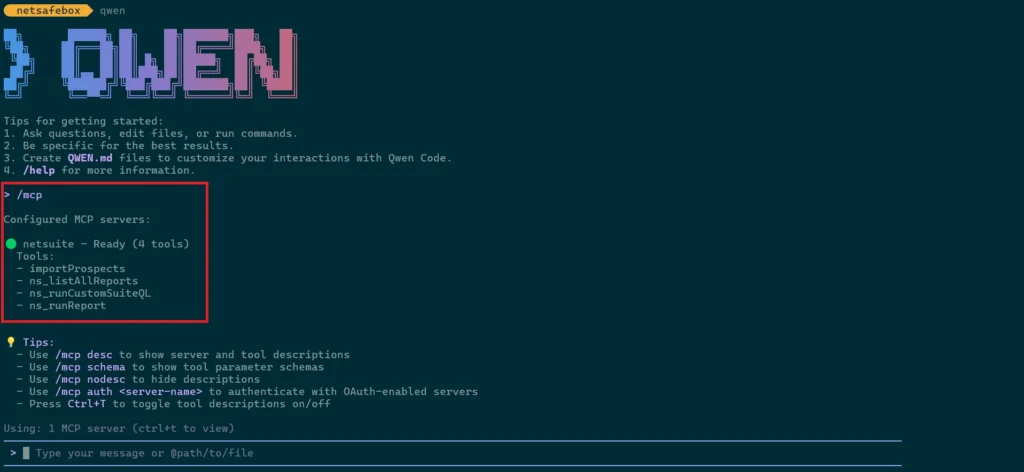
Step 4: Using MCP in Qwen Code
You can use the same prompt variation we used in the previous sections, or try your own. I’ll stick with the same one I used give me 5 inv items from netsuite.

You need to permit it if you’re running it for the first time. Once permitted, it will fetch your inventory items.
You can find more information about it in the official Qwen Code docs here.
Gemini CLI
Prerequisites
-
- Google account (A personal Google account is recommended. You can use a Workspace account, but it requires setting up a Google Cloud Project (GCP project) as well)
Step 1: Install Gemini
We will install Gemini CLI using npm.
- Open Command Prompt.
- Use this command to install Gemini CLI.
npm install -g @google/gemini-cli

This will install Gemini CLI on your system. Now navigate to your project to start using it.
Step 2: Set up Gemini CLI
Now run gemini to launch the CLI. If you’re not authenticated, you’ll see three login options:
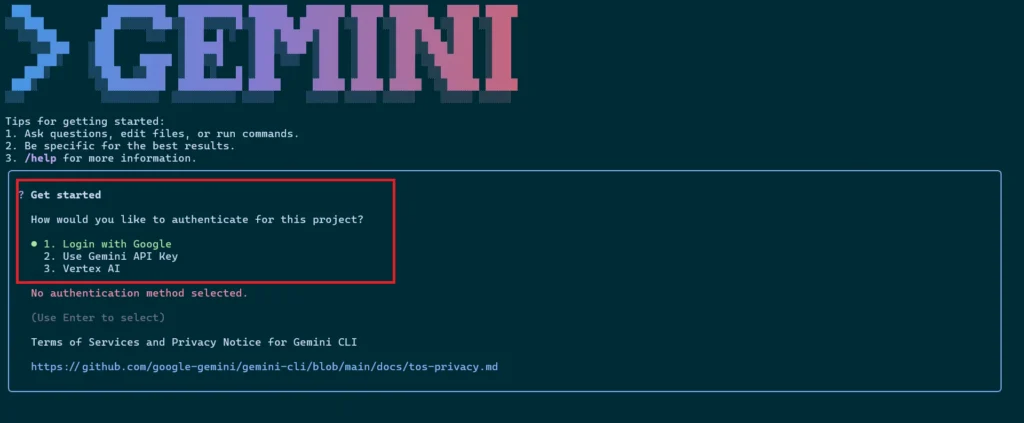
-
- Google Login: Opens a browser prompt to log in with your Google account. If you have a Workspace account, you’ll need a GCP (Google Cloud Platform) project with Gemini enabled. Individual users can use this directly.
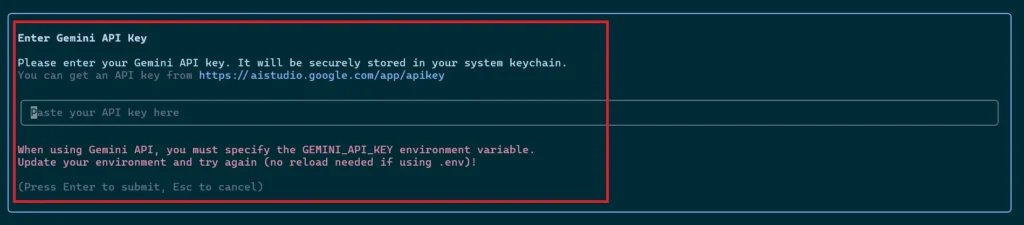
- Gemini API Key: Generate one from Google AI Studio, then enter it when prompted.
- Vertex AI: Same requirements as option 1, requires a GCP project with Gemini enabled.

For this blog, we’ll use the first option. For more details, see Gemini CLI Authentication Setup.
Step 3: Connecting Gemini CLI with MCP Tools
Gemini CLI uses the mcpServers configuration in its settings.json file to locate and connect to MCP servers. There are two methods to configure them—both produce the same result, so use whichever you prefer.
i. Through MCP Add Commands
First, exit the CLI, then run:
gemini mcp add --transport http netsuite https://tstdrv123456.suitetalk.api.netsuite.com/services/mcp/v1/all --header "Authorization: Bearer your-api-to
ken"
Here’s what you’ll see after running the command:

ii. Through settings.json
You can configure MCP servers by editing the settings.json file directly. For user-level configuration, this file is located at C:\Users\<your_username>\.gemini\settings.json on Windows, or ~/.gemini/settings.json on macOS/Linux. For project-level configuration, create or find a .gemini/settings.json file in your project root.
Add an mcpServers object with the following structure:
{ ...file contains other config objects
  "mcpServers": {
    "serverName": {
      "url": "path/to/server",
      "headers": "{Your auth header}",
      "...other args"
    }
  }
}

A note on configuration scopes:
Gemini CLI offers two scopes for MCP servers:
-
- User-level is stored in
~/.gemini/settings.json. The server is accessible across all projects. - Project-level is stored in
.gemini/settings.jsonwithin your project root. The server is only accessible within that project. Themcp addcommand adds servers at project-level by default.
To specify the scope when using the mcp add command, use the -s flag (e.g., -s user or -s project). The same applies when removing a server—if you added it globally, you’ll need the scope flag to remove it:
gemini mcp remove netsuite -s user
Once configured, save the file and relaunch the Gemini CLI. It will auto-authenticate with your MCP server. Run the /mcp command to confirm your servers are connected—you should see all available tools listed.

It’s ready for use now.
Step 4: Using MCP in Gemini CLI
Now type any prompt you like. For example, you could ask: Tell me 5 inv items in netsuite
Or just stick with the sample prompt introduced earlier:

And that’s it! You can learn more in the official Gemini CLI docs here.
OpenCode
OpenCode is an open-source AI coding agent available as a TUI, desktop app, or IDE extension. It connects to 75+ LLM providers through Models.dev, including subscription-based options (Claude Pro/Max, ChatGPT Plus/Pro, GitHub Copilot), API-based providers (Anthropic, OpenAI, Gemini, Groq, etc.), and free/local models via Ollama or LM Studio. OpenCode also offers Zen—a curated gateway with pay-as-you-go pricing for models optimized for coding tasks. It supports any OpenAI-compatible endpoint, so you can plug in custom providers or route through a unified gateway like the Claude Code Router (CCR) pattern. This flexibility makes it ideal for teams who want model choice without vendor lock-in.
Prerequisites
-
- API Keys for the LLM providers you want to use
- A modern terminal emulator
Step 1: Install OpenCode
We will install OpenCode using npm.
- Open Command Prompt.
- Use this command to install OpenCode.
npm install -g opencode-ai

This installs OpenCode on your system. Now navigate to your project to start using it.
Step 2: Set up OpenCode
Now run opencode to launch the TUI. It will select a free model by default.
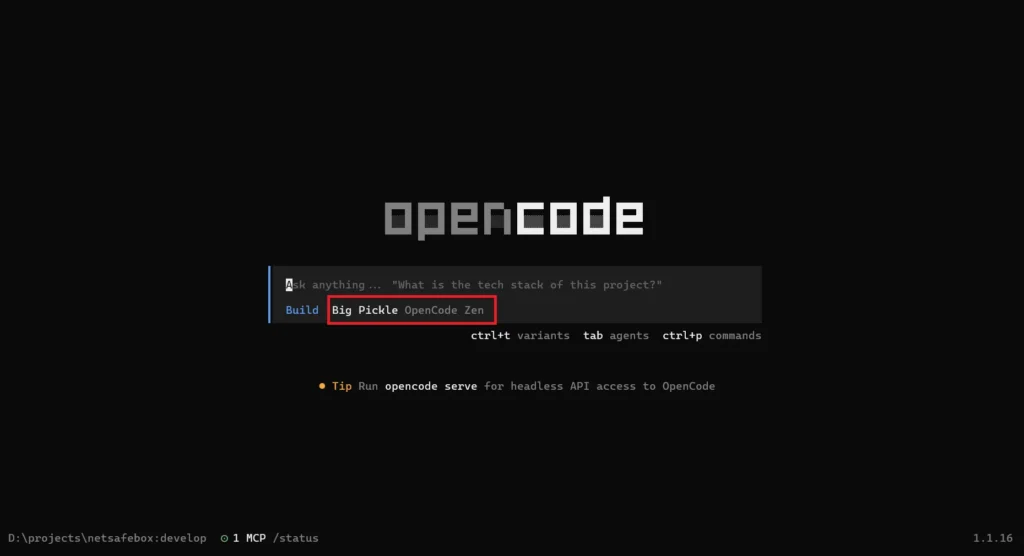
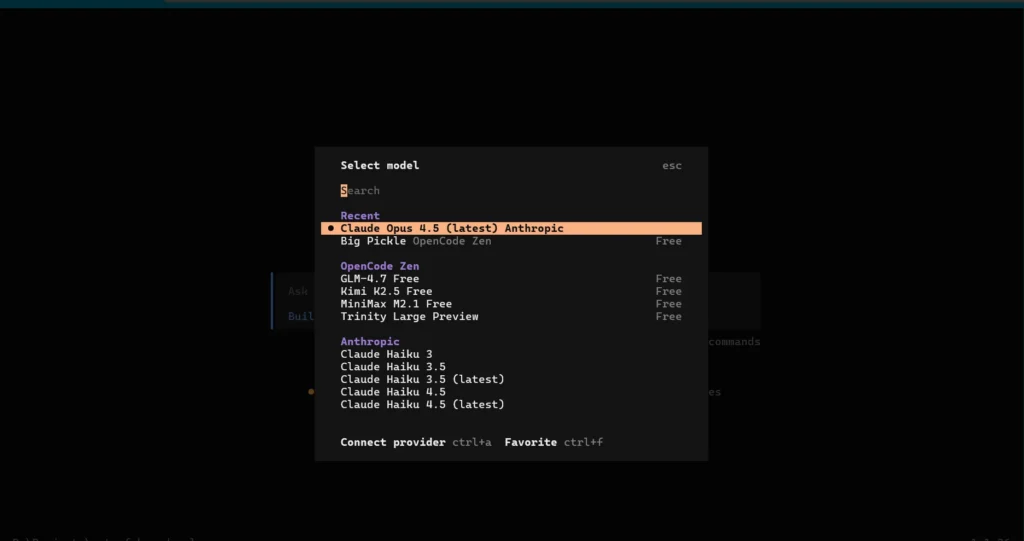
To choose a different model, run /models in the TUI. Select any model and follow its authentication process. I’ll be using Claude Opus 4.5.
Step 3: Connecting OpenCode with MCP Tools
OpenCode uses the mcp configuration in the config file to locate and connect to MCP servers. The file supports both JSON and JSONC (JSON with Comments) formats and can be placed in multiple locations, each serving a different purpose:
-
- Project config:
opencode.jsonin your project root—project-specific settings - Global config:
~/.config/opencode/opencode.json—user preferences across all projects - Remote config: Fetched from
.well-known/opencode—organizational defaults - Custom config: Set via
OPENCODE_CONFIGenvironment variable—custom overrides
Settings merge in order of precedence; later sources override earlier ones. Project config has the highest priority, followed by custom config, then global, then remote. For more details, see the official OpenCode config documentation.
I’ve created a config file in my project root. In your opencode.json, add an object for your MCP server under mcp:
{
  "$schema": "https://opencode.ai/config.json"
  "mcp": {
    "serverName": {
      "type": "remote",
      "url": "path/to/server",
      "enabled": true,
      "headers": "{Your auth header}",
      …other args
    }
  }
}

After saving the file, restart the CLI. OpenCode will automatically connect to your MCP server. Verify by running /mcp—it should show something like this:
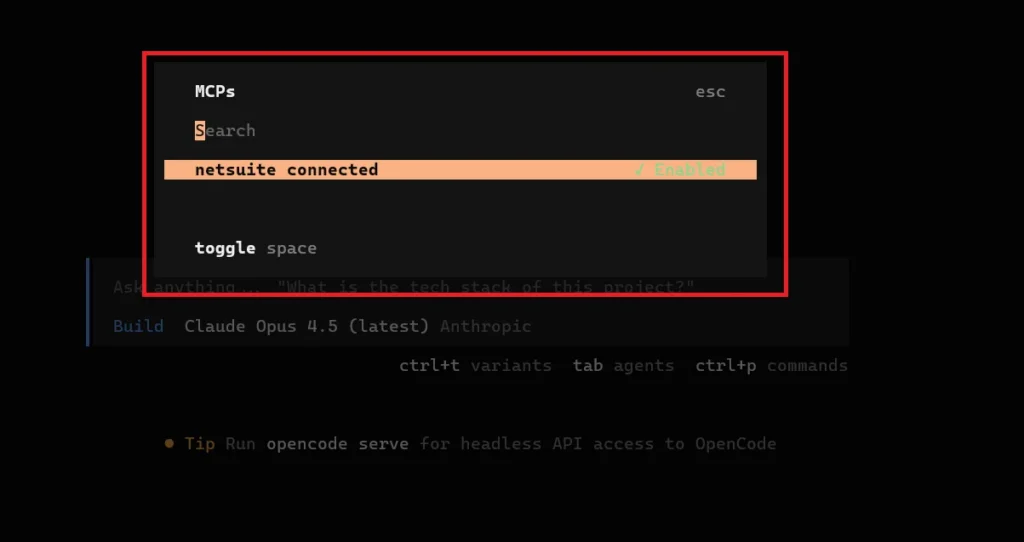
It’s ready for use. You can enable or disable this MCP server using the spacebar.
Step 4: Using MCP in OpenCode
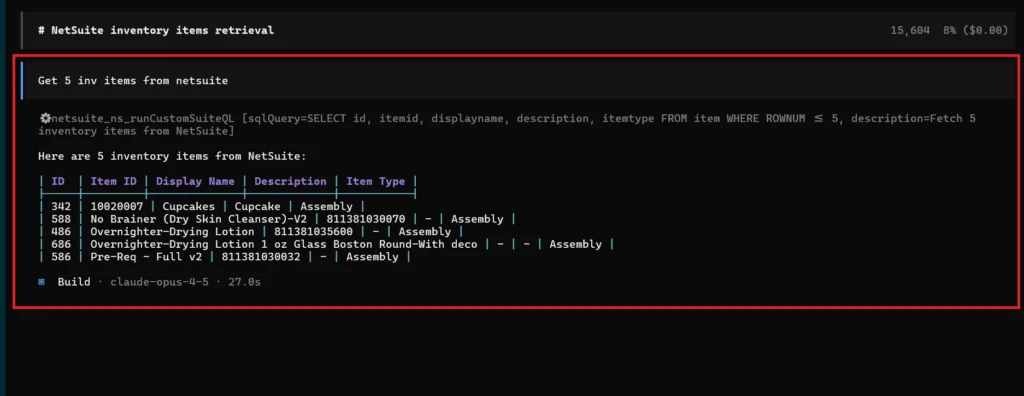
Type any prompt you want. You can repeat the sample prompt from above or enter your own: Get 5 inv items from netsuite
For more details, see the official OpenCode documentation.
Troubleshooting: OAuth Authentication Challenges in CLI Tools
The primary issue we encountered during integration was the inability to authenticate directly through the CLI tools built-in login options, despite each tool offering an OAuth authentication flow.
The root cause lies in how CLI tools handle OAuth 2.0 Dynamic Client Registration (DCR). To understand it, let’s first see how the DCR flow works. The client first makes a discovery call using the /.well-known/oauth-authorization-server endpoint. The response includes the registration_endpoint if the server supports DCR. After that, it sends a POST request to the registration endpoint, which returns a client_id, which is then used for the normal OAuth authorization code flow.
Update: NetSuite now supports Dynamic Client Registration (DCR), where a client_id is returned dynamically against the provided redirect_uris. However, an Integration Record still needs to be created and configured beforehand. DCR simplifies the flow after the record exists, but it is not a fully zero-setup process yet.
For NetSuite, we did some troubleshooting to understand the problem. First, we made a call to the well-known URL. Here is the response:
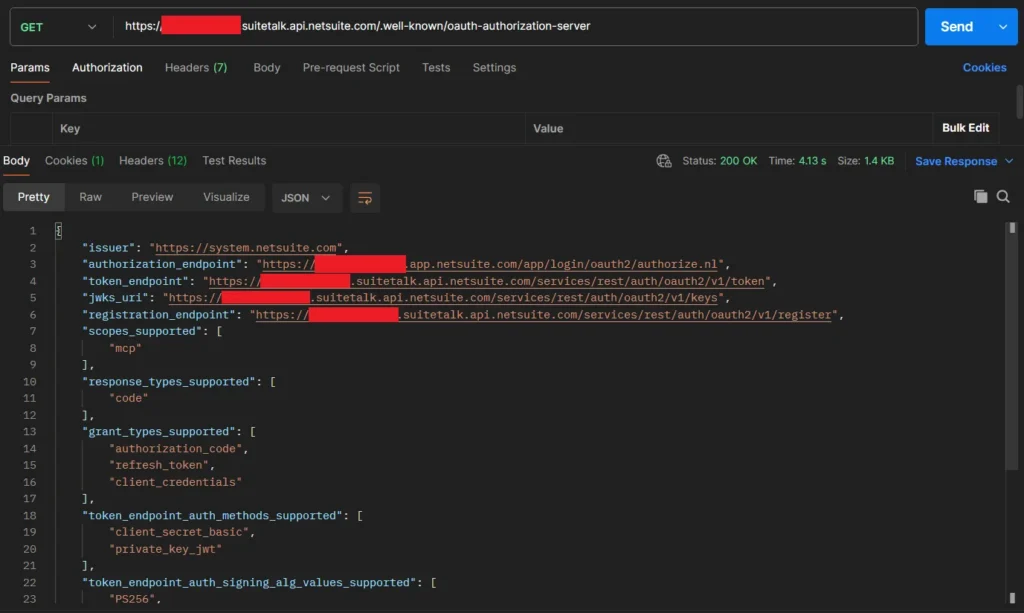
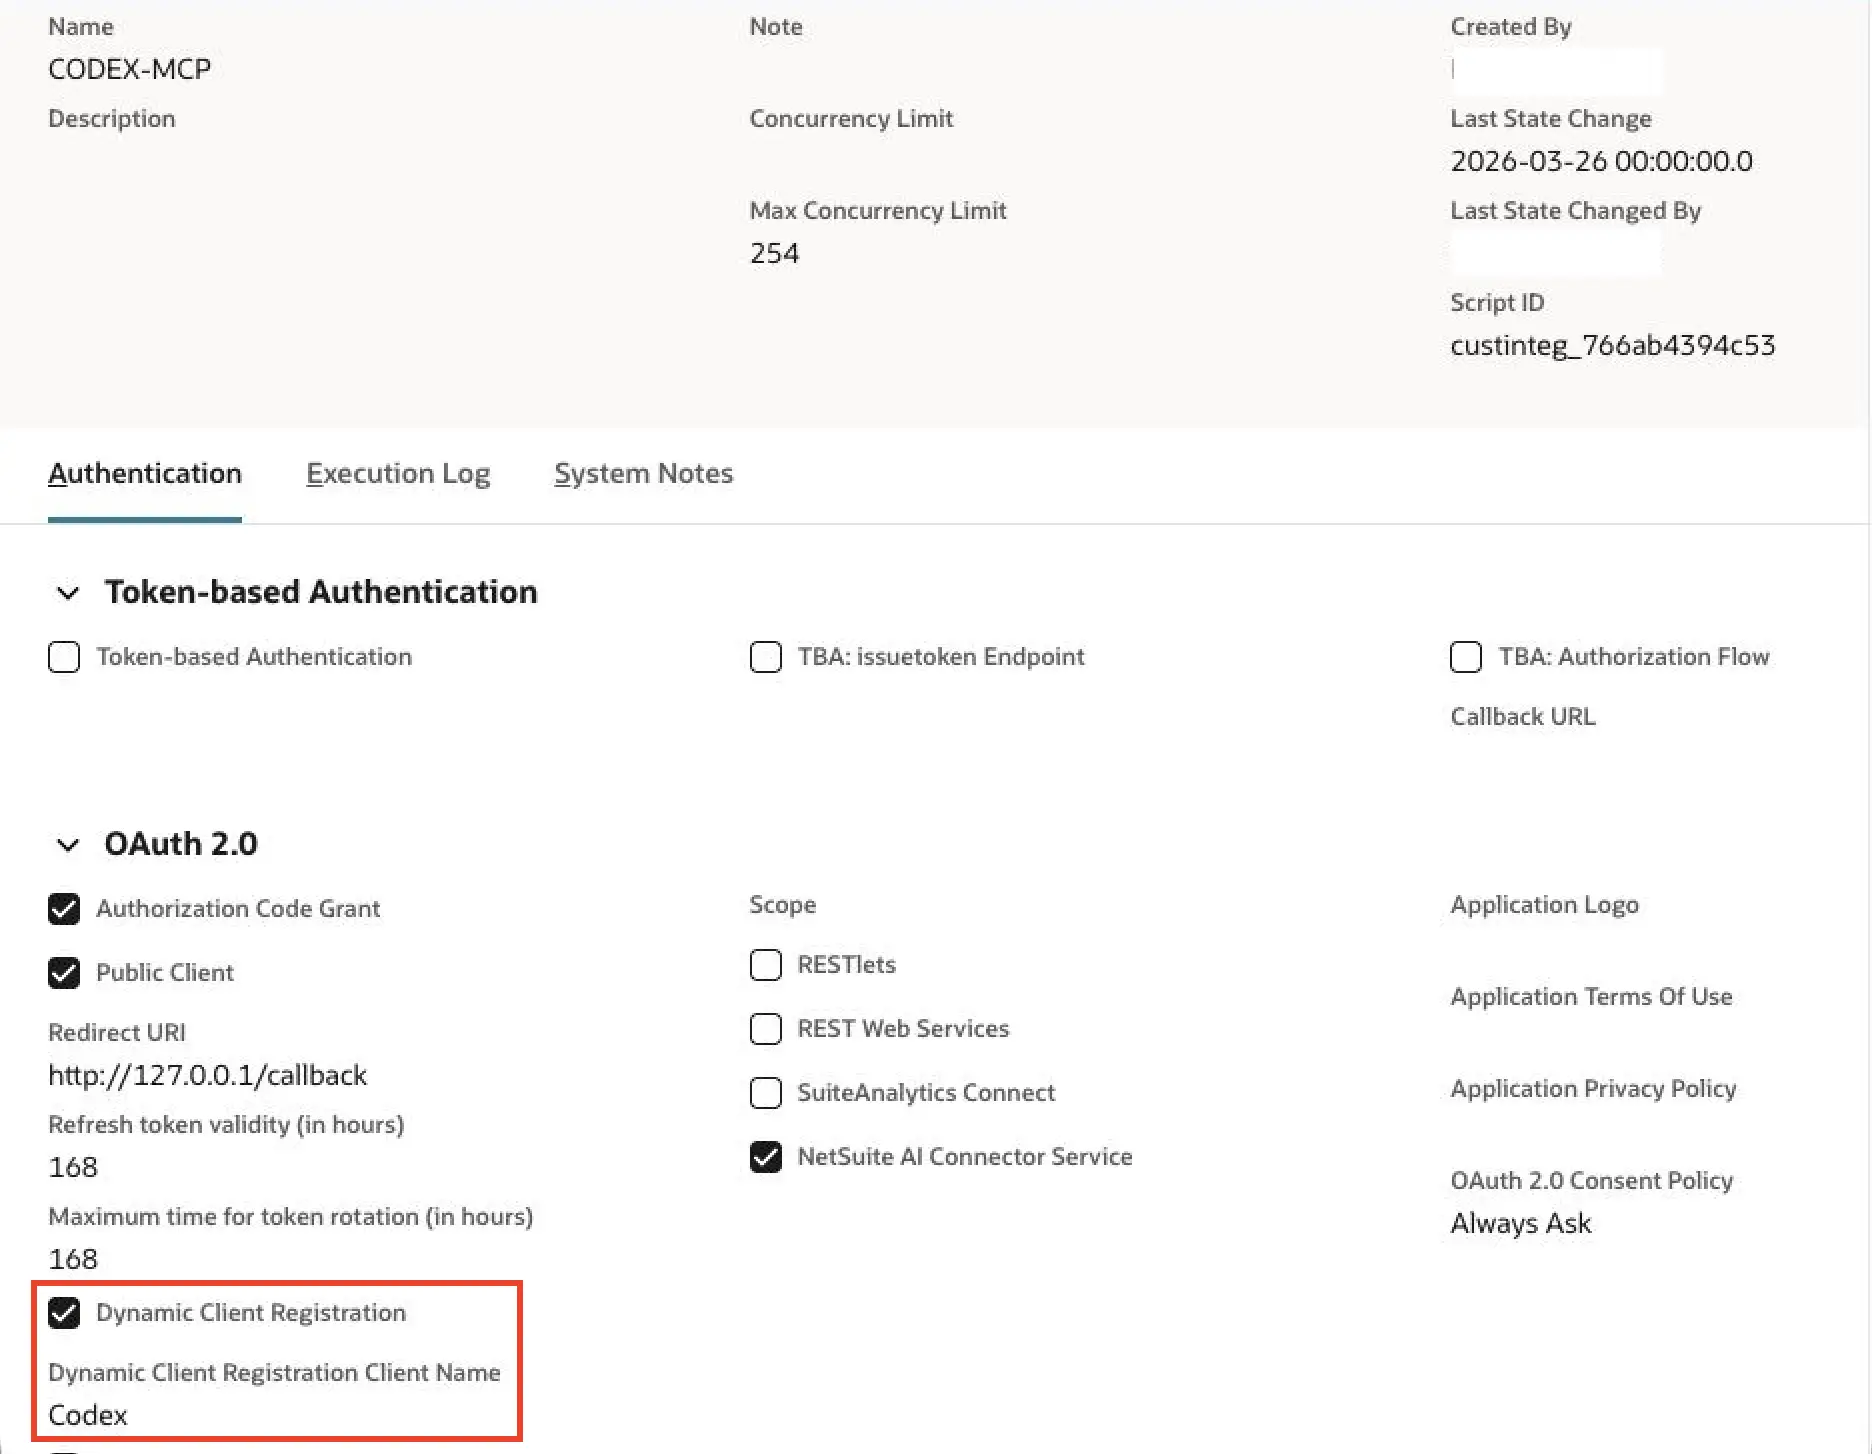
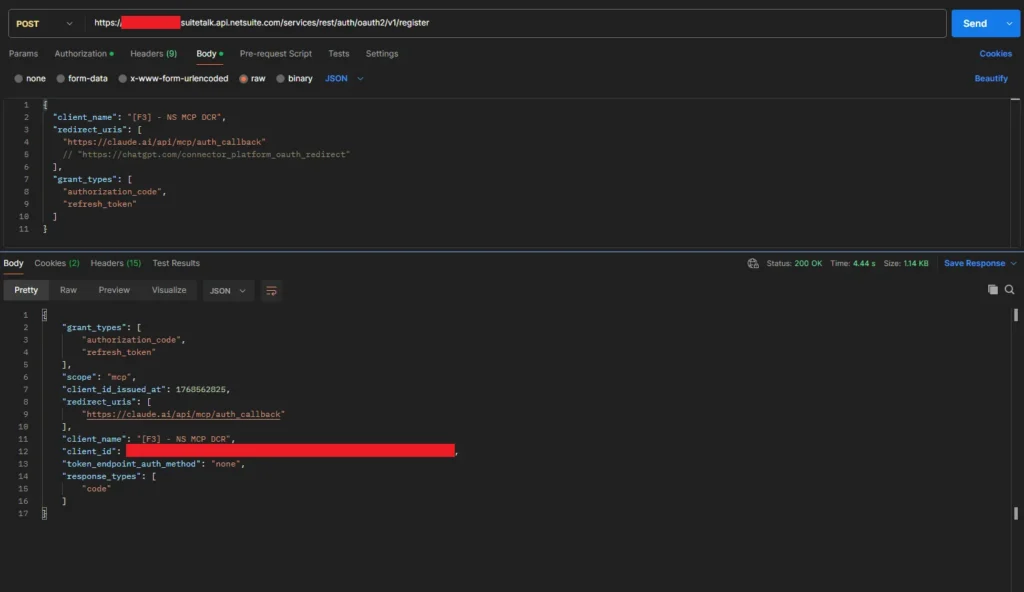
NetSuite returns a registration_endpoint, indicating that it supports DCR. Next, we tried the registration URL, which creates an Integration Record in NetSuite. Here’s how the API call looks:
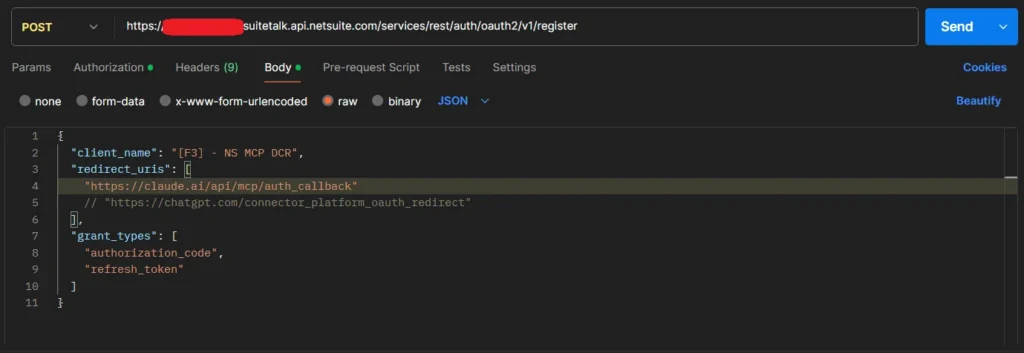
This works fine with ChatGPT or Claude redirect URLs (like https://claude.ai/api/mcp/auth_callback), but for any others—including CLI tools like Claude Code that use http://localhost:{port}/callback—it returns an access denied error.
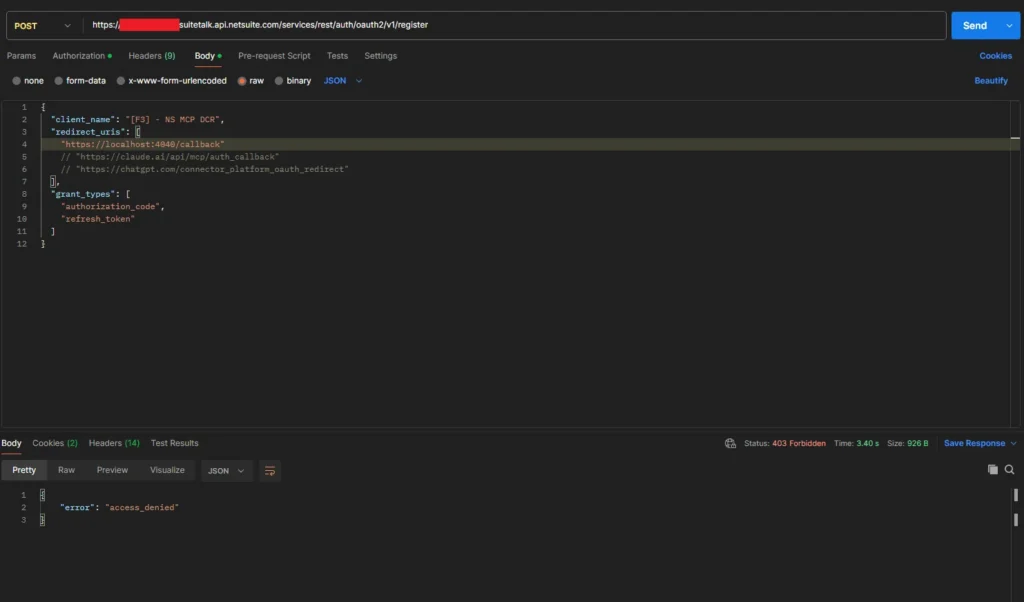
The most likely issue is that, for registration requests coming through these URLs, NetSuite currently supports only Claude or ChatGPT web-based applications. Other tools such as CLI tools, Gemini, or similar clients are not supported by NetSuite at this point. We can create a custom integration record manually. However, this would require providing the client_id to CLI tools by editing their code, which is not a recommended approach.
As a result, we must bypass the built-in OAuth flow and provide a pre-generated authentication token manually in the MCP configuration (not ideal long-term, but a valid short-term workaround). This token can be obtained using tools like Postman, as discussed earlier.
FAQ: Why does the MCP setup differ across CLI clients?
MCP is a common protocol, but MCP clients vary in how fully they support authentication flows (PKCE vs token-based), transports (Remote HTTP vs STDIO), and configuration formats.
Because of this, the most reliable setup depends on the client’s current capabilities, not just the MCP server.
If a client’s Remote + Auth flow is incomplete, using a token-based approach is a practical fallback until full OAuth support becomes more consistent across tools.
Appendix: New CLI + AI Agent Tools (2026 Snapshot)
CLI tools are getting smarter. Developers are moving beyond static commands to dynamic, AI-powered workflows. Here are some tools worth watching:
- Superset is a multi-agent orchestration tool for your machine, enabling dozens of AI coding agents to work in parallel without merge conflicts.
- Claude Run provides a visual command history layer that brings memory and context to every CLI session.
- Claude Code Tools offers productivity extensions that turn AI coding agents into self-organizing development assistants.
- Claude Agent Teams enable multiple agents to work in parallel across independent tasks and terminals, making them ideal for long-running research, infrastructure setup, and multi-track development workflows.
- Toktop delivers real-time terminal dashboards for monitoring model usage, tokens, and cost efficiency.
- VibeKanban enables collaborative, visual task management for multi-agent code review and execution.
- SkillsMP is a living catalog of tens of thousands of AI agents, offering plug-and-play skills for every development stack.
- Claude Code Router provides smart routing between models and APIs, transforming the CLI into a true multi-model control plane.
Conclusion
CLI-based agentic coding tools like Claude Code and Codex CLI represent the future of AI-assisted development. They bring intelligent automation directly into the terminal where developers work.
While connecting NetSuite MCP Tools to these CLI environments currently requires workarounds due to OAuth authentication limitations, the benefits are clear. Working directly in your terminal eliminates context switching. You get real-time ERP access to query NetSuite schemas while writing SuiteScript, and you can debug and deploy integrations in a single conversational flow. As OAuth compatibility improves, seamless NetSuite MCP integration will become standard across CLI environments.
Related Reads:
Before exploring advanced custom AI integrations, ensure you’ve completed the essential setup steps covered in our previous guides:
Getting Started
-
- A Complete Setup Guide for NetSuite AI Connector
-
- A Setup Guide for NetSuite AI Connector with Postman: API Integration Tutorial
- Getting Started with NetSuite SuiteTalk REST API in Postman
- NetSuite MCP OAuth 2.0 Token Generator Tool
- SuiteScript Essentials: A Developer’s Getting Started Guide
MCP + Client Integrations
-
- IDE Integration Guide for NetSuite MCP Tools in Cursor & VS Code
-
- Connecting MCP with ChatGPT: A Complete Guide
- Connecting MCP Tools with Qwen
- Connecting ChatGPT Business with NetSuite via MCP: The Future of Enterprise AI Integration
Advanced & Architecture
-
- A Development Guide to Build Custom Tools for NetSuite AI Connector
-
- Dual API Integration: Using NetSuite MCP Tools with OpenAI and Anthropic
- NetSuite MCP Challenge: Implementation Case Study & Results
- MCP Input Formats Compared: Token Usage Analysis for NetSuite MCP Tools
Together, these resources form a solid foundation so you can integrate AI with NetSuite smoothly and without any issue.