Key Takeaways
- Stripe fees should be recorded separately from customer payments and payouts.
- A structured Stripe NetSuite mapping workflow improves reconciliation and financial reporting.
- Automating Stripe fee mapping reduces manual work and posting errors.
- Testing mappings before deployment helps prevent reconciliation issues.
- The right integration setup keeps Stripe and NetSuite data synchronized.
Why Stripe Fee Mapping Is More Than Just an Accounting Task?
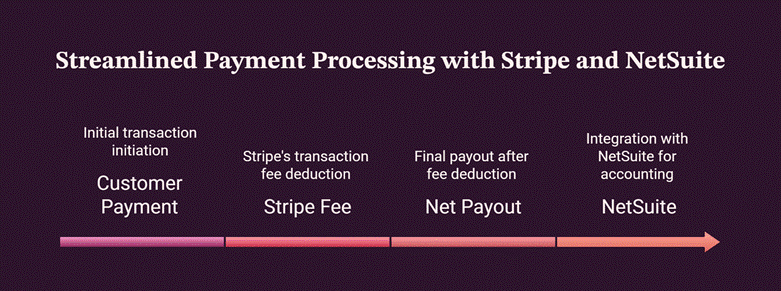
Accepting payments through Stripe is easy. Recording those payments correctly in NetSuite is where many businesses run into problems.
When Stripe processes a payment, it deducts processing fees before sending the remaining balance to your bank account.
If you only record the final payout, your revenue, expenses, and bank deposits won’t match, making month-end reconciliation much harder than it needs to be.
That’s the core challenge of Stripe fee mapping. The goal isn’t simply importing transactions into NetSuite; it’s making sure every dollar is categorized correctly so your financial reports remain accurate and your finance team spends less time investigating differences.
Fortunately, once you understand how the payment flow works, the mapping process becomes much easier.
Understanding How Stripe Fee Mapping Works
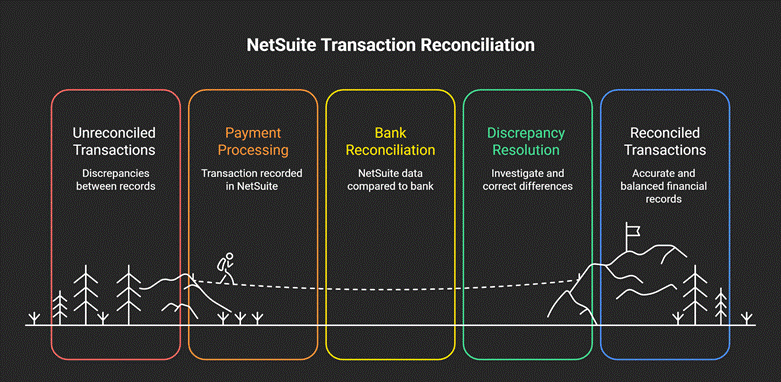
Before configuring any integration, it’s important to understand how Stripe moves money.
Every successful Stripe NetSuite mapping follows the same basic process, regardless of the integration method you choose.
Step 1. Record the Customer Payment
Start by recording the customer’s full payment amount. This represents your actual sales revenue before any processing fees are deducted.
Step 2. Separate the Stripe Processing Fee
Instead of reducing the payment amount, record the Stripe fee as a separate expense. This gives you a clearer picture of both revenue and payment processing costs.
Step 3. Record the Net Payout
Stripe transfers the remaining balance to your bank account after deducting its fees. This amount should match the bank deposit recorded in NetSuite.
Step 4. Reconcile the Transactions
Finally, reconcile the customer payment, Stripe fee, and bank payout to confirm everything balances correctly.
You can also use NetSuite Accounting software to make the whole process seamless.
Step-by-Step: How to Map Stripe Fees to NetSuite
Once you understand how Stripe processes payments, the next step is configuring how those transactions should appear in NetSuite. Following a structured process makes reconciliation easier and reduces the chances of reporting errors later.
Step 1. Create Dedicated General Ledger Accounts
Avoid posting every Stripe transaction into a single account. Instead, create separate General Ledger (GL) accounts for each transaction type.
- Customer Payments – Sales Revenue
- Stripe Processing Fees – Payment Processing Fees
- Stripe Payouts – Clearing Account
- Refunds – Refund Expense
- Chargebacks – Chargeback Expense
This structure makes it much easier to review financial statements and identify where every transaction belongs.
Step 2. Build Your Stripe NetSuite Mappings
Now define exactly how Stripe fields should map into NetSuite. Every payment event should have a matching destination inside your ERP. Keeping mappings consistent ensures reports remain accurate even as transaction volumes increase.
Step 3. Record Fees Separately From Revenue
One of the biggest mistakes businesses make is recording only the final payout.
Instead, record:
- Gross customer payment
- Stripe processing fee
- Net bank payout
Separating these transactions gives finance teams a true picture of both revenue and payment processing costs while simplifying month-end reconciliation.
Step 4. Use a Clearing Account for Payouts
A clearing account acts as a temporary holding account between Stripe and your bank.
Instead of posting deposits directly into your operating account, Stripe payouts first enter the clearing account before being matched against bank deposits.
This makes reconciliation significantly easier, especially for businesses processing hundreds or thousands of daily transactions.
Step 5. Test With Sample Transactions
Before processing live payments, test different payment scenarios.
Include transactions such as:
- Standard payments
- Partial refunds
- Full refunds
- Failed payments
- Chargebacks
- Multiple payouts in one day
Testing helps verify that every mapping behaves as expected before affecting live financial records.
Should You Automate Stripe Fee Mapping?
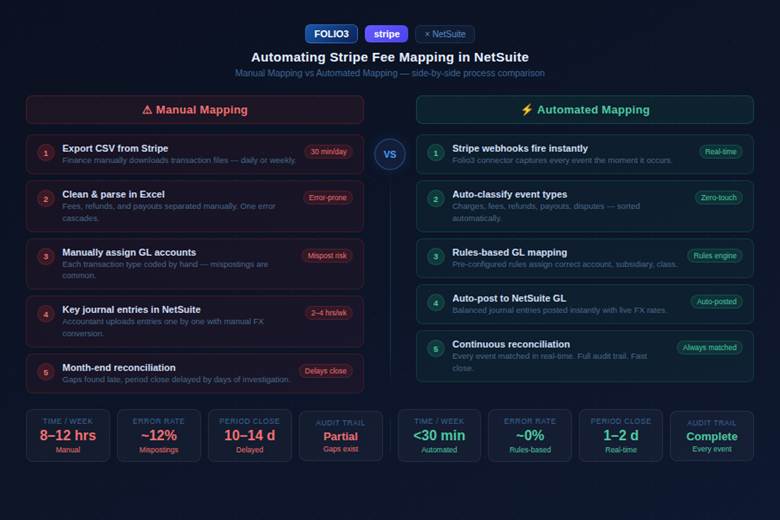
For businesses processing only a handful of Stripe transactions each week, manual reconciliation may still be manageable.
As payment volumes grow, however, manual entry becomes one of the biggest sources of accounting errors.
That’s why many organizations choose to automate Stripe fee mapping instead of maintaining spreadsheets or manually creating journal entries.
Manual Mapping vs Automated Mapping
| Manual Process | Automated Process |
| Manual journal entries | Automatic transaction posting |
| Spreadsheet reconciliation | Real-time synchronization |
| Higher risk of human error | Consistent fee categorization |
| Time-consuming month-end close | Faster reconciliation |
Automation also makes it easier to manage high transaction volumes across different industries. For example:
- Retail businesses handling thousands of online orders benefit from faster payment reconciliation.
- Apparel and Footwear brands processing seasonal sales can automatically categorize transaction fees without increasing manual work.
- Wholesale distributors receive more accurate reporting when customer payments and processing fees are recorded consistently.
- Growing startups avoid building manual accounting processes that become difficult to scale later.
- Small businesses can spend less time on bookkeeping and more time serving customers.
On that note, you can visit the Folio3 industries page to explore how NetSuite’s automation benefits apply to your particular business.
Needless to say, as your payment volume increases, automation doesn’t just save time. It also improves reporting accuracy and helps finance teams focus on higher-value work.
Most reconciliation problems don’t come from Stripe or NetSuite themselves. They come from incomplete mapping rules or inconsistent accounting processes.
Spending a little extra time configuring your Stripe NetSuite mapping workflow correctly can save hours of troubleshooting later and produce far more reliable financial reports.
A Quick Checklist Before You Start Mapping Stripe Fees
- Create separate GL accounts for Stripe fees, payouts, refunds, and chargebacks.
- Decide how customer payments will be recorded in NetSuite.
- Verify that your Chart of Accounts supports payment processing expenses.
- Map Stripe transaction types to the correct NetSuite records.
- Configure a clearing account for Stripe payouts.
- Test payments, refunds, disputes, and failed transactions.
- Validate reports before processing live payments.
- Schedule regular reconciliation between Stripe, NetSuite, and your bank.
Following this checklist helps ensure your financial records remain accurate as transaction volumes grow.
You can also check out different types of balance transactions that represent funds moving through your Stripe account.
When Should You Customize Your Stripe-NetSuite Integration?
You should consider customization if you:
- Process payments across multiple Stripe accounts.
- Operate multiple subsidiaries or legal entities.
- Need custom revenue recognition workflows.
- Sell through several ecommerce channels.
- Require department or location-based fee allocation.
- Need approval workflows before posting financial transactions.
For businesses with more complex operations, custom workflows ensure Stripe transactions follow internal accounting policies instead of requiring manual adjustments after every payout.
Why Folio3?
Whether you’re processing a few online payments each day or thousands across multiple sales channels, Folio3 helps you build Stripe NetSuite integration that are accurate, scalable, and easy to maintain.
From NetSuite integration services and custom workflows to financial automation and ongoing support, our team helps you streamline payment processing while keeping your accounting records reliable.
Final Thoughts
Learning how to map Stripe fees to NetSuite isn’t just about connecting two systems. It’s about creating an accounting process that accurately reflects every payment, fee, refund, and payout without adding unnecessary manual work.
It’s a common pitfall: businesses often focus on getting the integration running as quickly as possible and overlook the mapping strategy behind it.
Taking the time to define your Stripe NetSuite mappings, automate repetitive tasks, and test every transaction type will lead to cleaner financial reports, faster reconciliation, and fewer accounting surprises as your business grows.
Frequently Asked Questions
Can I map Stripe fees differently for different business entities?
Yes. If you operate multiple subsidiaries or legal entities, NetSuite allows you to configure different accounting treatments and mappings based on your organizational structure.
Do Stripe currency conversion fees need separate mapping in NetSuite?
Yes. Currency conversion fees should typically be recorded separately from standard processing fees to provide more accurate expense reporting and simplify multi-currency reconciliation.
Can historical Stripe transactions be imported into NetSuite after the integration is live?
Yes. Historical transactions can be imported using data migration or integration tools, provided the records are mapped correctly to avoid duplicate entries and reconciliation issues.
Can I map Stripe fees to different expense accounts in NetSuite?
Yes. NetSuite lets you assign different expense accounts based on fee types, payment methods, business entities, or transaction categories, giving you more detailed financial reporting.
How often should Stripe payouts be reconciled in NetSuite?
It’s best to reconcile Stripe payouts daily or whenever a payout is received. Regular reconciliation helps identify missing transactions, mapping errors, or discrepancies before they affect month-end reporting.