Customer support is a competitive advantage or a liability and there is no middle ground. When a customer has an issue, they are frustrated. Their experience over the next few hours determines whether they stay loyal or switch to a competitor.
Yet most support teams operate with fragmented tools: cases tracked in email, notes scattered across spreadsheets, history buried in old messages. No agent has a complete picture of what the customer has tried, what was promised, or why the issue occurred. Each handoff means repeating information. Each repeat damages trust.
NetSuite Case Management solves this by centralizing all customer support in one place. Every interaction is documented. Every case is tracked. Every resolution is recorded. The result: faster resolution times, higher first-contact resolution rates, and customers who feel heard.
This guide covers what NetSuite Case Management is, why it matters, how to set it up, and how to configure it for your business.
Key Takeaways
- Peak Support’s 2024 research shows top companies respond to customer tickets within 120 seconds.
- Only 5% of call centers achieve the 80% FCR standard, but centralized case management significantly improves this metric.
- Companies with well-implemented SLAs report 35% improvement in service delivery consistency and 28% fewer customer complaints.
- Instead of fragmented notes across emails and spreadsheets, all case history, communications, and resolution steps live in one record.
- Assignments based on skill, workload, and expertise ensure customers reach the right agent faster.
What Is NetSuite Case Management
Case Management in NetSuite is a system for organizing, tracking, and resolving customer inquiries and issues. Cases can be created from multiple channels—email, phone, web forms, or the customer portal—and unified in a single system.
Core Components
- Reporting: Dashboard visibility into case metrics and team performance
- Case Creation: Customer issues logged as cases with unique identifiers and categorization
- Case Types: Distinguish between questions, problems, and concerns (or custom types)
- Case Territories: Route cases to the right support team based on predefined rules
- Case Forms: Customizable intake forms for customers and support agents
- Case Tracking: Monitor status, add notes, attach files, document all interactions
- Assignment & Escalation: Assign cases based on skill, availability, or priority
- SLA Management: Track response and resolution times, trigger alerts if breaching
Setting Up Case Management in NetSuite
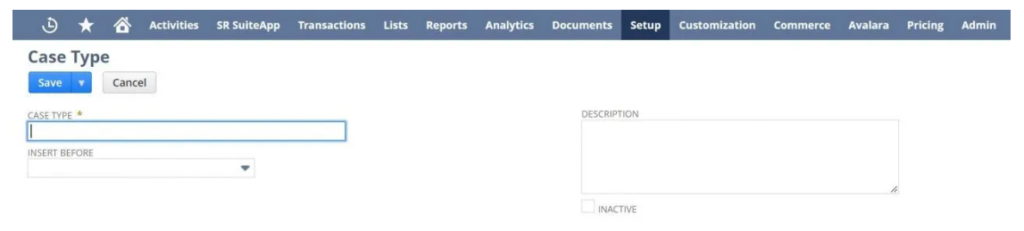
Step 1: Define Case Types
NetSuite provides three default case types: Question, Problem, and Concern. If you need custom types:
- Navigate to Setup > Support > Case Types > New
- Name the type (e.g., ‘Billing Issue,’ ‘Product Defect,’ ‘Feature Request’)
- Decide display order in the dropdown
- Add a description for agent context
- Save and make available on case records
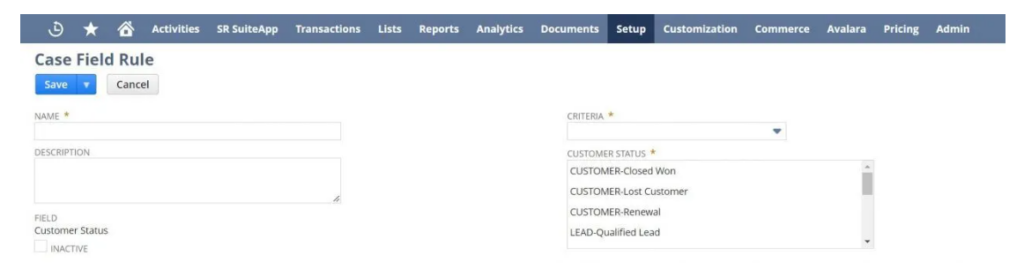
Step 2: Create Case Rules
Case Rules determine how cases are routed. They match criteria (product, region, account type, priority) and assign cases to territories.
- Navigate to Setup > Support > Case Management > Case Rules
- Click New to create a rule
- Define the criterion (e.g., ‘Case Type = Billing Issue’)
- Set conditions for rule application
- Save the rule
Step 3: Set Up Case Territories
Territories group related rules and assign support agents to handle matching cases.
- Navigate to Setup > Support > Case Management > Case Territories
- Click New to create a territory
- Name the territory (e.g., ‘Enterprise Billing Support’)
- Assign the case rules that trigger assignment to this territory
- Decide: Cases must match ALL rules or ANY rule
- In the Support Assignment tab, assign support agents/teams to this territory
- Save the territory

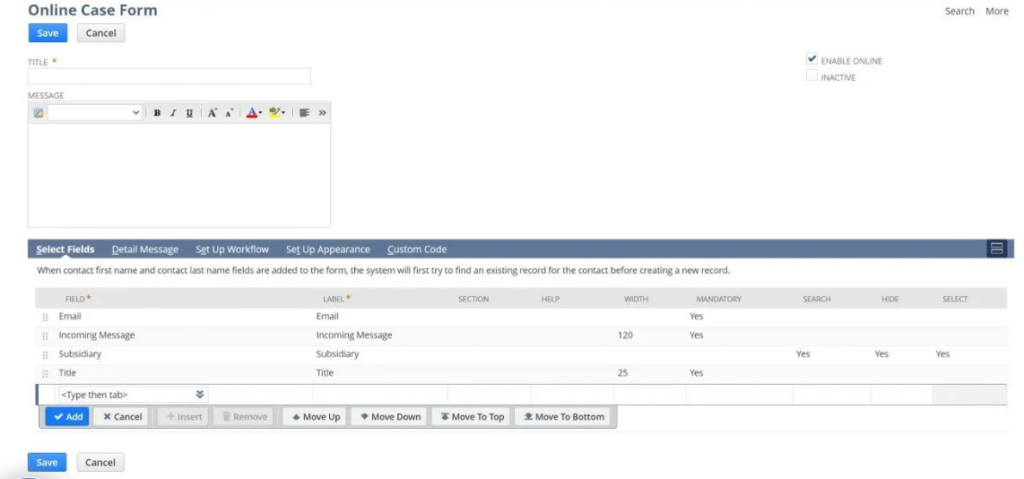
Step 4: Create Case Forms
Case forms are the intake interface for customers and agents. Two types exist:
- Online Case Forms: Public forms customers use to submit cases via your website or customer portal
- Internal Case Forms: Forms agents use to log cases from calls or other channels
To create an online form:
- Navigate to Setup > Support > Case Management > Online Case Forms > New
- Choose Default Form Template or Custom HTML Template
- Customize field labels, descriptions, and required fields
- Test the form before publishing
- Add the form URL to your website or customer portal
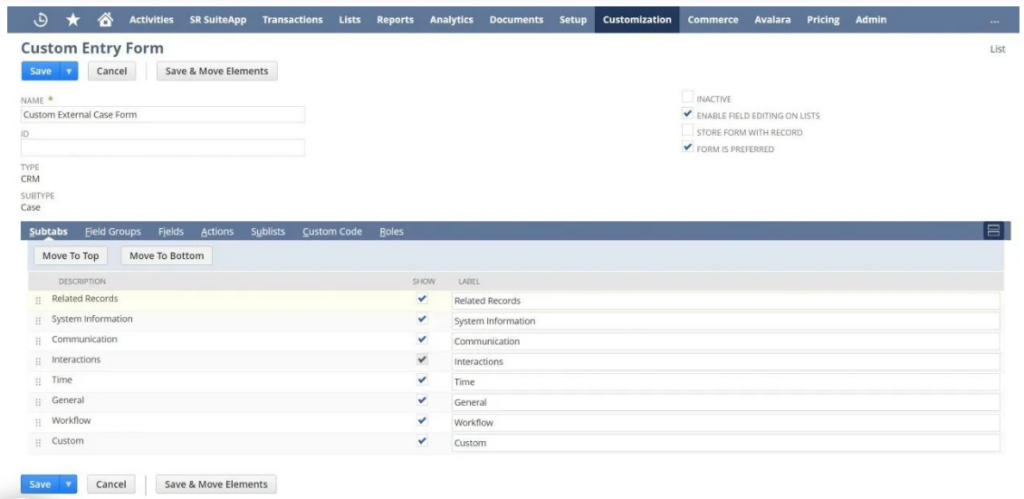
Step 5: Customize Case Forms for Your Team
Tailor the case form that agents use when creating cases from phone calls or internal escalations:
- Navigate to Customization > Forms > Entry Forms
- Click Customize next to ‘Standard Case Form’ (for agents) or ‘Standard External Case Form’ (for customers)
- Hide unnecessary fields
- Reorder fields for logical flow
- Add custom fields specific to your business
- Save and deploy
Best Practices for Case Management Success
1. Define and Monitor SLAs
Service Level Agreements set customer expectations. Document response times and resolution times for different case priorities:
- Priority 1 (Critical): Respond within 15 minutes, resolve within 4 hours
- Priority 2 (High): Respond within 1 hour, resolve within 8 hours
- Priority 3 (Medium): Respond within 4 hours, resolve within 24 hours
- Priority 4 (Low): Respond within 24 hours, resolve within 5 days
Track compliance on the Case Management dashboard. When tickets approach breach time, alerts notify agents to prioritize.
2. Automate Case Routing
Manual case assignment is error-prone and slow. Configure automatic routing based on:
- Case type (billing cases → billing team, technical cases → tech team)
- Customer tier (premium customers → senior support)
- Agent workload (route to agent with fewest open cases)
- Product or region (geographic or product specialists)
3. Create Knowledge Base Articles for Self-Service
Many cases contain repetitive questions. Create a knowledge base in NetSuite so customers can find answers without opening a case. Embed it in your customer portal for easy access.
4. Document Every Interaction
A case without notes is worthless. Require agents to document:
- What the customer reported
- What was tried to resolve it
- What the customer agreed to
- What the next step is
This documentation serves three purposes: (1) if the customer calls back, you have context; (2) if escalation occurs, notes guide the next agent; (3) if dispute occurs, you have proof of the conversation.
5. Measure First Contact Resolution (FCR)
Track what percentage of cases are resolved on first contact without escalation. Industry best practice is 70-80%. If your FCR is low, analyze root causes: missing information on the form? Agents lack training? Escalation delays?
Conclusion
NetSuite Case Management transforms support from a reactive, scattered process into a proactive, organized system. By centralizing cases, automating routing, tracking SLAs, and measuring outcomes, you improve response times, increase first-contact resolution, and build customer loyalty.
The best companies respond within 2 minutes. They resolve 80% of issues on first contact. They maintain 90%+ SLA compliance. None of this happens with email and spreadsheets. It happens with case management systems that give agents the context they need to resolve issues fast.
Start by setting up case types and rules. Then create intake forms. Then measure performance. Within weeks, you will see improvement in resolution times and customer satisfaction.
You can talk to us and discuss how to set things up on your NetSuite dashboard.