Key Takeaways
- One entity can simultaneously hold Customer, Vendor, Contact, and Partner roles. All transaction types for that entity stay under one unified record.
- Three approaches exist, each with different constraints: The UI supports it natively. Client Scripts can trigger the relationship URL directly. Backend scripts require an indirect workaround using task.TaskType.ENTITY_DEDUPLICATION.
- The backend approach works by merging two duplicate records: Create separate Customer and Vendor records with identical details, designate one as the Master, trigger a deduplication task via N/task, then poll for completion before continuing.
- The relationship URL is not accessible from server-side scripts: This is a documented platform constraint. The N/task ENTITY_DEDUPLICATION approach is the only programmatic backend solution that creates the relationship without direct URL access.
- Synchronous polling after the task is submitted is required: The deduplication task runs asynchronously. Any logic that depends on the relationship being established must wait for the task.TaskStatus.COMPLETE before proceeding.
What Is a Multi-Role Entity in NetSuite
In NetSuite, an entity record has a single internal ID but can hold multiple roles simultaneously: Customer, Vendor, Contact, Partner, or any combination. A single company record can appear as a vendor (for procurement) and a customer (for sales) within the same account, all transactions on both sides reference the same internal ID.
This matters for reporting and data integrity. When a customer also sells goods back to you (a trade-in model, for example), keeping that entity under one record means their full transaction history is visible in one place. Split across two records, the relationship is invisible and reporting is incomplete.
The relationship is visible on any entity record in the Relationships section. The plus (+) icon in that section opens an ‘Other Relationships’ modal where additional roles can be assigned.
NetSuite allows a single entity record, as witnessed by its internal ID, to be more than one of these specific types.
It suggests that an entity is holding more than one role in transactional constructs. This frequently comes up in many business models. For instance, in any business that has a Trade-In Business Model where a customer can first sell an item to that business and then, with the proceeds from that sale, buy another item from the same business.
When we have a single entity referencing transactions of different types (such as both revenue and costs), our reporting becomes more powerful.
Entity Relationship in NetSuite Form User Interface
Navigate to any Entity Record I.e. Customer/Vendor
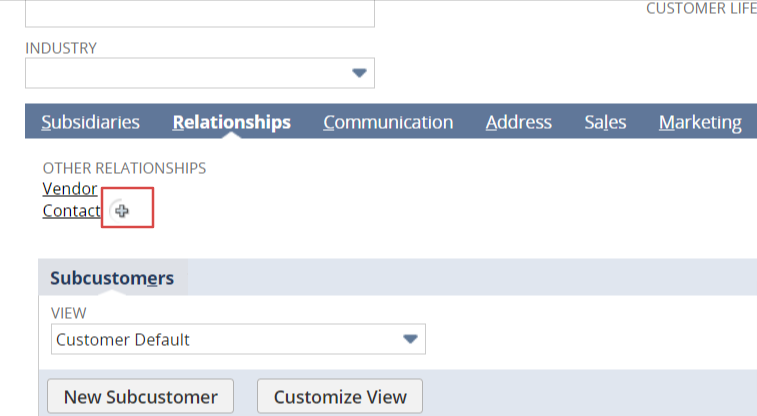
In the provided screenshot, it is evident that the selected Entity Record has two assigned roles: Vendor and Contact. If there is a need to assign additional roles, you can use the plus (+) icon. Upon clicking the plus icon, a modal window titled “Other Relationships” will appear.
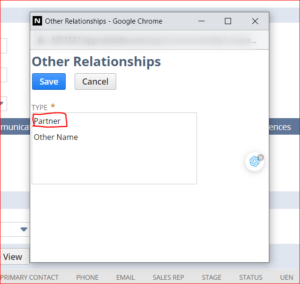
For example, if you wish to add an extra role, such as “Partner,” for the selected entity, you can simply select “Partner” from the options in the modal window and click save. Upon returning to the entity record and inspecting its relationships, you will find that the Partner relationship has been successfully added, as illustrated in the referenced screenshot.

From Client Script:
Basically when we create the relationship on Any Entity it doesn’t make changes/update anything in existing record but make request to Another URL in order to create a Relationship.
For Instance,
In above URL, relationship of customer is being added over vendor entity
However, form backend there was some limitations
Above URL Was accessible with client script but was not accessible from Backend scripts.
From Backend Script:
We Learned about another Way,
Navigate to , List -> Mass Update -> Saved Mass Update
and Set Filter on Entities with Contact
After clicking the “Submit Selected” button at the top-right, it will initiate a task in the backend to add a duplicate relationship on the primary entity and subsequently delete that duplicated relationship.
We have incorporated this approach into our backend script to achieve entity relationships.
For example, if you wish to create an entity record with both roles, such as Customer and Vendor, from background scripts, you need to first create separate Customer and Vendor records with identical details.
From the records created above, you must specify which record will be the Master record. The Master Record will have a relationship added to the other record, and the other one will be deleted during the duplicate merge operation.
In the `linkEntitiesToEachOther` method, we perform the merge of duplicates and create a relationship by triggering a task based on given parameters. This method eventually returns the ID of the task that was just triggered for the purpose of entity relationship and runs in the background.
I pass the task ID to this method and introduce a delay until the relationship is created because I want to ensure that subsequent actions are performed only after the relationship is established.
addSynchronousDelayUnlessRelationshipTaskCreates
I’ve added the snippets that’ll help you understand the definition of function.
const nsVendorInternalId = this.upsertEntity(record.Type.VENDOR, entityObj);
        const nsCustomerInternalId = this.upsertEntity(record.Type.CUSTOMER, entityObj, entitySearchObj.entityInternalId);
        const entityLinkTaskId = this.linkEntitiesToEachOther('customer', nsVendorInternalId, nsCustomerInternalId);
        this.addSynchronousDelayUnlessRelationshipTaskCompletes(entityLinkTaskId);


/**
   *
   * @param {string} masterEntity
   * @param {integer} nsVendorId
   * @param {integer} nsCustomerId
   */
  linkEntitiesToEachOther(masterEntity, nsVendorId, nsCustomerId) {
    const LOG_TITLE = `${LOG_FILE} => linkEntitiesToEachOther`;
    try {
      const entityLinkTask = task.create({taskType: task.TaskType.ENTITY_DEDUPLICATION});
      entityLinkTask.entityType = (masterEntity == 'vendor')
      ? task.DedupeEntityType.CUSTOMER
      : task.DedupeEntityType.VENDOR;

      entityLinkTask.dedupeMode = task.DedupeMode.MERGE;
      entityLinkTask.masterSelectionMode = task.MasterSelectionMode.SELECT_BY_ID;
      entityLinkTask.masterRecordId = (masterEntity == 'vendor') ? nsVendorId : nsCustomerId
      entityLinkTask.recordIds = (masterEntity == 'vendor') ? [nsCustomerId] : [nsVendorId];
      const entityLinkTaskId = entityLinkTask.submit();
      return entityLinkTaskId;
    } catch (error) {
      log.error(`ERROR: ${LOG_TITLE}`, error);
      throw error;
    }
  },


  /**
   *
   * @param {*} taskId
   */
  addSynchronousDelayUnlessRelationshipTaskCompletes(taskId) {
    const taskStatus = task.checkStatus({taskId});
    // add 3 seconds delay syncronouly unless task status completes
    while(taskStatus.status != task.TaskStatus.COMPLETE) {
      const milliseconds = 2000;
      const date = new Date();
      date.setMilliseconds(date.getMilliseconds() + milliseconds);
      while(new Date() < date){}
    }

    log.debug('linkEntitiesToEach Task Completed', 'Task Completed');
    log.debug('taskStatus.status', taskStatus.status);
  },
Three Approaches
- UI (manual): Works for one-off cases. No code required. Not viable for bulk operations or scripted workflows.
- Client Script (URL trigger): Works for browser-context operations. Cannot be used in backend scripts. Useful when relationship creation is triggered by a user action in the form.
- Backend Script (ENTITY_DEDUPLICATION task): The only viable approach for server-side automation. Requires creating two records and merging them. Adds complexity but works in all script contexts where the URL approach fails.
Important Considerations
Master Record Selection
Choose the Master record based on which record has the transaction history you want to keep. The master retains all linked transactions from both records after the merge. The non-master is removed. If both records have transactions (unlikely if you just created them, but possible in a migration scenario), confirm which history should be preserved before submitting the task.
Governance Units
task.create() and task.submit() consume governance units in the calling script. The synchronous wait loop also consumes units as the while condition is evaluated. For high-volume entity processing, use a Map/Reduce script with yield checkpoints rather than a Scheduled Script with a busy-wait loop.
For an overview of how script types compare in terms of governance limits and appropriate use cases, see our guide to SuiteScript scripting for custom business processes, which covers when to use Scheduled Scripts versus Map/Reduce for bulk operations.
Error Handling
The linkEntitiesToEachOther method in the code above includes a try/catch that logs and rethrows errors. Deduplication tasks can fail if the records are not found, if the entity type parameter is incorrect, or if the account does not have the Duplicate Detection feature enabled. Log the task ID on submit so you can check its status in NetSuite’s Task Manager if issues arise.
Duplicate Detection Feature Requirement
The ENTITY_DEDUPLICATION task requires the Duplicate Detection & Merge feature to be enabled at the account level. Verify this is active before deploying any script that uses this approach. Navigate to Setup > Company > Enable Features > CRM > Duplicate Detection & Merge.
Conclusion
NetSuite’s entity relationship model allows a single internal ID to hold multiple roles across different transaction types. The UI approach handles this in three clicks. The Client Script URL approach handles it programmatically when the user is in the browser. The backend script approach, using the ENTITY_DEDUPLICATION task, handles it when neither of the first two options is available.
The backend approach adds steps: two records created, a task submitted, synchronous polling until completion. That complexity is the cost of working around the platform constraint that blocks the relationship URL from server-side contexts. The code above handles the full sequence. Adapt the upsertEntity method to your record creation logic, set the masterEntity parameter to match which record should be kept, and the deduplication task handles the rest.
If you’re evaluating the best approach for managing duplicate entities in NetSuite, book a meeting with our NetSuite experts. We can help you design a deduplication strategy that aligns with your business processes, minimizes data integrity risks, and scales with your environment.