In this post, I’ll show you how to add custom item fields to item records in NetSuite. As you know, custom item fields in NetSuite are fields that are used to store/display custom data within item records. You can spot these type of fields by their internal NetSuite IDs, which start with “custitem”. You can create and update these fields from the following tab in NetSuite: Customization -> Records -> Item Fields.
These custom item fields can be of various types depending on the need, the most commonly types being:
- Free Form Text
- List/Record
- Check Box
- Currency
- Date/ Time
- Integer Number
- Multiple Select
- Document
You can apply custom item field values to the following item types:
- Inventory Item
- Non Inventory Item
- Kit Item
- Service
- Other Charge Item
- Group
- Assembly
Types of Custom Records In NetSuite
NetSuite offers 8 different types of custom record and transaction fields that can be created across various parts of the system. Each type is designed for a specific record category, allowing you to capture and manage data exactly where it is needed.
1. Item Fields
Used to add custom fields to item records. These include both accounting and website-related item types.
- Applicable to: Inventory, Non-inventory, Service, Group, Kit/Package, Assembly/Bill of Materials
- Common use: Adding attributes like product specifications, internal tags, or ecommerce data
2. Entity Fields
Used to extend entity records that store relationship and employee data.
- Applicable to: Customers, Vendors, Employees, Contacts, Partners, Groups
- Common use: Storing additional customer info, vendor classifications, or employee details
3. CRM Fields
Used to customize CRM-related records within NetSuite.
- Applicable to: Activities, Marketing, and Support records
- Includes: Tasks, Events, Campaigns, Cases
- Common use: Tracking campaign data, support details, or activity-specific information
4. Transaction Body Fields
Used to add fields to the main section (header/body) of transaction records.
- Applicable to: Sales Orders, Invoices, Purchase Orders, Opportunities, Journal Entries, Expense Reports
- Common use: Adding approval status, reference IDs, or custom transaction-level data
5. Transaction Line Fields
Used to add fields to the line-level (columns) of transaction records.
- Appears in item or expense sublists
- Common use: Capturing line-specific data like item-level discounts, custom costs, or project references
6. Item Number Fields
Used for serial-numbered or lot-numbered inventory items.
- Tracks data at the individual item level
- Common use: Quality control tracking, warranty data, recall information, or compliance details
7. Other Record Fields
Used for records that do not fall into standard categories.
- Applicable to: Campaign Events, Classes, Competitors, Departments, Locations
- Common use: Adding custom data to supporting or classification records
8. Other Sublist Fields
Used to add fields to custom sublists within records.
- Appears as columns in sublists
- Common use: Capturing structured, repeatable data tied to a parent record
Identifying Custom Fields in NetSuite
You can distinguish between custom fields and standard fields by enabling the Show Internal IDs preference:
- Navigate to: Home → Set Preferences → General (Defaults tab)
- Enable: Show Internal IDs
Once enabled:
- Clicking on any field opens the help popup
- The field ID appears in the bottom right corner
- If it is a custom field, it will display a custom ID (usually starting with cust…)
Adding Custom Item Field to NetSuite Items
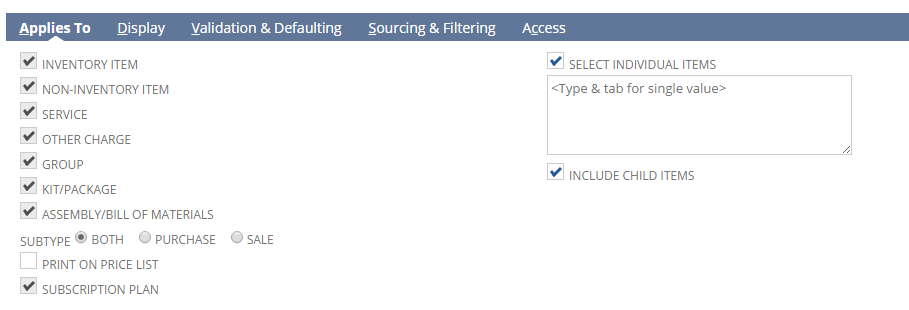
In order to assign a custom item field to individual item records, you need to enable the checkbox titled “SELECT INDIVIDUAL ITEMS” and then select the items you want to apply the custom field to from the multi-select field. If you have any matrix items in your inventory, then you should also select the “INCLUDE CHILD ITEMS” check box (as shown below), so you can display this custom field on child item records as well.
Step 1: Access the Custom Field Setup
- Navigate to:
Customization → Lists, Records, & Fields → Item Fields → New - Choose the field type depending on the data you want to capture (e.g., text, list, date).
Tip: Use descriptive names and unique IDs to avoid confusion in searches, reports, or scripts
Step 2: Define Field Properties
- Label: Enter the display name of the field.
- ID: NetSuite auto-generates an ID, but you can customize it.
- Type: Select the appropriate data type (Text, List/Record, Date, etc.).
- Store Value: Check this box if the value should be saved to the database.
- Description: Optionally add notes about the field for admins or users.
Output:
- The field is now created in NetSuite’s metadata but not yet visible on item records.
Step 3: Apply Field to Item Forms
- Under the Applies To tab, select the types of items where this field should appear (Inventory, Non-Inventory, Service, etc.).
- Check Display options to control visibility on forms:
- Show on Entry Form
- Show on List
- Include in Reports
Output:
- The field will now appear on the item forms you selected.
Step 4: Set Field Display and Sourcing Options
- Display Tab: Configure whether the field appears as mandatory, inline, or hidden.
- Sourcing & Filtering (Optional):
- Source the value from another record (e.g., Vendor, Customer).
- Filter options for list/record fields based on conditions.
Output:
- Field behavior is now fully controlled for users and integrations.
Step 5: Use the Field in Transactions and Searches
- Save the custom field and refresh an item record.
- The new field should now be visible on the item form.
- You can include the field in:
- Saved Searches: Filter, summarize, and report on the custom field.
- Workflows: Trigger actions based on the field value.
- Scripts (SuiteScript): Read or write values programmatically.
SuiteScript Example:
// Load an item record and set a custom field value
var itemRecord = record.load({type: record.Type.INVENTORY_ITEM, id: 123});
itemRecord.setValue({ fieldId: 'custitem_custom_field', value: 'New Value' });
itemRecord.save();
Step 6: Test and Validate
- Open several item records to confirm the field appears correctly.
- Test in Saved Searches, reports, and scripts to ensure proper functionality.
- Ensure field permissions are set correctly: Customization → Roles → Permissions
Output:
- Custom field is fully functional, secure, and ready for reporting or automation.
Best Practices
- Use consistent naming conventions for custom fields (e.g.,
custitem_…). - Document all custom fields for future admins and developers.
- Limit the number of custom fields to avoid clutter and maintain performance.
- Test changes in a sandbox before applying to production
Get Expert Help With NetSuite Custom Fields
Implementing custom fields effectively can be complex, especially when dealing with multiple record types, workflows, and reporting needs. Our NetSuite experts can help you design, configure, and optimize custom fields for your business. From setup to automation and advanced reporting, we ensure your NetSuite instance captures the right data efficiently and accurately. Contact us today to take full advantage of your NetSuite customization capabilities.
FAQs
1. How do I decide which custom field type to use?
Choosing the correct field type depends on the kind of data you want to capture:
- Text or Text Area: For names, descriptions, or notes.
- Integer/Decimal: For numeric data, counts, or measurements.
- Currency: For financial amounts.
- List/Record: To maintain consistent values from another record.
- Checkbox: For true/false flags.
Tip: Match the field type to your reporting and workflow requirements to avoid errors and extra work later.
2. Can custom fields be used in Saved Searches and Reports?
Yes, all custom fields can be included in Saved Searches, Workbooks, and reports.
- Add the custom field as a column or filter in your search.
- Use formulas in Saved Searches to manipulate or summarize data.
- Include fields in dashboards for real-time visibility.
Output: Custom fields enhance reporting accuracy and allow detailed analytics for business decisions.
3. How can I make a custom field appear only on certain forms?
NetSuite allows form-specific visibility for custom fields:
- During setup, use the Applies To tab to select the record types.
- Use the Display tab to specify which forms show the field.
- Optional: Use sourcing or filtering to dynamically show/hide the field based on conditions.
Result: Users only see relevant fields, keeping forms clean and easier to use.
4. How do I use custom fields in SuiteScript?
Custom fields can be read or written programmatically using SuiteScript 2.0.
Example:
var record = require('N/record');// Load an item record
var item = record.load({ type: record.Type.INVENTORY_ITEM, id: 123 });// Set a custom field value
item.setValue({ fieldId: 'custitem_custom_field', value: 'Test Value' });// Save the record
item.save();
Output: Automation or integrations can dynamically update custom fields based on logic, reducing manual entry.
5. How do I distinguish standard fields from custom fields?
Enable the Show Internal IDs preference:
- Navigate: Home → Set Preferences → General → Defaults → Show Internal IDs
- Click on any field to see its ID in the help popup.
- Custom fields usually start with
cust…and standard fields have system-generated IDs.
Result: Quickly identify custom vs standard fields for scripting, searches, and reporting.