While assisting customers, you’re bound to encounter some issues. In NetSuite, these issues are referred to as cases. The people in your company who handle these cases are support reps. Understanding NetSuite Case Management set up can greatly improve customer interactions. It helps you manage their issues more efficiently and strengthens your relationship. This blog will serve as a guide to help you understand more about NetSuite Case Management.
Case Management: A Comprehensive Overview
NetSuite Case Management set up is about efficiently handling and resolving customer inquiries, issues, or incidents. It’s a cool feature that helps streamline customer support by bringing together all interactions and information related to customer cases in one place.
Here’s an overview of how Case Management works in NetSuite:
Case Creation: When customers reach out with inquiries or issues, whether it’s via email, phone calls, or other channels, the support person logs them into NetSuite as cases. Each case gets a unique identifier and is categorized based on its nature or the product/service involved.
Tracking and Documentation: With NetSuite, you can easily keep track of the status of cases from start to finish. Agents can add notes, attach files, and document all customer interactions within the case record, creating a detailed history.
Assignment and Prioritization: You can assign cases to support agents or teams based on their skill set, workload, or expertise. You can also set prioritization rules to ensure critical issues are dealt with promptly.
Workflow Automation: NetSuite’s Case Management system often uses workflow automation to make things easier. It helps streamline repetitive tasks or standard processes like sending acknowledgment emails, escalating issues, or triggering follow-up actions.
Resolution and Closure: Agents resolve customer queries or issues using the information gathered within the system. Once a case is settled, it’s marked as closed, but the complete record is still accessible for future reference.
Reporting and Analytics: NetSuite offers reporting and analytics tools that allow you to dive into case resolution times, customer satisfaction, agent performance, and other essential metrics. These insights help you identify trends, improve processes, and enhance customer service.
Integration: In NetSuite, Case Management can seamlessly integrate with other modules like CRM (Customer Relationship Management), giving you a complete picture of customer interactions and preferences.
Overall, NetSuite Case Management set up streamlines the customer support process, enhances communication, and ensures a structured approach to resolving customer issues efficiently.
We just gave you a big-picture view of NetSuite Case Management from a theoretical standpoint. But don’t worry, we’ll not leave you hanging. Now, let’s dive into the details and find out how you can get into the nitty-gritty of NetSuite Case Management.
NetSuite Case Management Set Up
When new cases come in, they can arrive through the NetSuite interface, an online form, email capture, or the customer center. These cases go through a system that sorts them out and assigns them to the right support team member. That team member uses a case form to talk to the customer and handle the case.
NetSuite ensures they are directed to the right support person when cases come in. This is done through predefined rules and territories designed explicitly for handling each case.
Creating Rules
To create these rules, you’ll want to log in as the Administrator and head over to Setup. From there, navigate to Support, then Case Management, and finally Case Rules. Click on “New” to get started. Now, you choose a specific criterion to base your rule on.
Next, you’ll set the conditions for the rule’s application. Keep in mind that this may vary depending on your selection. Once you’re done setting it up, save the rule. Repeat these steps for any additional rules you require.

Case Territories
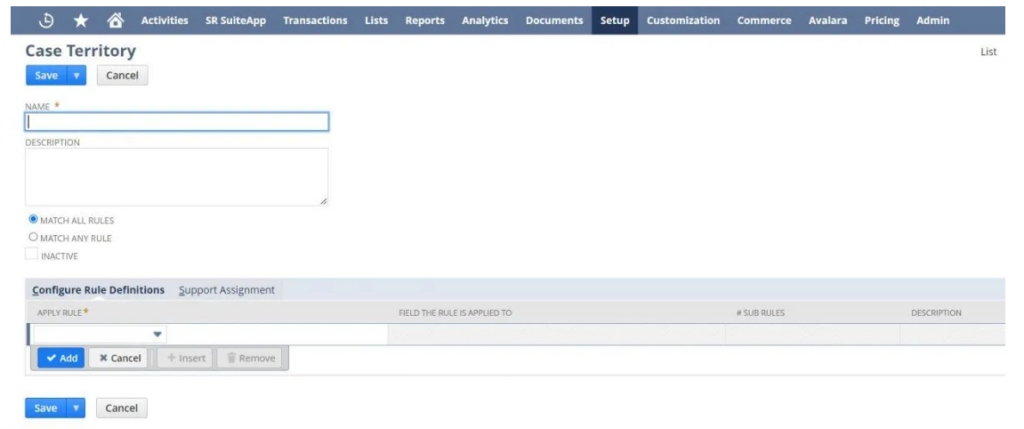
Once you’ve set up the rules for handling cases, you can create territories based on those rules. To do this, go to Setup, select Support, and then Case Management. From there, click on Case Territories and choose the New option.
Here, you can give the territory a name and description and select which rules should apply. You can decide whether a case needs to match all the rules or just one to be assigned to this territory.
Once you’ve set the rules, you can assign a support person to this territory using the Support Assignment tab. From then on, whenever new cases match these rules, they’ll automatically be directed to the right support person.

Case Types
Your support representatives can quickly understand customer support needs by looking at the type of case. NetSuite offers three automatic case types: concern, problem, and question. When customers complete a case form, they choose one of these case types.
If you need more case types than the three provided by NetSuite, you can create a new one. Go to Setup > Support > Case Types > New. You can name the new case type, decide where it appears in the case type dropdown list, and provide a short description. After saving the new case type, it will be available as an option on case records.

Case Forms
How do you add new cases to your system? Case forms are the main way support representatives gather information about new cases.
Creating Online Case Forms
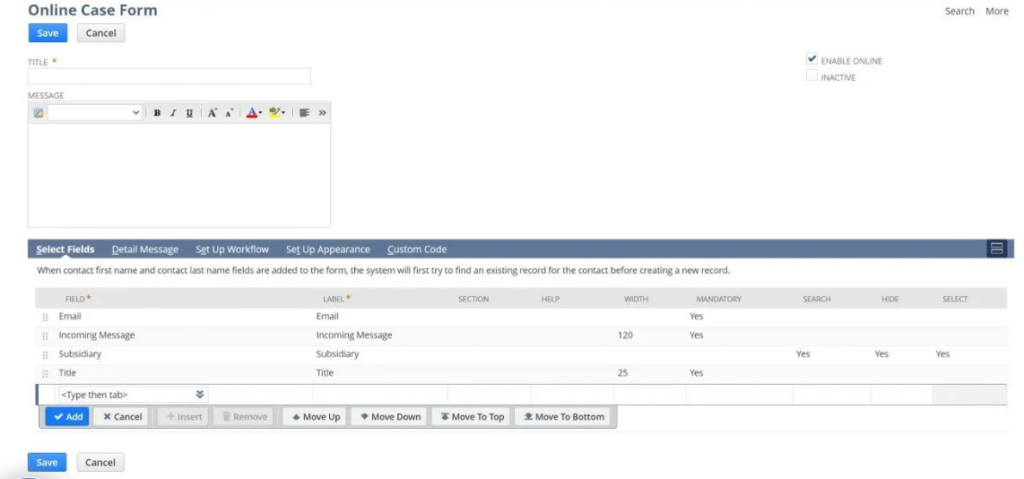
One of the main ways customers can submit new cases is by using an online case form. You can include a link to the form on your website or in the Customer Center. Go to Setup > Support > Case Management > Online Case Forms > New to create an online case form.
You can start with the Default Form Template or the Custom HTML Template. Once you’ve chosen your starting point, you’ll be directed to the Online Case Form page, where you can provide a name for the form and customize its content.

Customizing Case Forms
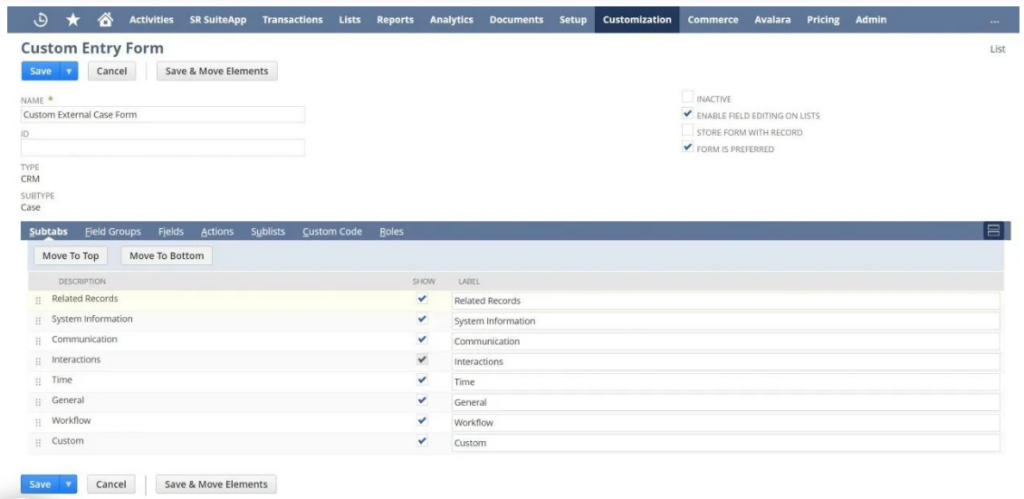
There are two types of case forms – the ones your customers use to submit new cases and those your support representatives use for the same purpose. To personalize these forms, you can go to Customization > Forms > Entry Forms.
If you want to modify the case form for support representatives, click on Customize next to the Standard Case Form. If you want to customize the customer case form, select Customize next to the Standard External Case Form. On either form, you can assign a unique name to the form, hide existing fields, lists, or subtabs, and add any required custom fields.

Wrapping It Up
NetSuite Case Management set up makes support a breeze! It organizes, prioritizes, and resolves customer issues efficiently, so no request slips through the cracks. With customizable case types and workflows, it adapts to your unique business needs. Automation simplifies routine tasks, saving precious time for support teams.
Plus, real-time insights through reporting and analytics help you make better decisions. Seamless integration with other NetSuite modules also gives you a holistic view of customer interactions. Ultimately, it enhances customer satisfaction by delivering swift and personalized resolutions.
