
Key Takeaways
- Bank Reconciliation in NetSuite Has Two Distinct Tools: The Match Bank Data page handles transaction-level matching. The Reconcile Account Statement page finalizes the period and locks in the closing balance. Most finance teams use both in sequence, but they serve different purposes.
- The Difference Field Is Your North Star: When you reconcile, NetSuite calculates a Difference between your internal records and the bank statement balance. If it is zero, you are done. If it is not, the work is finding out why before you close.
- Most Reconciliation Problems Come From Setup, Not Transactions: Incorrect bank-to-GL account mapping, wrong date formats in bank imports, and previously reconciled items being pulled back in are the top causes of reconciliation failures. All three are configuration issues, not data issues.
- Bank Feeds Change the Reconciliation Equation: Connecting your bank directly to NetSuite via the Bank Feeds SuiteApp replaces manual CSV imports with automatic daily transaction feeds, which reduces the data entry errors that cause most matching failures.
- Reconciliation Frequency Matters More Than Most Finance Teams Realize: Companies that reconcile monthly take an average of 8 days to close their books. Those that reconcile weekly close in under 4 days. The math on frequency compounds over a full year.
- NetSuite’s Audit Trail Is Your Audit Defense: Every matched transaction, every manual adjustment, and every reconciliation completion creates a timestamped record in NetSuite. That trail is what makes your books defensible to auditors and reviewers.
How long does your month-end close take right now?
If the answer involves someone spending two or three days reconciling bank accounts, chasing unmatched transactions, or running difference reports that never quite reach zero on the first try, you are not dealing with a data problem. You are dealing with a process design problem.
We see this consistently with businesses that moved to NetSuite but did not set up bank reconciliation correctly from the start. They are technically using NetSuite for reconciliation. But they are still spending as much time on it as they did in the old system, because the matching rules are not configured, the bank feeds are not connected, or the GL mapping was set up incorrectly during implementation and nobody has gone back to fix it.
Bank reconciliation in NetSuite, when it is configured well, is not a two-day job. It is a one-click confirmation of the work the system has already done. This guide covers how to get there: what the tools are, how the process works, why it fails, and what good looks like.
What Is Bank Reconciliation in NetSuite?
Bank reconciliation is the process of matching your internal transaction records in NetSuite’s general ledger against your external bank statement, confirming that every credit and debit is accounted for and that the closing balance matches.
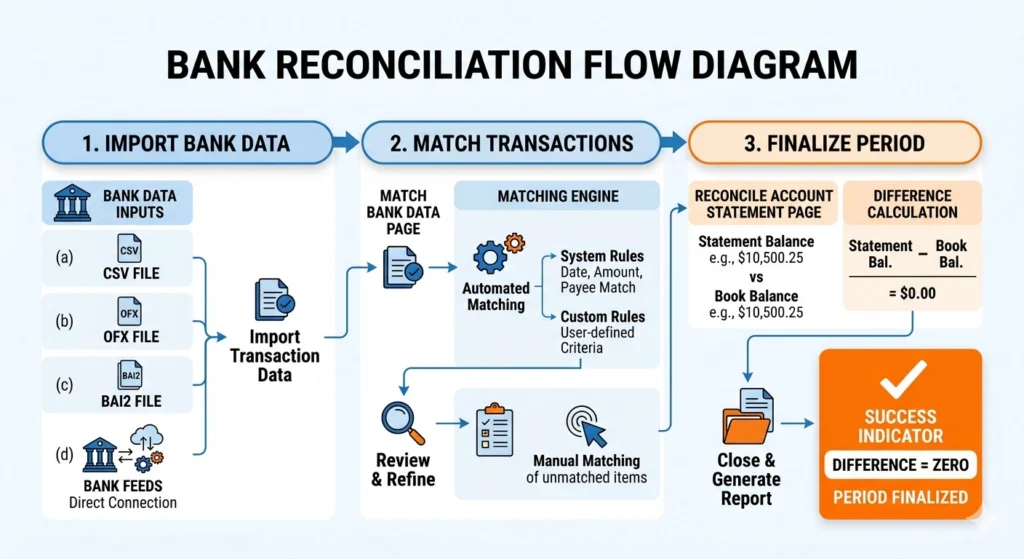
NetSuite’s bank reconciliation process starts by importing your bank statement data, either through a direct bank connection or by uploading a file. You can use formats like CSV, OFX, or BAI2, depending on your bank.
But it is more than a data-matching exercise. Reconciliation is also your primary control for detecting unauthorized transactions, catching data entry errors before they compound, and confirming that your cash position reflects reality. A balance sheet built on an unreconciled bank account is a balance sheet you cannot trust.
The Two Tools: Match Bank Data vs. Reconcile Account Statement
This distinction matters because most frustration with reconciliation stems from conflating these two steps or using them in the wrong order.
The Match Bank Data Page
This is where the transaction-level work happens. You import your bank data (or pull it automatically through Bank Feeds), and NetSuite’s matching engine compares each bank transaction to the corresponding record in your general ledger.
Matching happens in three ways:
System rules: NetSuite’s built-in logic matches transactions based on amount, date, and reference number. A bank debit for $1,247.50 on March 14th matches to a vendor payment recorded in NetSuite for the same amount and date.
Custom rules: You define your own matching logic based on memo field content, transaction type, or account. Useful when your bank uses a reference format that does not match what NetSuite records natively.
Manual matching: For transactions that the system cannot match automatically, you review and match them on the Match Bank Data page. You can also create new transactions directly from the bank data if a transaction exists in the bank but not yet in NetSuite.

The Reconcile Account Statement Page
Once matching is complete, this page is where you finalize the period. You enter the statement end date and the closing statement balance from your bank. NetSuite calculates the Difference between your matched transactions and the bank’s reported balance.
If the Difference is zero, you click Reconcile. The period closes, the transactions are locked, and NetSuite generates a full reconciliation report for your records.
If the Difference is not zero, you have more work to do before closing. The next section covers what typically causes that gap.
To understand the relationship between bank feeds and the reconciliation process in more detail, our walkthrough on setting up and using NetSuite Bank Feeds covers the connection setup from start to finish.
Why the Difference Is Not Zero: The Most Common Causes
This is the section most blogs skip. When the reconciliation Difference does not reach zero, there are five places to look first.
Incorrect Bank-to-GL Account Mapping
Ensure correct bank-to-GL account mapping to prevent mismatched transactions. If your bank account in NetSuite is mapped to the wrong general ledger account, transactions will never match correctly, because they are being compared against the wrong set of records. This is the most common setup error from implementations done under time pressure.
Fix it by navigating to Lists > Accounting > Accounts and confirming that each bank account points to the correct GL account. Then review your matching results for the current period to see whether historical mismatches need correcting before you can close cleanly.
Previously Reconciled Items Being Re-Pulled
When you import bank data for a new period, and the import date range overlaps with a previously reconciled period, already-matched transactions can be pulled back into the unmatched queue. This creates phantom discrepancies that appear to be new, unmatched items, but are actually items you have already reconciled.
Exclude previously reconciled items to avoid duplication and discrepancies. When setting up your import, confirm that the statement date range starts exactly at the day after your last reconciled period ended.
Timing Differences
A payment recorded in NetSuite on March 31st may clear at the bank on April 2nd. These timing differences are expected and do not indicate an error. They become a problem when they are not tracked and when finance teams try to force every item to match within a single period.
The right handling is to note outstanding items (checks issued but not yet cleared, deposits recorded but not yet posted) as part of your reconciliation documentation. NetSuite’s reconciliation report separates cleared items from outstanding items, which gives you what you need to explain any legitimate timing difference.
Date Format Errors in Bank Data Imports
Use the correct date format when importing bank information to avoid processing errors. NetSuite expects dates in a specific format. If your bank’s export file uses a different date format (DD/MM/YYYY vs MM/DD/YYYY, or dates with dashes vs. slashes), the import may fail or produce transactions with incorrect dates that will not match.
The fix is standardizing your bank export format before importing, or using Bank Feeds, which handles format conversion automatically.
Unrecorded Transactions
A bank transaction appears in your import but has no corresponding record in NetSuite. This can be a bank fee that was not entered, an automatic debit that was not captured, or an ACH payment that bypassed the normal payment entry process.
On the Match Bank Data page, unmatched bank items appear in a separate queue. You can create a new NetSuite transaction directly from the unmatched bank item, which enters it into the GL at the same time as matching it. For regularly occurring items like bank fees, building a custom rule that automatically creates the NetSuite entry on import is the right long-term fix.
How Bank Feeds Change the Reconciliation Process
The Bank Feeds SuiteApp is the most useful improvement to NetSuite bank reconciliation available today. It replaces manual CSV uploads with a direct, automated connection between your bank and NetSuite.
Instead of downloading a statement from your bank’s portal, formatting it correctly, and uploading it to NetSuite, Bank Feeds pulls your transactions automatically, typically daily. This means:
- Transactions are available to match as soon as they clear the bank
- Date format errors from manual imports are eliminated
- The delay between when a transaction occurs and when it appears in your reconciliation queue drops from days to hours
- Reconciliation can happen continuously rather than as a month-end event
The result is that reconciliation becomes less of a close-the-books task and more of an ongoing confirmation process. Finance teams that use Bank Feeds typically spend a few minutes a day reviewing auto-matched transactions rather than a full day at month-end matching everything at once.
If you are evaluating whether Bank Feeds fits your banking relationships and reconciliation volume, our overview of what Bank Feeds are in NetSuite and how they work covers the connection types, supported banks, and setup requirements.
Setting Up NetSuite Bank Reconciliation: The Configuration Steps
Getting reconciliation right starts before your first statement import. These are the setup steps that determine whether reconciliation is routine or painful.
Step 1: Enable the Correct Features
Navigate to Setup > Accounting > Accounting Preferences and enable:
- Use Match Bank Data and Reconcile Account Statement Pages — this activates both reconciliation tools
- If using Bank Feeds: install the Bank Feeds SuiteApp from the SuiteApp Marketplace and configure your bank connection
Step 2: Confirm Bank Account to GL Mapping
For each bank account you reconcile, confirm the GL account mapping is correct. This is the most common source of persistent reconciliation discrepancies, and checking it once saves hours of downstream troubleshooting.
Step 3: Configure Matching Rules
Start with NetSuite’s default system rules, which match on amount, date, and reference number. Then add custom rules for any scenarios where your bank uses different reference formats or memo structures than your NetSuite records.
Good custom rules to configure early:
- Rules that match bank fees by description (e.g., “MONTHLY SERVICE FEE” always maps to your bank charges GL account)
- Rules that match payroll ACH debits by originator ID
- Rules that handle split deposits, where a single bank deposit covers multiple customer payments
Step 4: Set Your Reconciliation Frequency
Match your reconciliation cadence to your transaction volume. For businesses with high daily transaction volumes, daily or weekly reconciliation keeps the unmatched queue manageable. For lower-volume operations, monthly reconciliation is suitable, but expect more manual review at close.
The productivity difference compounds. Monthly reconciliation means one large, stressful close event per period. Weekly reconciliation means four smaller, routine reviews that rarely surface surprises.
Running a Bank Reconciliation in NetSuite: Step by Step
With setup complete, the standard reconciliation process follows these steps.
Step 1: Import or receive bank data
If using manual imports, go to Banking > Bank Feeds > Import Bank Data and upload your statement file. If using Bank Feeds, your transactions are already in the queue from the automatic daily pull.
Step 2: Match transactions on the Match Bank Data page
Navigate to Banking > Bank Feeds > Match Bank Data. Review the auto-matched transactions and confirm them. Work through the unmatched queue, either applying custom rules, matching manually, or creating new transactions for items that do not exist in NetSuite.
Step 3: Finalize on the Reconcile Account Statement page
Navigate to Banking > Bank Feeds > Reconcile Account Statement. Enter the statement end date and the closing balance from your bank statement. NetSuite calculates the Difference.
If the Difference is zero: click Reconcile. The period closes.
If the Difference is not zero: do not close. Return to the Match Bank Data page and investigate. Check for unmatched items, incorrect amounts, or timing differences as described above.
Step 4: Generate and file the reconciliation report
After closing, generate the reconciliation report at Reports > Banking/Budgeting > Reconciliation > Detail. This report documents every matched transaction and any outstanding items. Keep it for your audit file.
Best Practices for Clean Reconciliation
The finance teams that close fastest are not necessarily the ones with the fewest transactions. They are the ones whose reconciliation process has fewer surprises, because they have designed it to surface problems early rather than pile them up at month-end.
Reconcile More Often Than You Think You Need To
Waiting until month-end to reconcile means every discrepancy is 30 days old by the time you find it. At that point, tracking down a missing ACH payment or an unrecorded bank fee means going back through weeks of transactions. Reconciling weekly reduces that window to 7 days, which is the difference between a quick lookup and a multi-hour investigation.
Build Custom Rules Before You Need Them
Every time you manually match a transaction type, ask whether a custom rule could handle it automatically next time. A bank fee that appears every month, a payroll debit that fires on the same day each period, a customer payment that always comes with a specific reference prefix: all of these are candidates for a custom rule. Build the rule once and never touch that transaction type again.
Review the Unmatched Queue Before Closing
Do not close a period with items still in the unmatched queue. Every unmatched item represents either a transaction that did not get recorded in NetSuite or a transaction that was recorded incorrectly. Closing with unmatched items carries those errors into the next period, where they compound.
To understand the broader context of reconciliation within NetSuite’s accounting function and common pitfalls that trip up finance teams, our breakdown of NetSuite account reconciliation best practices and common pitfalls covers both the process and the failure patterns in detail.
The Audit Trail: Why It Matters Beyond Month-End Close
NetSuite’s bank reconciliation creates a complete audit trail automatically. Every matched transaction records who matched it and when. Every manual entry created from the bank feed records the source bank transaction. Every reconciliation completion records the statement balance, the date, and the user who finalized it.
This trail matters in three specific situations:
Audit readiness: When your external auditors request bank reconciliation documentation, you generate the reconciliation report and provide the period-close records. No spreadsheet reconstruction needed.
Fraud detection: When a transaction appears in your bank data but has no corresponding NetSuite record and no explanation, the audit trail shows exactly when it was imported and whether it was matched, manually created, or left unmatched. Unusual patterns surface clearly.
Error correction: When a reconciled item turns out to be incorrect, the audit trail shows what was matched to what, making the reversal and correction straightforward.
If you are looking at NetSuite’s accounting capabilities more broadly, including financial reporting, period close management, and how bank reconciliation connects to your overall close process, the NetSuite for accounting page has a full breakdown of the financial management tools available.
Final Thoughts
Bank reconciliation is one of those processes where the difference between a well-configured system and a poorly configured one is measured in days per month and accountant-hours per close.
NetSuite’s reconciliation tools are capable. The Match Bank Data page, the auto-matching rules, Bank Feeds, the audit trail: all of it is there. The businesses that spend two days reconciling each month are not using a weaker product. They are using the same product with worse configuration decisions.
If your current reconciliation process still feels manual, still surfaces surprises at month-end, or still regularly ends with a Difference that takes hours to trace, the fix is almost always in setup: account mapping, matching rules, import format, or reconciliation frequency. Not in the transactions themselves.
FAQs
What is bank reconciliation in NetSuite?
Bank reconciliation in NetSuite is the process of matching your internal transaction records in the general ledger against your external bank statement to confirm accuracy and identify discrepancies. It uses two tools: the Match Bank Data page for transaction-level matching and the Reconcile Account Statement page for finalizing the period and locking the closing balance.
How do I fix a reconciliation difference in NetSuite?
Return to the Match Bank Data page and look for unmatched items in both directions: bank transactions with no NetSuite match and NetSuite transactions that did not match any bank item. Check for previously reconciled items that were re-imported, confirm your bank-to-GL account mapping is correct, and review whether the statement date range overlaps with the previous period. If the difference is a legitimate timing item (outstanding check, deposit in transit), document it and close with a note.
What is the difference between Bank Feeds and manual bank import in NetSuite?
Manual import requires you to download a statement file from your bank and upload it to NetSuite in a supported format (CSV, OFX, BAI2). Bank Feeds connects your bank directly to NetSuite and pulls transactions automatically, typically daily. Bank Feeds reduces data entry errors, eliminates date format issues, and lets reconciliation happen continuously rather than as a month-end event.
How often should I run bank reconciliation in NetSuite?
As often as your transaction volume warrants. High-volume businesses benefit from daily or weekly reconciliation, which keeps the unmatched queue small and makes discrepancies easier to investigate. Lower-volume businesses can reconcile monthly, but expect a larger manual review at close. The general rule: the less frequently you reconcile, the more time each reconciliation session takes.
What reports does NetSuite generate from bank reconciliation?
After each reconciliation, NetSuite generates a Reconciliation Detail report at Reports > Banking/Budgeting > Reconciliation > Detail. This report shows every matched transaction, any outstanding items, and the closing balance. It serves as the primary audit documentation for the reconciled period.


