To match bank data in NetSuite, go to the Bank Reconciliation screen and review your imported bank statement lines. NetSuite will auto-match them with your general ledger transactions. You can manually match any remaining items that don’t line up. Once all items are matched, you can reconcile the account.
Key Takeaways for Match Bank Data in NetSuite
1. NetSuite can automatically match many bank transactions with your general ledger records, saving you time.
2. You can manually match any unmatched items to make sure everything lines up correctly.
3. Accurate bank matching helps keep your books clean and reduces reconciliation errors.
4. Connecting your bank feed and keeping it updated makes the whole process faster and easier.
5. Regular reconciliation ensures your finances stay accurate and audit-ready, so make sure it’s done properly.
Since the payment reconciliation feature has been upgraded by a new feature of Bank Reconciliation, it is more important than ever to understand how to match bank data in NetSuite, along with other factors that you need to know about.
In this blog, we focus on matching bank data in NetSuite, its benefits, common issues, and how you can do NetSuite bank reconciliation easily.
What is Match Bank Data in NetSuite?
The term match bank data is the process of reconciling financial transfers that are recorded in an organization’s accounting records with the corresponding transactions that are reported by the bank or financial institution. The process makes sure that all the transactions recorded in the organization’s book reflect the same and accurate data that is recorded by the bank.
NetSuite Accounting provides a tool for importing and matching back data that streamlines all the reconciliation processes.
How Does NetSuite Bank Reconciliation Work?
When bank data of an organization is imported into NetSuite, there is an Intelligent Transaction Matching feature that executes reconciliation rules to uaotmaite;llu imported data lines to the corresponding transactions. That being said, you can also manually match exceptions and reconcile transactions, without requiring spreadsheets or third-party tools
On the other hand, if you have accounting statements but you find importing them difficult at the moment, you can simply mark the corresponding account transactions in NetSuite as cleared without importing the matching bank lines.
In NetSuite, you will see on the Match Bank Data page that you can view side-by-side grids of imported bank lines and account transactions in NetSuite. Therefore, you can do the following:
- Match account transactions.
- For transactions with no matching bank line, mark them as cleared pending submission.
- Exclude imported bank lines.
- Review matched and user-cleared account transactions.
- Submit transactions to clear them in the system.
Benefits of Automated Bank Matching
How to Do NetSuite Bank Reconciliation?
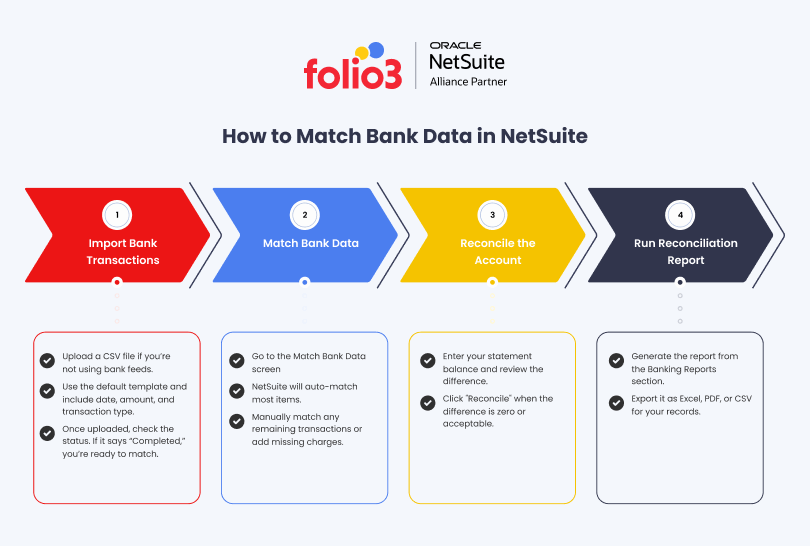
For matching bank reconciliation in NetSuite, you must start with importing bank transactions if you are not already using bank feeds, match data with NetSuite transactions, reconcile the account statement using NetSuite features, and then generate the reconciliation reports using the steps given in detail below.
Bank reconciliation in NetSuite is an essential accounting task that ensures your internal records match your actual bank account activity. Whether you use automated bank feeds or manually import statements, reconciling correctly is key to maintaining accurate cash balances and spotting errors early.
This guide explains how to perform a full reconciliation in NetSuite, step by step.
Step 1: Importing Bank Transactions (If You’re Not Using Bank Feeds)
If your organization doesn’t have automated bank feeds set up, you’ll start your reconciliation by manually uploading a CSV file that contains your bank transactions. This is a one-time import for each reconciliation period.
To begin, log into your NetSuite account and go to the following path: Transactions > Bank > Banking Import History > Upload File
Once you’re on the upload screen, select the option called “Import with Default Parser.” This will provide you with the exact CSV file format that NetSuite expects. It is important to download this template and follow it closely to avoid formatting errors that may prevent the data from importing.
The CSV template includes required fields such as:
- Date of the transaction
- Payer or Payee name
- Transaction ID
- Transaction Type (such as payment, deposit, charge)
- Amount involved in the transaction
- An optional Memo field to include any notes
After filling out the CSV file with your bank data, go back to the Upload File page. Click the Choose File button and select the completed CSV file from your computer. Make sure you select the correct bank account in the Account dropdown, as this determines where your data will be posted.
Once everything is set, click Import. NetSuite will begin processing the file. You’ll see a message confirming that the file is being uploaded and a link that says “Track your status.” Click that to monitor progress.
If the status returns as Failed, click the error message to find out what went wrong. Common issues include missing required columns, incorrect date formats, or invalid transaction types. Fix the CSV file accordingly and try uploading it again.
If the status shows Completed, that means your file was imported successfully, and the bank lines are now ready to be matched with NetSuite transactions.
Step 2: Matching Bank Data with NetSuite Transactions
Once your bank transactions are in NetSuite, the next step is to match them against internal transactions recorded in the system. To do this, go to:
Transactions > Bank > Match Bank Data
On this page, you will see two main data grids:
- Imported Bank Data: These are the lines you uploaded or pulled via Bank Feeds.
- Account Transactions: These are existing NetSuite transactions like bills, payments, deposits, etc.
You’ll first need to select the correct bank account from the Account dropdown. Once selected, the imported bank lines and account transactions for that account will load on the screen.
NetSuite automatically applies Intelligent Transaction Matching, which attempts to match imported bank lines with existing NetSuite transactions. These matches are based on amount, date, transaction type, and other criteria.
If matches are found, you can review them in the Review tab. For any lines that couldn’t be matched automatically, go to the To Be Matched tab. This is where you will do manual matching.
To manually match:
- Check the box next to one or more lines in the Imported Bank Data section.
- Then, check the box next to the corresponding transactions in the Account Transactions section.
- As you select them, NetSuite calculates the difference. When the total difference is zero, the Match button becomes clickable.
Click Match to confirm the pairing.
If you accidentally matched the wrong lines, go to the Review tab, click the Matched link beside the entry, and select Undo Match. This will reverse the match so you can fix it.
If there are internal transactions (such as journal entries or checks) that do not have corresponding bank lines, you can still clear them. Simply check the box next to the transaction in the Account Transactions list and click Clear. This will mark them as reconciled for internal purposes.
In cases where bank fees or charges haven’t yet been recorded, you can add them on the spot. Click the Add Charge button. A form will open where you can enter the following:
- Payee
- Transaction date
- Check number (if applicable)
- Memo
- Amount
- Posting account (usually a bank fees expense account)
- Any applicable departments or locations
After adding the charge, it appears in your Account Transactions list. Check the box next to it and click Clear so that it’s included in your reconciliation.
Once all matching, clearing, and manual entries are done, click Submit. This sends your selections to the next step: reconciliation.
Step 3: Reconcile the Account Statement
After matching is complete, the final step is to reconcile your books with your actual bank statement.
To do this, go to: Transactions > Bank > Reconcile Account Statement
Start by selecting the same bank account you’ve been working on. Then enter the Statement End Date, and this should match the end date of your bank statement. Next, input the Ending Balance from your statement into the corresponding field.
NetSuite will compare your cleared and matched transactions against the statement balance. It will calculate a Difference, which reflects how much your internal records are off from the bank’s reported balance.
If the difference is zero, you’re fully reconciled and can proceed. If there’s a small difference (for example, due to a timing delay in deposits), you can still complete the reconciliation
Click Reconcile to lock in the reconciliation for this period. A confirmation message will appear, showing the last reconciled balance and close date.
Step 4: Generate Reconciliation Reports
Once the reconciliation is done, it’s a good practice to generate a report for internal documentation or audits.
Go to: Reports > Banking/Budgeting > Reconciliation > Detail
This report displays all transactions included in the reconciliation, along with any unmatched or uncleared items. You can filter the report by date, account, or reconciliation period.
To share or archive the report:
- Click Export
- Choose from formats like CSV, Excel, Word, or PDF
These reports are especially useful for finance teams and auditors to verify that no errors were overlooked.

Common Issues in Bank Data Reconciliation and How to Fix Them
The common issues in bank data reconciliation include missing or duplicate data of transactions, timing differences, data entry errors, incorrect settings, or software updates. In order to overcome these challenges, the best solution includes implementing validation rules, strengthening internal controls, and adopting regular reconciliation practices.
1. Missing or Unrecorded Transactions
This happens when a transaction appears in your bank statement but is missing from your accounting system — or vice versa. A deposit, for example, may have hit your bank but hasn’t been posted in NetSuite yet. Or maybe someone forgot to enter a vendor payment.
How to fix it:
To solve this challenge, you can compare your bank statement with your accounting records regularly. You can do this manually or, even better, by connecting your bank account to your accounting software to pull data automatically. If a transaction is missing, record it right away.
2. Duplicate Transactions
Sometimes a payment or deposit gets recorded twice by mistake. Maybe someone entered it manually, and then it was also imported automatically. These duplicates throw off your totals and cause reconciliation errors.
How to fix it:
Go through your transactions carefully and look for duplicates, especially those with the same amount and date. Once you find them, delete the extra entry.
3. Timing Differences
This one’s common. Some transactions take time to clear. For example, you might have written a check that hasn’t been cashed yet or a deposit that’s still pending in your bank account.
How to fix it:
Know that timing differences are normal. Mark these as “outstanding” and don’t try to match them until they show up in the next bank statement. If you’re using NetSuite, make sure the right reconciliation rules are set so these items don’t confuse the system.
4. Data Entry Errors
Manual entry means human mistakes, such as entering the wrong amount, date, or even the wrong vendor. These small issues can make a huge mess during reconciliation.
How to fix it:
Use validation rules in your system that catch odd entries, like negative payments or dates in the future. Also, train your staff to double-check their work and review new entries before closing the books.
5. Incorrect Software Settings or Bugs
Sometimes, your software might be the problem. Misconfigured settings, old versions, or bugs in the system can cause mismatches or import errors.
How to fix it:
It is best to always keep your accounting software updated. Review your bank integration settings and test them regularly. If you see issues after a new update or customization, flag it quickly and get support.
6. Fraud or Unauthorized Transactions
If something shows up in your bank that your team didn’t approve, like an unknown withdrawal or suspicious charge, immediately check it.
How to fix it:
Set up internal controls to catch these early. Always have more than one person involved in approvals and reconciliations. Review your bank feeds and reconciliations frequently so nothing slips through.
Best Practices for Clean Matching
The best practices for clean matching in bank data reconciliation include regularly cross-checking the transactions, consistency, using automation, and regular statement audits to avoid any kind of discrepancies.
Here are simple habits that make reconciliation faster, smoother, and less stressful:
- Reconcile your bank account every week or at least once a month. Waiting too long makes it harder to track down issues.
- Use standard formats for transaction IDs, vendor names, and dates across systems. This makes matching easier.
- Use validation tools to catch errors before they’re saved, especially with amounts and dates.
- Set up bank feeds or reconciliation tools in NetSuite to reduce manual entry and speed up the process.
- Make sure everyone handling transactions knows how to enter data properly and what to watch for.
- Regular internal audits can help catch hidden issues before they snowball.
- Having a simple reconciliation checklist helps you stay organized and avoid missed steps.
- Outdated systems are more likely to glitch or break connections with your bank. Update regularly.
- Always keep records of reconciliations and any changes made. This is useful for audits and reviews.
Final Thoughts
Matching Bank Data in NetSuite streamlines the accounting processes of organizations and makes it flawless. NetSuite helps businesses keep their records clean, accurate, and up to date. It saves time, reduces errors, and makes monthly closings a lot easier. By using the right tools and doing regular checks, your finance team can stay on top of cash flow without the stress.
If you’re looking for help setting up or customizing bank reconciliation in NetSuite, Folio3 can make the process smooth from start to finish.
Talk to a NetSuite expert today!
FAQs
Can NetSuite’s bank reconciliation process be customized for our business needs?
Yes, it can. You can customize rules for matching, set up workflows for approvals, and even tailor how bank files are imported. A NetSuite partner like Folio3 can help build these customizations based on how your finance team works.
What’s involved in implementing bank reconciliation in NetSuite?
Implementation includes setting up bank feeds or CSV import, configuring the Match Bank Data page, and aligning it with your chart of accounts. If needed, you can also add automation rules and reconciliation reports during setup.
Can we automate the matching process to reduce manual work?
Yes. NetSuite has built-in Intelligent Transaction Matching, and this can be further automated with custom rules. You can also integrate it with tools like Automated Cash Application to handle customer payments faster.
What if our bank file format doesn’t match NetSuite’s template?
No problem. Folio3 can customize the import parser or build a script to match your bank’s format. That way, you won’t need to manually edit files every time you upload transactions.