In this blog, we are going to build a WhatsApp-triggered AI Agent that can receive text or voice messages, understand them, query NetSuite in real time using MCP Tools, and reply all through your WhatsApp number 🚀.
N8n, an open-source automation platform, powers the entire workflow, and the AI backbone runs on top of NetSuite MCP Tools with PostgreSQL-backed memory for contextual conversations. Whether a user sends a voice note asking about a customer’s open invoices or types a question about a sales order, the agent handles it intelligently.
Let’s start from scratch.
What is n8n?
n8n is an open source, node based automation tool that lets you visually connect apps and APIs without writing boilerplate code. Think of it as a self hostable Zapier, but built for developers. Workflows are made of nodes, small blocks that act as a trigger, action, or transformation. You connect them on a canvas, and n8n handles the data flow.
Why n8n Instead of Writing Custom APIs?
You could build this with Express or Flask, but n8n gets you there faster. No boilerplate for webhooks, OAuth, retries, or error handling, it’s all built in. It also ships with ready made integrations for OpenAI, PostgreSQL, Slack, and WhatsApp, so there’s no SDK setup involved.
Debugging is visual too. You can see exactly what data passed through each node instead of digging through logs. And it natively handles loops and queuing, useful when multiple WhatsApp messages land at once.
As the project grows, you extend the workflow visually instead of rewriting code. For multi API, logic heavy workflows like this, n8n gives you no code speed with developer level control.
n8n is Open Source — You Can Run It Anywhere
n8n is fully open source, so you can self host it for full data privacy or run it locally, like we’re doing here. No per task fees, and more importantly, your data, NetSuite credentials, WhatsApp messages, AI responses, never leaves your own setup.
For enterprise NetSuite users, that’s huge. No sensitive ERP data passing through someone else’s cloud.
Setting Up n8n Locally
Prerequisites
Before installing n8n, make sure Node.js is set up on your machine. We’re using Node.js v24.12.0 and n8n v2.20.9.
n8n needs at least v20.19 to run, anything older like Node 16 or 18 simply won’t work. If you’re on an older version, update before installing.
Node.js version: v24.12.0 n8n version: v2.20.9
⚠️ Important Version Note: n8n version 2.15.1 has a known issue with the OpenAI transcription node (Whisper). If you are planning to transcribe voice messages, which we are, make sure you are on n8n v2.20.9 or later. We ran into this ourselves, so save yourself the trouble.
You can check your Node.js version by running:
node –version
If you do not have Node.js installed, grab the latest LTS version from nodejs.org.
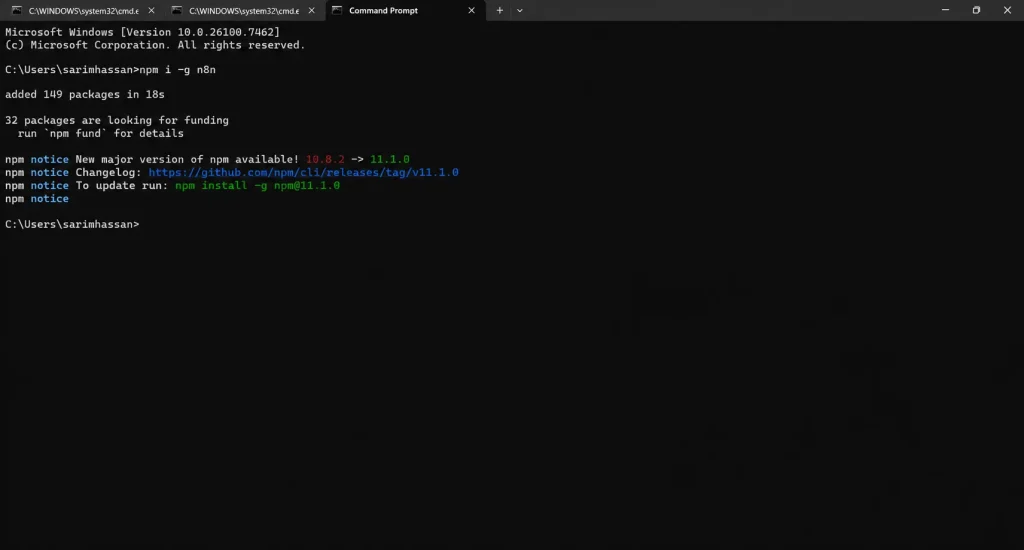
Step 1: Install n8n Globally
With Node.js ready, install n8n globally using npm:
npm i -g n8n
This installs the n8n CLI globally, making the n8n command available from anywhere in your terminal.
Step 2: Start the n8n Server
Once installed, start the n8n server with:
n8n start
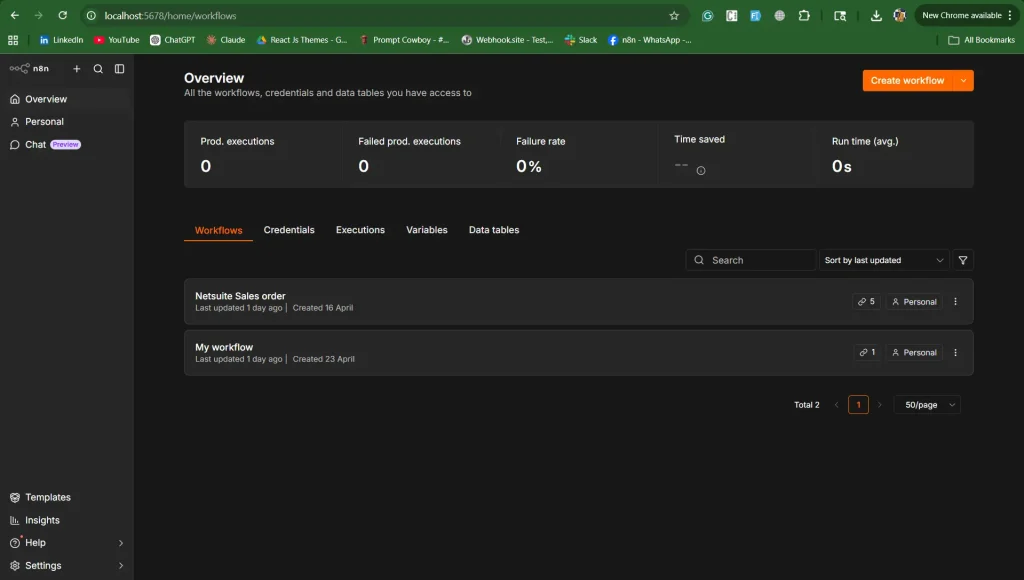
By default, this starts n8n on port 5678. Open your browser and navigate to:
http://localhost:5678
You should see the n8n editor load right up. Create a local account when prompted. This is stored only on your machine.
Understanding Workflow Triggers in n8n
Every n8n workflow must start with a trigger node, the event that kicks off the entire execution chain. Without a trigger, the workflow simply has no way of knowing when to run.
Common trigger types include a Webhook Trigger that listens on an HTTP endpoint, a Schedule Trigger that runs on a cron schedule, and various app-specific triggers for Gmail, Slack, Google Sheets, and more.
In our workflow, we use the WhatsApp Business Trigger, which is essentially a webhook listener that Meta calls every time a message is sent to our registered agent number.
Setting Up WhatsApp Business on Meta
To receive WhatsApp messages in n8n, you need a Meta Developer account with a WhatsApp Business App configured. Here is how to do it step by step.
Step 1: Create a Meta Developer Account
Go to developers.facebook.com and log in with your Facebook account. If you do not have a developer account yet, registering one is free.
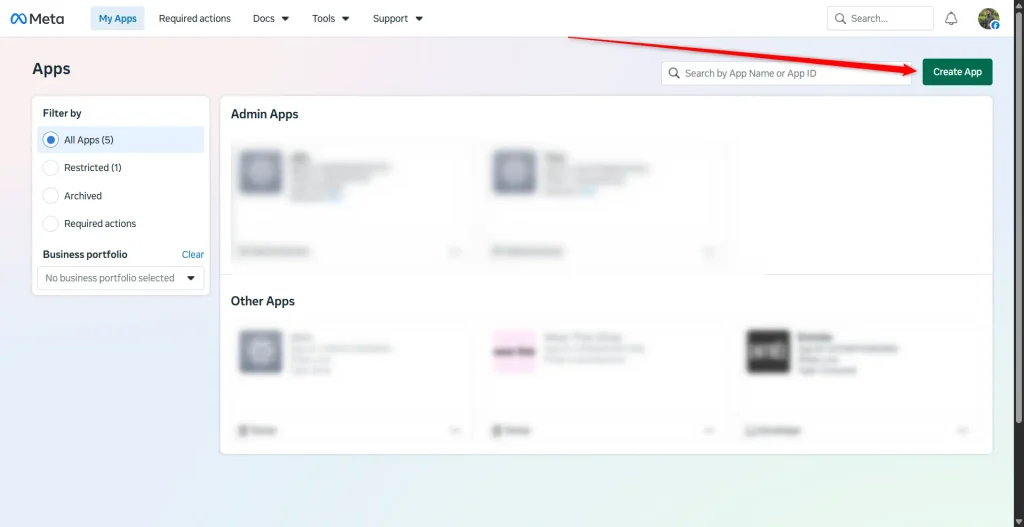
Step 2: Create a New App
From the developers dashboard, click on “Create App”. Next, select “Business” as the app type, fill in a name (something like NetSuite WhatsApp Agent) along with your business email, then click “Create App”.

Step 3: Add the Product (Whatsapp)
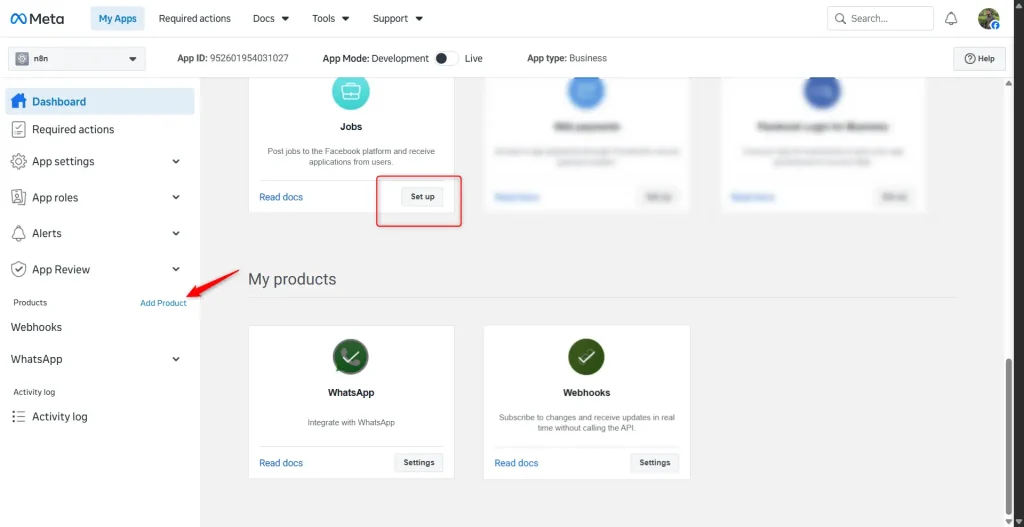
Once your app is created, you will land on the app dashboard. Scroll down to the “Add Products to Your App” section and click “Set up” next to WhatsApp.
Note: “Set Up” button is not visible, it is because WhatsApp has already been added to my Meta app.
Step 4: Register a Phone Number
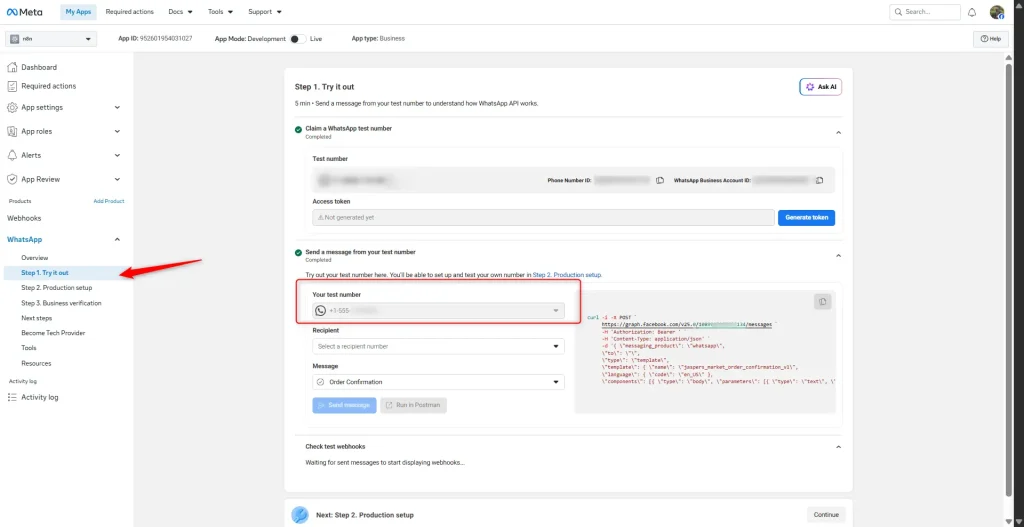
Inside the WhatsApp setup section, navigate to Step 1. Try it out. Meta gives you a free test phone number by default, which is enough to get started. You will see a “From” number already listed there.
If you want to add your own business number, click “Add phone number” under the Phone Numbers section, enter your WhatsApp Business number, and complete the verification via OTP.
Exposing Your Local n8n Server with ngrok
Here is the thing: WhatsApp webhooks require a publicly accessible HTTPS URL to send events to. Since n8n is running on localhost:5678, Meta cannot reach it directly. We need a tunnel to bridge the gap.
We use ngrok, a tool that creates a secure public tunnel to your local server in seconds. It is incredibly simple to set up.
Step 1: Install ngrok
Download ngrok from ngrok.com/download
After installation, authenticate your ngrok agent using the token from your ngrok dashboard (you get this after signing up at ngrok.com):
ngrok config add-authtoken YOUR_AUTH_TOKEN
Step 2: Start the Tunnel
With n8n running on port 5678, open a new terminal window and run:
ngrok http 5678
ngrok will generate a public HTTPS URL that forwards all traffic to your local server. It looks something like this:
https://a1b2c3d4.ngrok-free.app -> http://localhost:5678
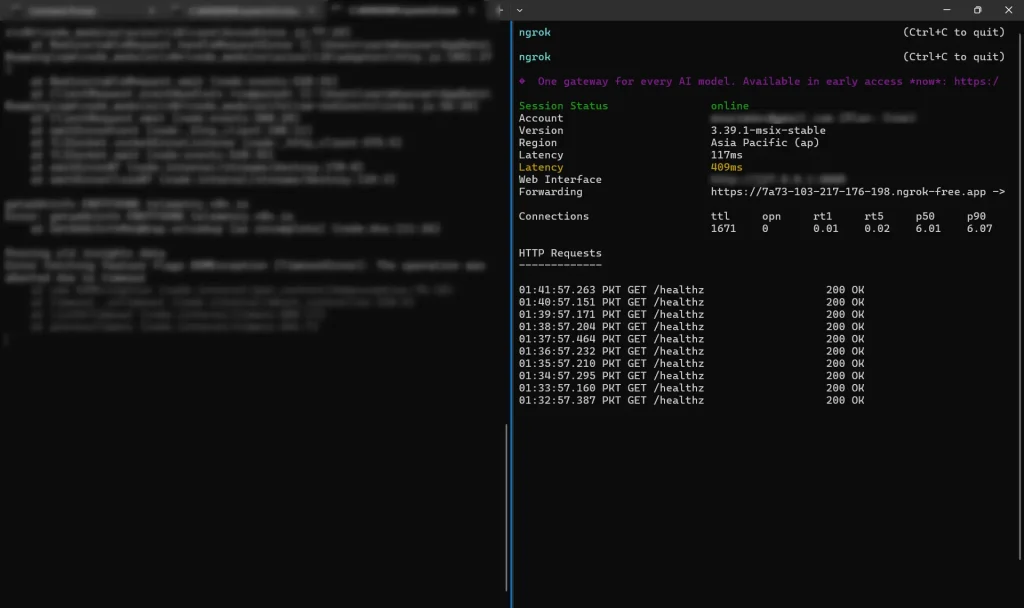
Keep this terminal window open. Closing it will terminate the tunnel, and your webhook will stop receiving messages.
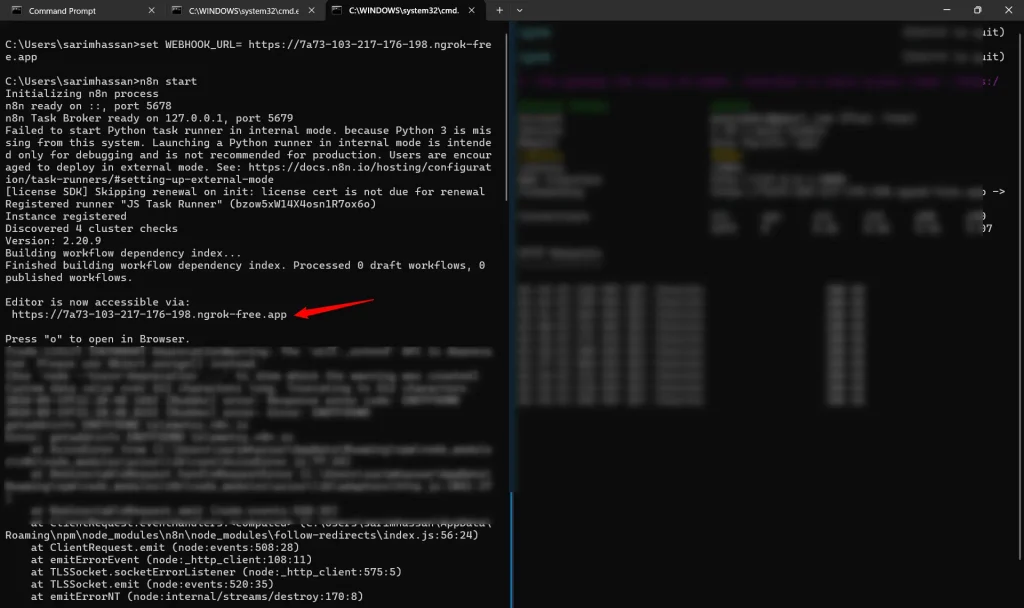
Step 3: Set the Webhook URL Environment Variable
Before configuring the WhatsApp trigger in n8n, you need to tell n8n what its public base URL is. Stop the n8n server, set the environment variable, and restart it.
On macOS or Linux:
export WEBHOOK_URL=https://a1b2c3d4.ngrok-free.app
n8n start
On Windows (Command Prompt):
set WEBHOOK_URL=https://a1b2c3d4.ngrok-free.app
n8n start
Replace the URL above with the actual forwarding URL from your ngrok terminal. This ensures n8n generates webhook URLs that point to your public ngrok address rather than localhost.
Connecting the WhatsApp Trigger in n8n
With n8n running and ngrok exposing it publicly, it is time to wire up the WhatsApp Business trigger inside n8n.
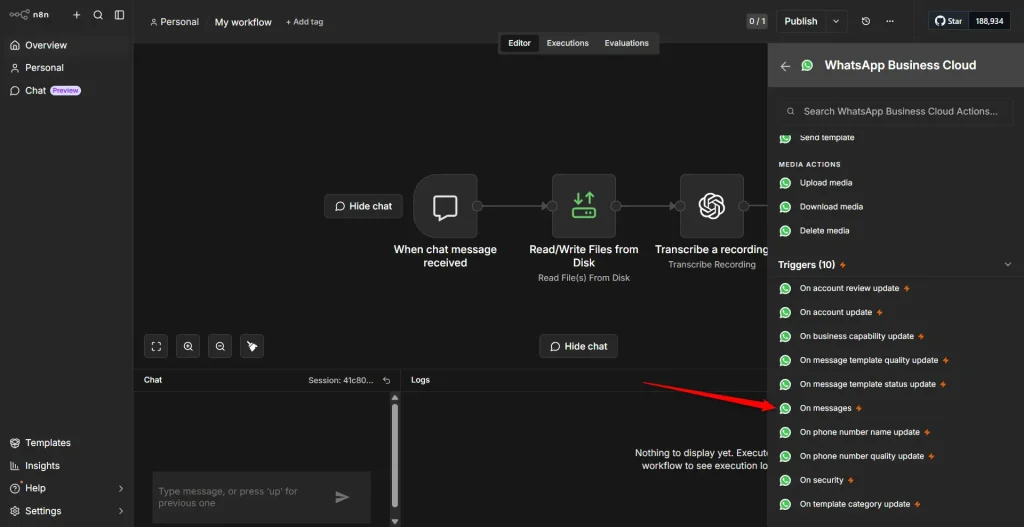
Step 1: Create a New Workflow and Add the Trigger Node
In the n8n editor, click “New Workflow”. Click the “+” button to add a node and search for “WhatsApp Business”. Select the “WhatsApp Business Trigger” from the results.
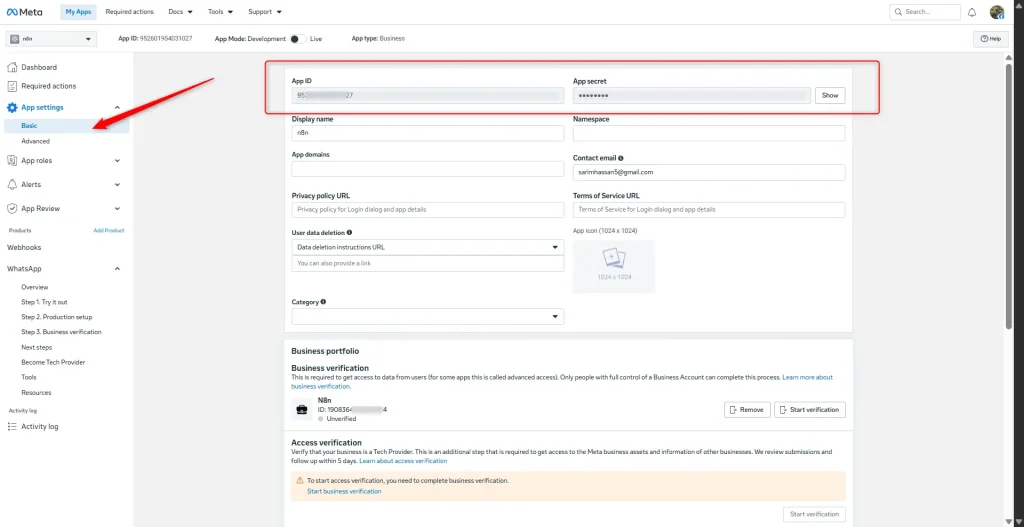
Step 2: Configure Credentials
Inside the trigger node settings, you will need to connect your Meta WhatsApp credentials. You need two things — a Client ID and Client Secret (found in your Meta App dashboard under App Settings > Basic)
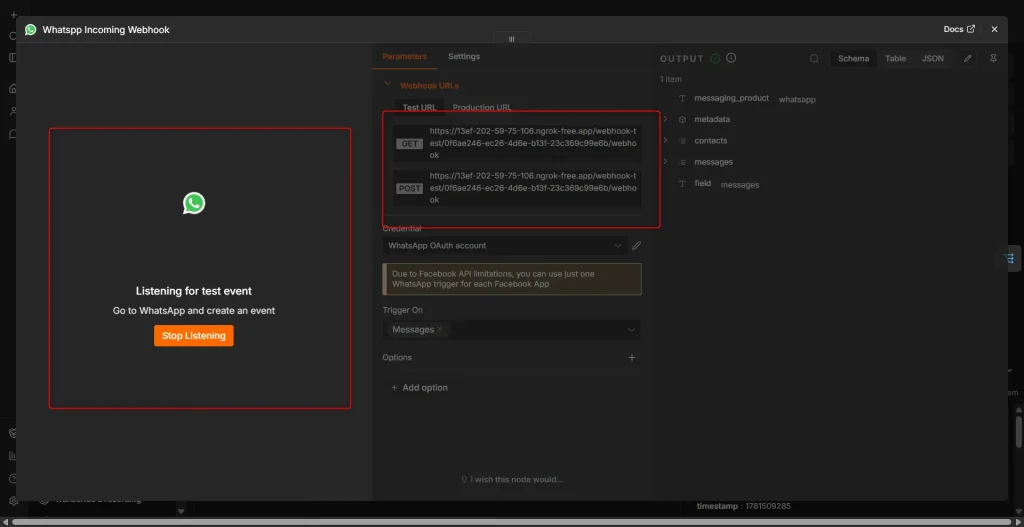
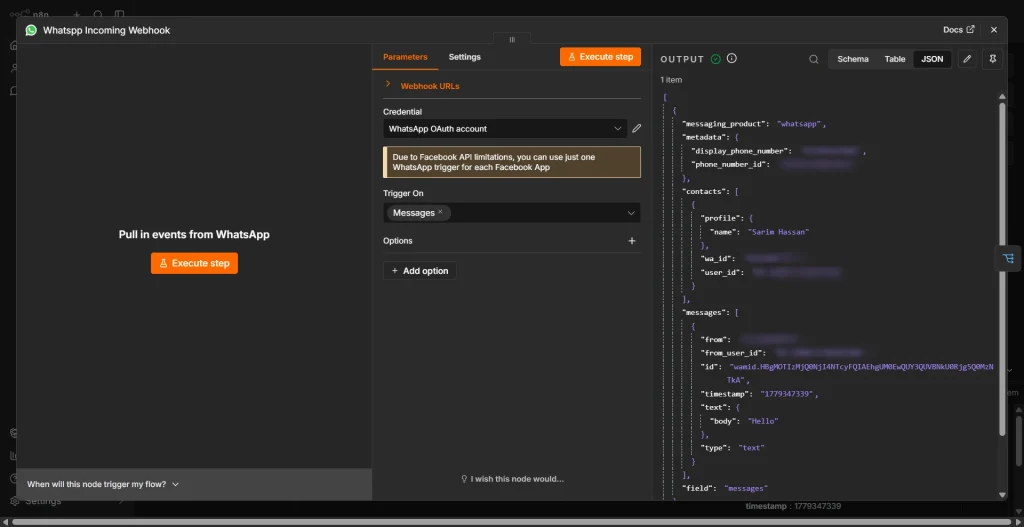
Step 3: Execute the Trigger to Get the Webhook URL
Click “Execute Step” (or “Listen for Event”) on the WhatsApp trigger node. n8n will start listening for incoming events and display the generated Webhook URL in the node output panel.
Copy that webhook URL. It will look something like:
https://a1b2c3d4.ngrok-free.app/webhook-test/a1b2c3d4/webhook
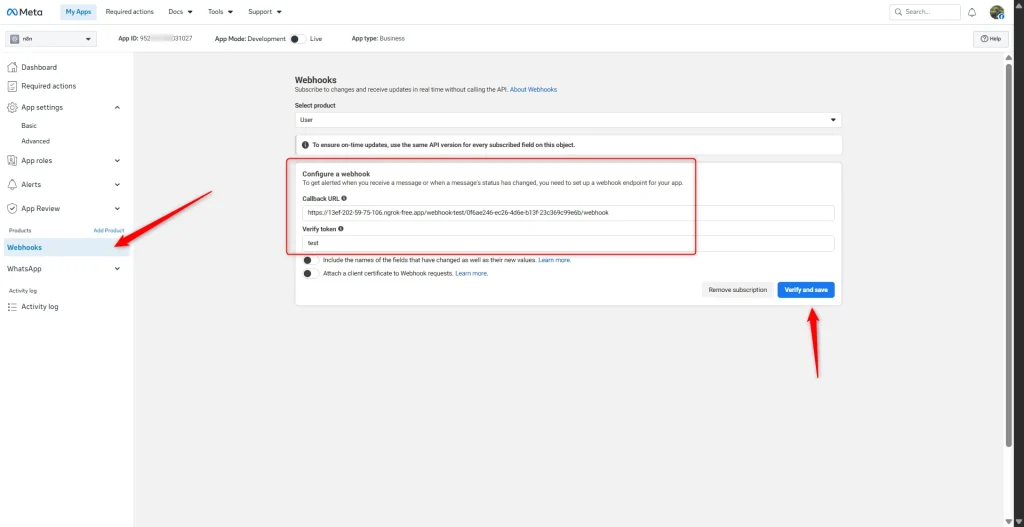
Step 4: Register the Webhook URL in the Meta App
Go back to your Meta App Dashboard > WhatsApp > Configuration. Under the “Webhook” section, click “Edit”. Paste your n8n webhook URL into the “Callback URL” field. Enter a Verify Token — this can be any string you choose (for example, netsuite_whatsapp_agent).
Click “Verify and Save”. Meta will send a GET request to your webhook URL to verify it — n8n will respond automatically, and the verification will go through.
Finally, under “Webhook Fields”, enable the “messages” subscription so Meta starts forwarding incoming messages to your webhook.
Your WhatsApp Trigger is Now Live ✅
Send a WhatsApp message to your registered agent number. You should see the event appear in the n8n execution log with the full message payload displayed inside the trigger node output.
Handling Both Text and Voice Messages with a Switch Node
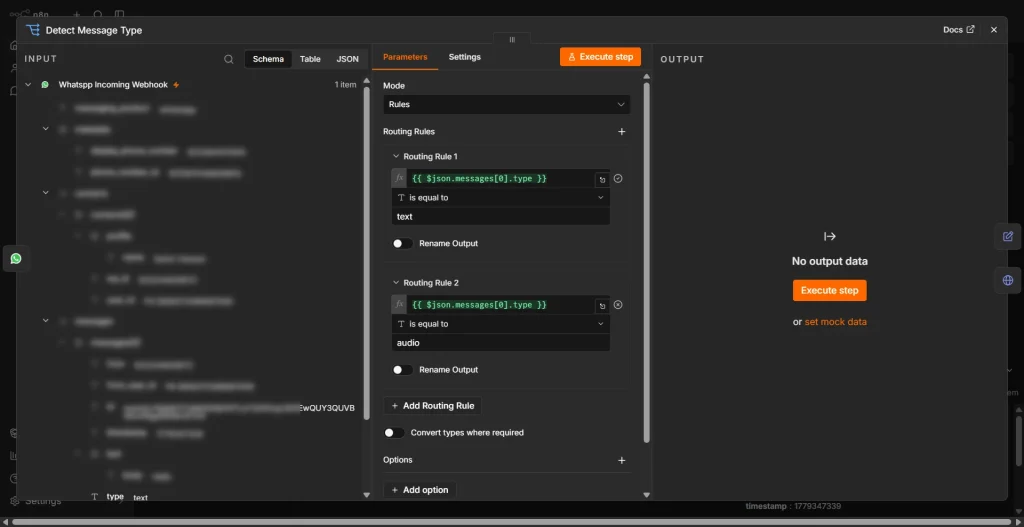
Now that our WhatsApp trigger is live and receiving messages, we need to think about what kinds of messages can actually come in. A user might type a question as plain text, or they might send a voice note. Both are completely valid, and both need to reach the AI agent, but they need to be handled differently before they get there.
This is where the Switch node comes in. The Switch node in n8n works like a conditional router; it looks at the incoming message data and sends the execution down one path or another depending on what it finds. In our case, we check whether the incoming message contains an audio object or not. If it does, we route it through the voice processing path. If it does not, we know it is a plain text message, and we can pass it straight to the AI agent.
Processing Voice Messages: From Audio to Text
The voice processing path has three steps: first, we fetch the audio file URL from Meta, then we download the actual binary audio file, and finally, we send it to OpenAI to transcribe. Let us walk through each one.
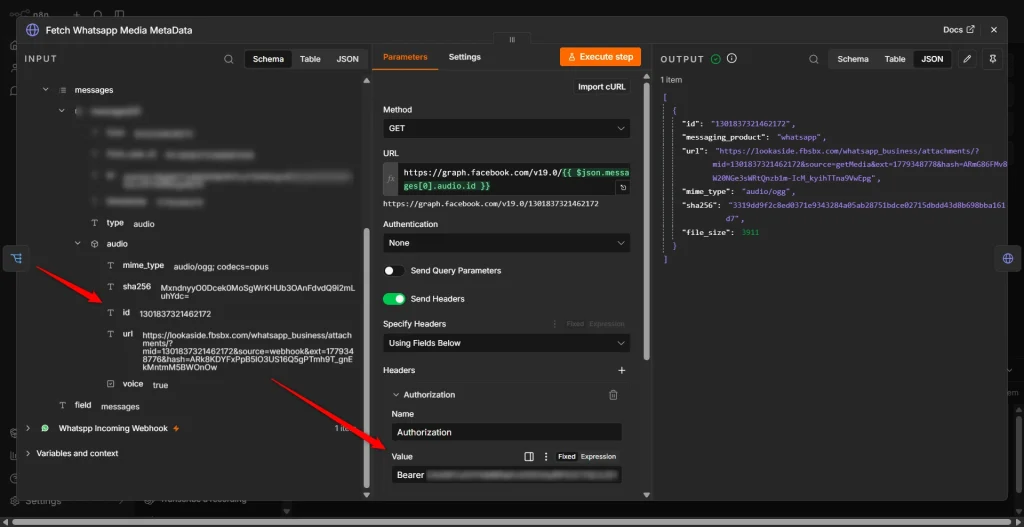
Step 1: Get the Audio File URL from Meta
When WhatsApp sends a voice message to your webhook, the payload does not include the audio file directly. Instead, Meta gives you an audio ID inside the message object. You have to make a separate API call to Meta’s Graph API to exchange that ID for the actual download URL.
To do this, add an HTTP Request node right after the Switch node (on the voice branch). Configure it as a GET request pointing to:
https://graph.facebook.com/v19.0/{{ $json.messages[0].audio.id }}
The {{ $json.messages[0].audio.id }} part is an n8n expression that dynamically pulls the audio ID out of the incoming WhatsApp message payload. When this node executes, Meta returns a JSON response containing a url field that is the temporary download link for the actual audio file.
Make sure you pass your WhatsApp Access Token as a Bearer token in the Authorization header of this request; Meta will reject it.
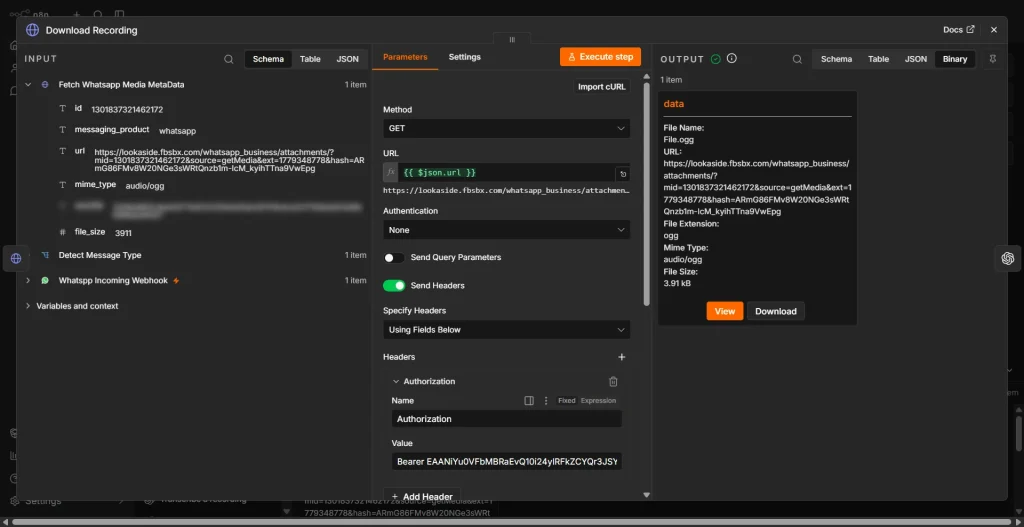
Step 2: Download the Audio Binary File
Now that we have the audio URL, we need to actually download the file. Add another HTTP Request node right after the previous one. This time, point it to the URL returned by the last node. You can reference it using an n8n expression like:
{{ $json.url }}
The critical thing to get right here is telling n8n to treat the response as a binary file rather than JSON or text. In the HTTP Request node settings, set the Response Format to “File”. This instructs n8n to store the downloaded content as a binary data object, which is exactly what the OpenAI transcription node expects to receive.
Once this node runs, you will have the raw audio binary sitting in the workflow, ready to be transcribed.
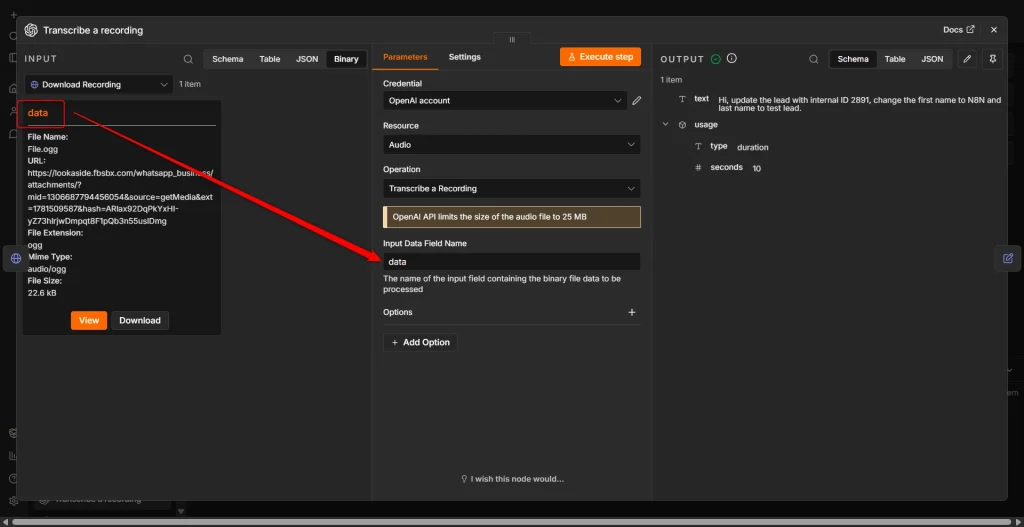
Step 3: Transcribe the Voice Message Using OpenAI
With the binary audio file in hand, the next step is transcription. Add the OpenAI node and select “Transcribe a Recording” as the operation (this uses OpenAI’s Whisper model under the hood).
For the input, point it to the binary data from the previous node. n8n will automatically pass the audio file to Whisper, and the node will return the transcribed text as a plain string.
This transcribed text is now exactly the same format as a message that came in as plain text, which means both branches of our Switch node now converge at the same point: a clean text string ready to be sent to the AI agent.
Normalizing the Payload Before the AI Agent
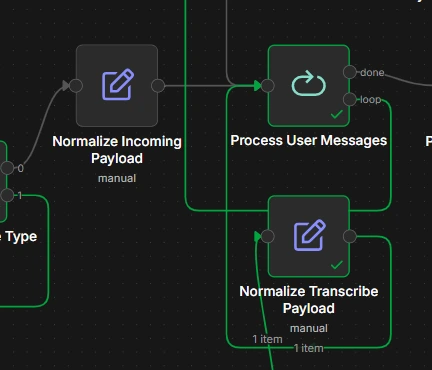
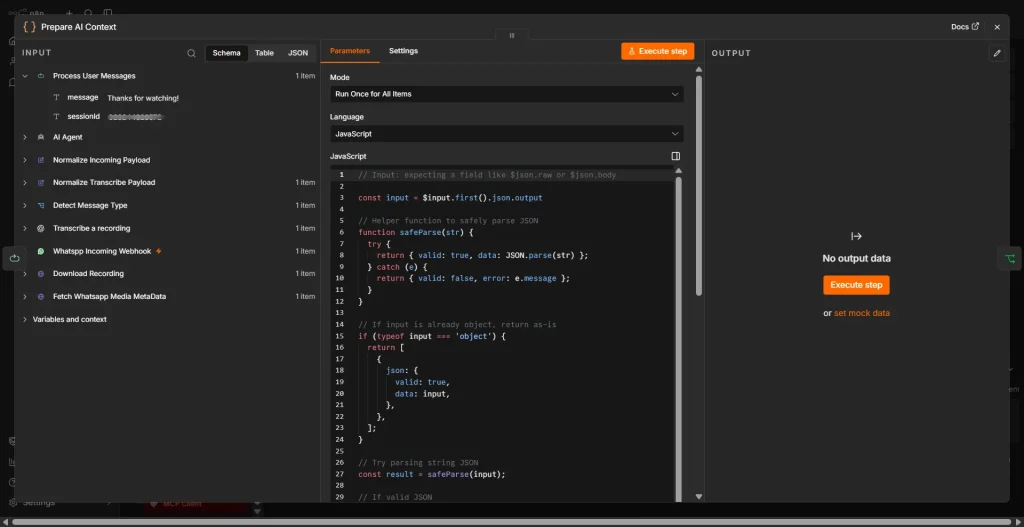
At this point in the workflow, both paths, text messages and transcribed voice messages, have produced a clean text string. But they arrive from different nodes with slightly different data shapes. Before feeding anything into the AI agent, it is good practice to normalize the payload into a consistent structure so the agent always receives the same format regardless of where the message came from.
Looking at the workflow, you can see two Normalize nodes, one on the text path labeled “Normalize Incoming Payload” and one on the voice path labeled “Normalize Transcribe Payload”. Both of these are simple Set nodes that extract the message text and map it to a standard field, for example, userMessage, that every downstream node can rely on. Once both paths have been normalized, they converge into the Process User Messages node, which prepares the final input for the AI agent.
The AI Agent: The Brain of the Workflow
This is the main highlight of the entire workflow. The AI Agent node in n8n is where the intelligence lives. It takes the user’s message, thinks about it using the configured language model, consults its memory for previous context, calls whatever tools it needs, in our case, NetSuite MCP Tools, and produces a response.
From the workflow image, you can see the AI Agent node has three sub-connections attached to it: a Model, a Memory, and Tools. Each one plays a distinct role and needs to be configured separately.

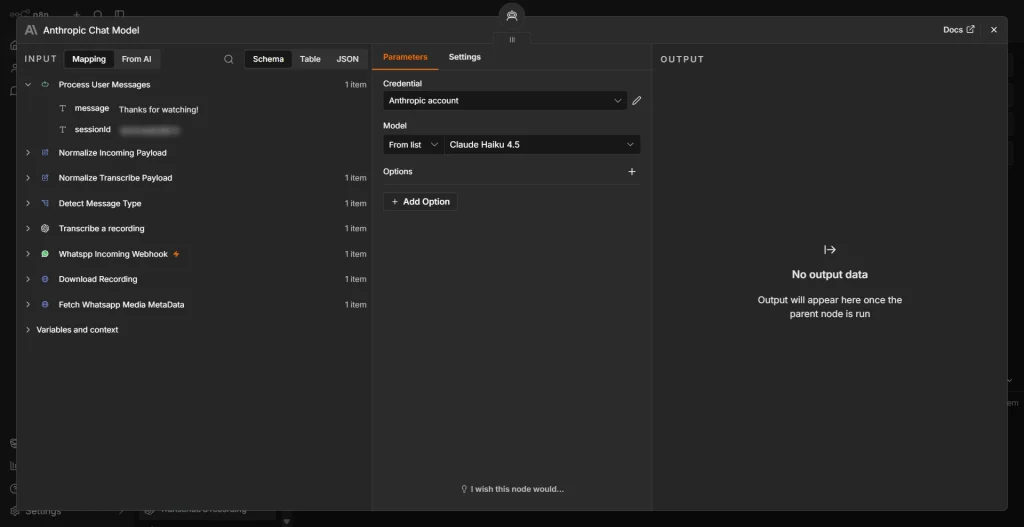
Connecting the Language Model
For the language model, we are using Anthropic’s Claude via the Anthropic Chat Model node. You can see this in the workflow connected to the Model slot of the AI Agent. To set this up, add the Anthropic Chat Model node, select the Claude model you want to use, and connect your Anthropic API key in the credentials.
If you prefer to use OpenAI’s GPT models instead, n8n supports that just as easily. Simply swap the Anthropic node for the OpenAI Chat Model node and point it to your OpenAI credentials. The AI Agent node accepts any compatible language model.
Getting Your API Keys: OpenAI and Anthropic
If you haven’t set up your OpenAI and Anthropic API keys yet, follow our step-by-step guide: Dual API Integration: Using NetSuite MCP Tools with OpenAI and Anthropic.
Adding PostgreSQL Memory for Contextual Conversations
Without memory, every single message the user sends would be treated as a completely fresh conversation. The agent would have no idea what was discussed five seconds ago. That is clearly not how a useful assistant should behave.
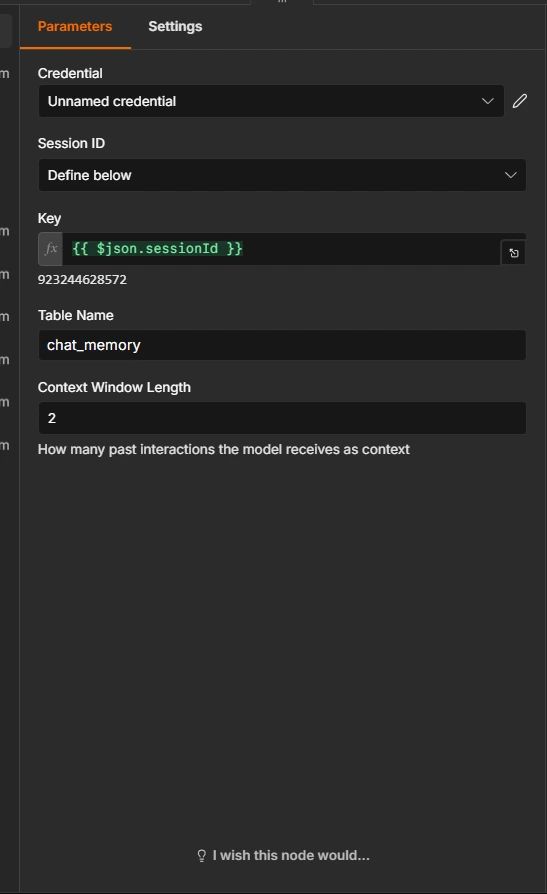
To fix this, we connect a Postgres Chat Memory node to the Memory slot of the AI Agent. This node stores the conversation history in a PostgreSQL database table and retrieves it on every new message, giving the agent full context of what has been said before.
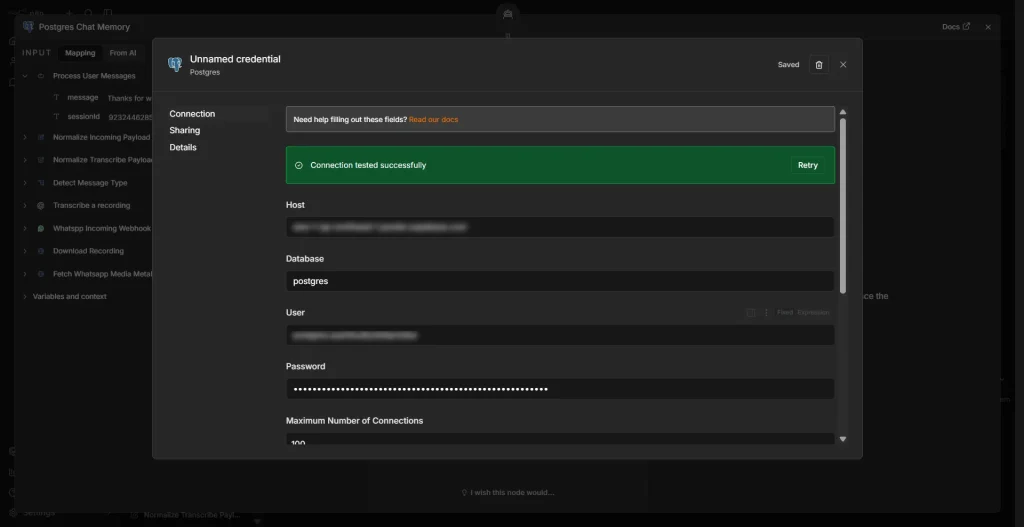
The best part is that you do not need to worry about creating the database schema yourself. You just provide your PostgreSQL connection credentials, host, port, database name, username, and password, and n8n handles the table creation and schema management automatically. It creates a chat history table in your database and manages inserts and lookups on your behalf.
To configure it, add the Postgres Chat Memory node, create a new PostgreSQL credential with your database connection details, and connect the node to the Memory slot on the AI Agent. That is genuinely all there is to it.
Connecting NetSuite MCP Tools
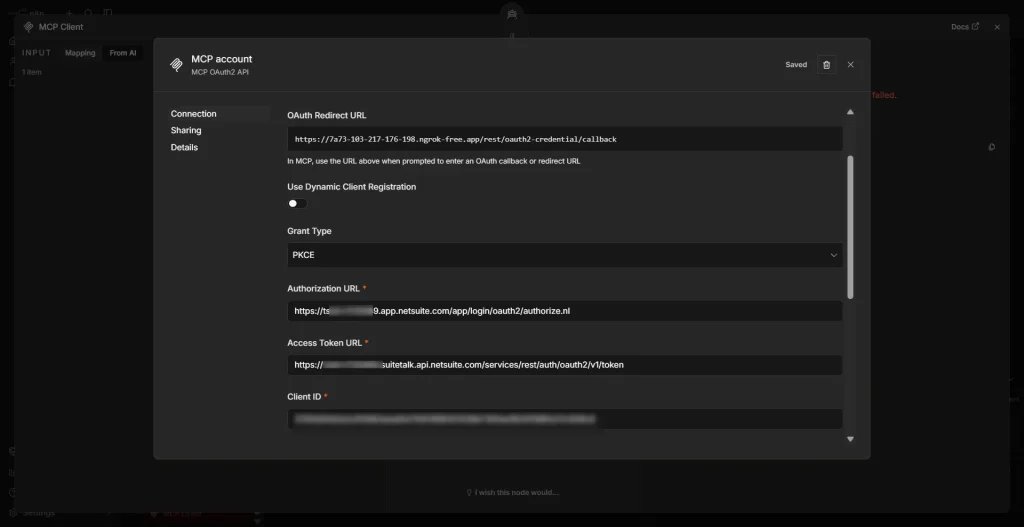
This is where the NetSuite integration comes in. The MCP Client node connects to your NetSuite MCP server and exposes all the tools it provides, querying records, fetching invoices, looking up customers, checking sales orders, and so on, directly to the AI agent.
Before you can connect n8n to NetSuite, though, there is some one-time configuration that needs to happen inside your NetSuite account first. Specifically, you need to install the MCP Tools SuiteApp in your NetSuite instance, create a dedicated MCP role and assign the appropriate permissions to it, and then create a new Integration Record which gives you the OAuth 2.0 credentials your MCP server will use to authenticate. These steps are done entirely inside NetSuite and only need to be done once.
We have a dedicated blog that walks through all of this in detail. If you have not set up your NetSuite account yet, go through this guide first before continuing: A Complete Setup Guide for NetSuite AI Connector.
Once your NetSuite side is configured and your MCP server is up and running, come back here and continue with the n8n setup.
To set this up, add the MCP Client node and connect it to the Tools slot on the AI Agent. Inside the node configuration, you will need to provide the URL of your running NetSuite MCP server along with the authentication credentials (your NetSuite OAuth 2.0 tokens). Once connected, the AI agent can call any of the exposed NetSuite tools automatically whenever the user’s message requires it.
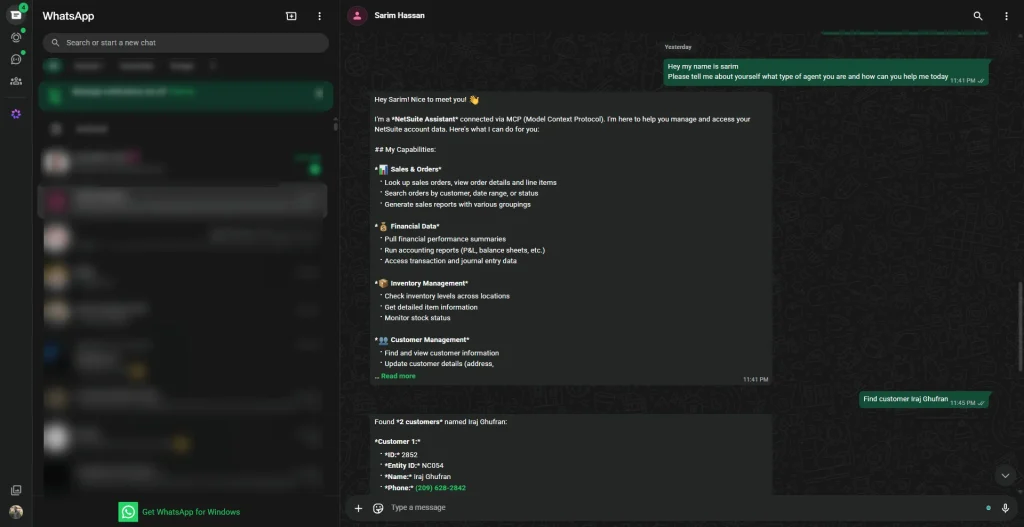
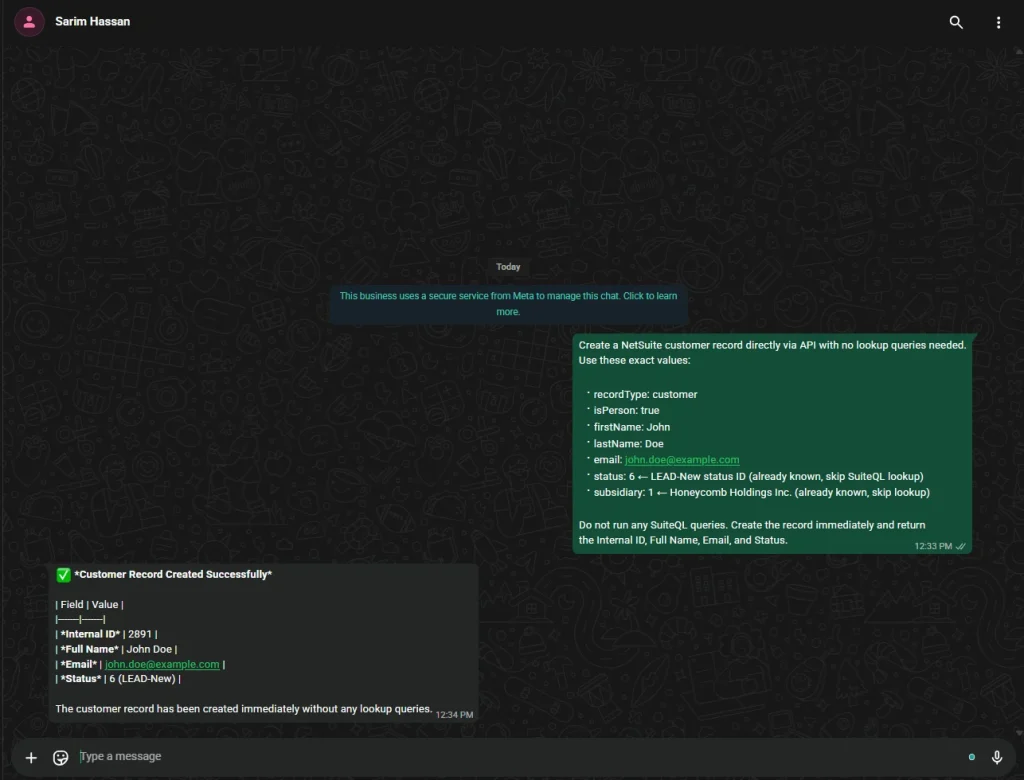
For example, if a user asks “What are the open invoices for customer ABC?”, the agent will recognize that it needs to query NetSuite, call the appropriate MCP tool with the right parameters, get the data back, and weave it into a natural language response, all without you writing a single line of integration code.
Using a Loop to Handle Multiple Simultaneous Messages
There is a practical problem worth thinking about here. WhatsApp users do not always send one message at a time. Someone might send three or four short messages in quick succession: “Hey,” “I need to check something”, “What is the status of order 1234?” all within a few seconds of each other. Without any queuing logic, all of these could hit the workflow simultaneously and cause race conditions or jumbled responses.
To handle this gracefully, the workflow uses a Loop node that processes incoming messages one at a time in sequence. Looking at the workflow image, you can see this in action. The loop ensures that even if multiple messages arrive at once, each one gets picked up, processed fully through the AI agent, and responded to before the next one begins. It essentially turns a flood of simultaneous messages into an orderly queue.
Checking and Formatting the AI Response
Once the AI agent generates its response, there are two more steps before it goes back to the user.
The first is the Check AI Response node. This is a simple validation step that verifies the agent actually produced a usable response and handles any edge cases where the output might be empty or malformed.
The second is the Format WhatsApp Reply node. WhatsApp messages have certain formatting quirks. For instance, it uses asterisks for bold text rather than markdown, and long responses need to be structured carefully to be readable on a mobile screen. This node takes the raw AI response and shapes it into something that will look clean and readable when it arrives in a WhatsApp chat.
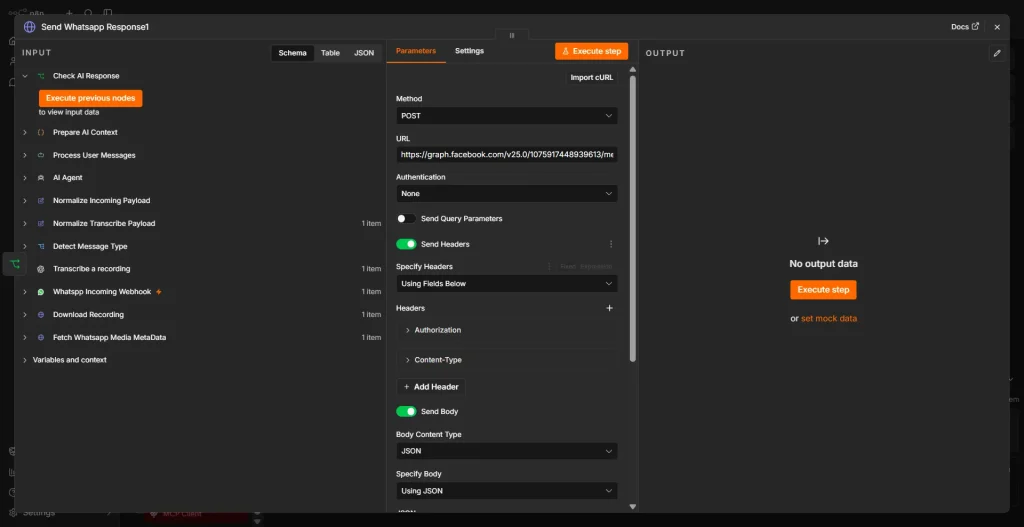
Sending the Response Back to WhatsApp
The final step is sending the formatted response back to the user. This is handled by the Send WhatsApp Response node, which is an HTTP Request node making a POST call to:
https://graph.facebook.com/v19.0/{PHONE_NUMBER_ID}/messages
The request body contains the recipient’s phone number (extracted from the original incoming message) and the formatted text response. Just like the earlier Meta API calls, this request requires your WhatsApp Access Token in the Authorization header.
When this node executes successfully, the user receives the AI agent’s response directly in their WhatsApp chat, completing the full round trip from message received to intelligent reply delivered.
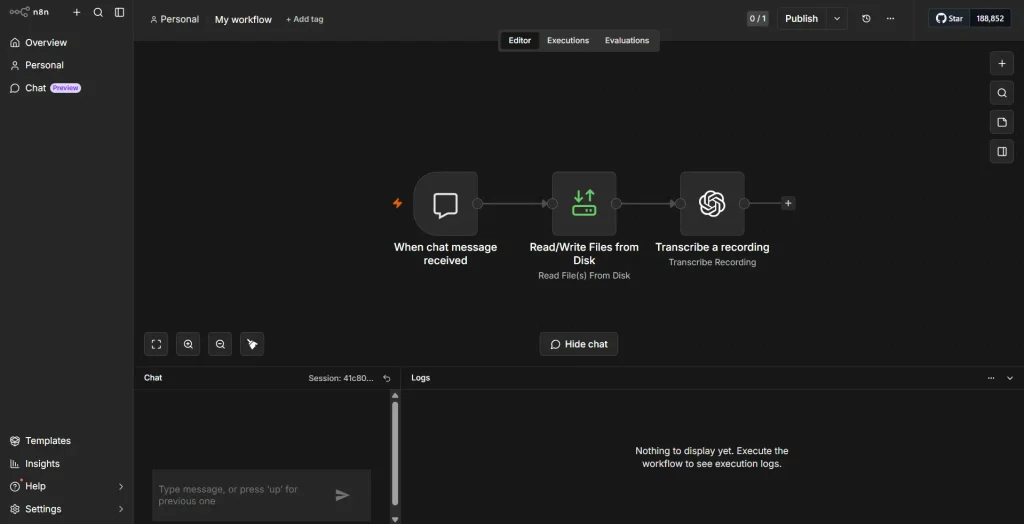
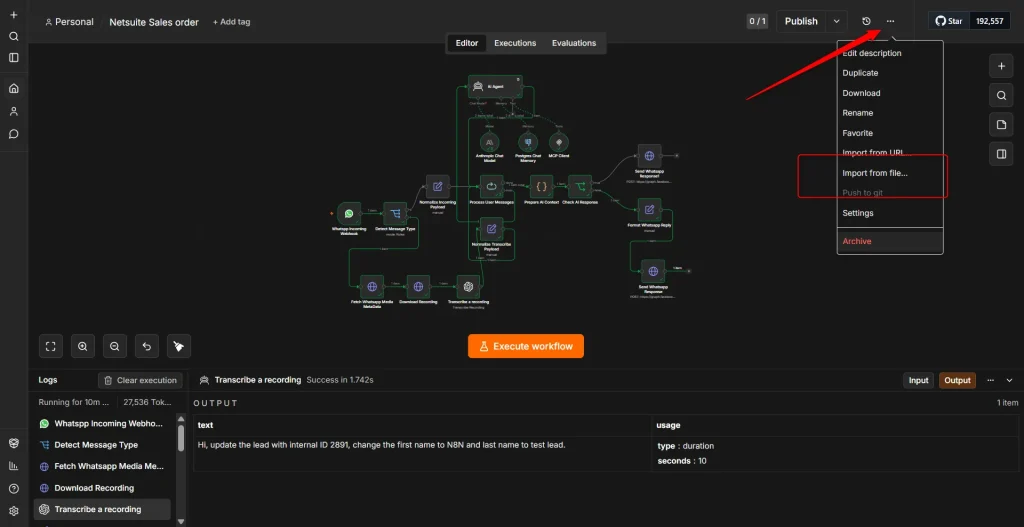
Audio Transcription with OpenAI Whisper
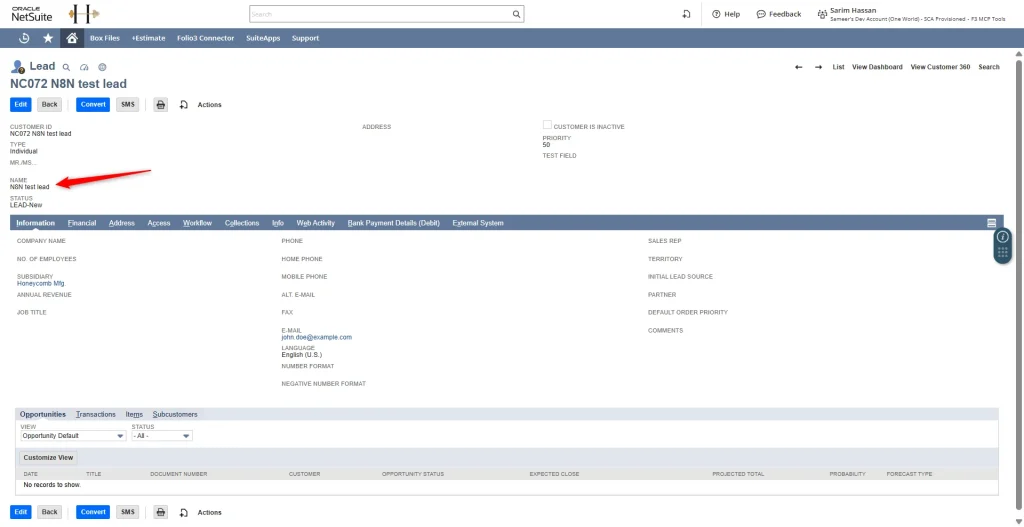
Audio Message:
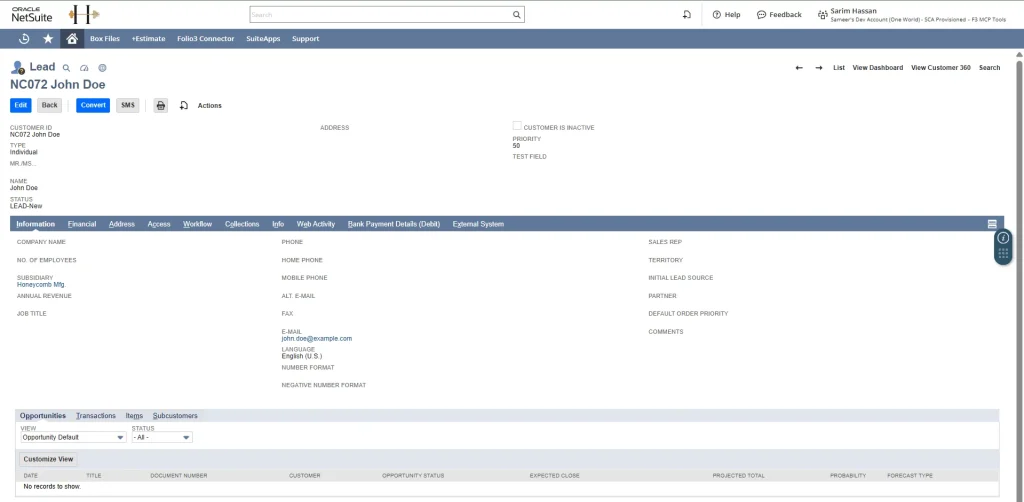
“Hi, update the lead with internal ID 2891, change the first name to N8N and last name to test lead.”

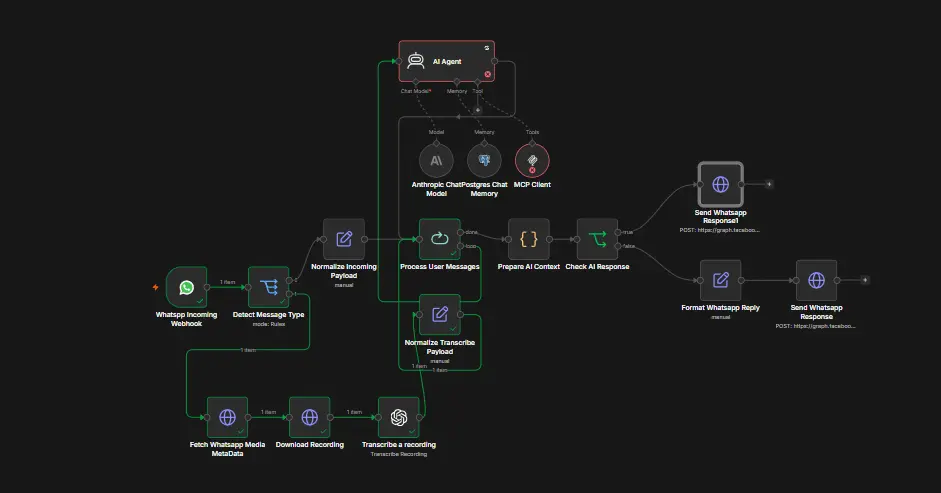
The Complete Workflow at a Glance
Looking at the full workflow in n8n, here is what the entire chain looks like from start to finish. The WhatsApp Incoming Webhook receives the message. The Detect Message Type switch routes the voice messages to go through Fetch WhatsApp Media Metadata, Download Recording, and Transcribe a Recording before being normalized. Text messages are normalized immediately. Both paths converge at Process User Messages, which feeds the AI Agent backed by Anthropic Claude, Postgres memory, and NetSuite MCP Tools. The response is checked, formatted, and finally sent back to the user via the Send WhatsApp Response node.
Download and Use the Workflow
To help you get started quickly, we’ve provided the complete n8n workflow used in this blog.
Workflow Download:
Download File
Simply download the JSON file from the link above and import it directly into your n8n instance. Once imported, you can review the workflow structure, update the credentials and configuration according to your environment, and start using it immediately.
This workflow serves as a practical reference for building AI-powered NetSuite automations using n8n and MCP tools, helping you accelerate your implementation without having to build everything from scratch.
What comes next?
What we built here is a fairly simple workflow, but it points to something bigger. Once WhatsApp, an AI agent, and a live system like NetSuite are connected through a common protocol like MCP, there’s a lot more you can do with that same setup.
The NetSuite MCP server we used out of the box covers the basics, querying records, checking invoices, looking up sales orders. But MCP is an open protocol, so you’re not stuck with just that. You can build your own MCP server and expose whatever tools your business actually needs.
Say you build a custom tool that syncs NetSuite with Shopify. Now a warehouse manager can just send a WhatsApp message like “sync sales order 1234 to Shopify.” The agent picks up the intent, calls the right tool with the right order ID, and pushes the update through, no dashboard, no code, just a text message.
And this isn’t limited to WhatsApp triggered actions either. The same n8n setup can run scheduled or agentic workflows in the background. You could have a scheduled script that checks for overdue invoices every morning and triggers a NetSuite RESTlet to send reminder emails to clients automatically, no manual step involved.
That’s really the direction this is headed. Inventory syncs, fulfillment updates, approval flows, automated reports, scheduled email triggers, any of it can be wired up as an MCP tool or a scheduled n8n workflow. The core setup stays the same, only the tools and triggers change.
What we built today is just the starting point. Where you take it from here is up to you.
Related Reads
For those who want to go full ninja mode, check out additional blogs for further technical insights to automate your workflows. Because why do things manually when you can automate?
Getting Started
- A Complete Setup Guide for NetSuite AI Connector
- A Setup Guide for NetSuite AI Connector with Postman: API Integration Tutorial
- Getting Started with NetSuite SuiteTalk REST API in Postman
- NetSuite MCP OAuth 2.0 Token Generator Tool
- SuiteScript Essentials: A Developer’s Getting Started Guide
- Open Source for Dummies: A Beginner’s Open Source Journey
MCP + Client Integrations
- IDE Integration Guide for NetSuite MCP Tools in Cursor & VS Code
- Connecting MCP with ChatGPT: A Complete Guide
- Connecting MCP Tools with Qwen
- Connecting ChatGPT Business with NetSuite via MCP: The Future of Enterprise AI Integration
- OAuth 2.0 in NetSuite: Complete Setup Guide (Client Credentials Flow)
Advanced & Architecture
- A Development Guide to Build Custom Tools for NetSuite AI Connector
- Dual API Integration: Using NetSuite MCP Tools with OpenAI and Anthropic
- NetSuite MCP Challenge: Implementation Case Study & Results
- MCP Input Formats Compared: Token Usage Analysis for NetSuite MCP Tools
- Integrating NetSuite MCP Tools with AI-Powered CLI Tools
Together, these resources form a solid foundation, walking you through everything from initial configuration and authentication to advanced deployment, so you can integrate AI with NetSuite smoothly and without any issues.