What if an online store could use the same product information, pricing, inventory, customer records, and orders already managed inside NetSuite?
That is the main value of SuiteCommerce. Instead of operating an isolated storefront and repeatedly synchronizing it with an ERP, businesses can build B2B and B2C shopping experiences directly around their NetSuite data and processes.
Customers can discover products, see relevant prices, place orders, and manage their accounts, while the business continues managing inventory, transactions, fulfillment, and customer information from a connected platform.
For developers, SuiteCommerce offers more than storefront styling. It provides an opportunity to improve product discovery, simplify checkout, introduce customer self-service features, automate business processes, and create reusable functionality through themes and extensions.
This guide takes you from your first look at SuiteCommerce to configuring the account, understanding the storefront, creating an extension, deploying it, and troubleshooting common problems.
Who is this guide for?
This guide is designed for developers starting their first SuiteCommerce project, NetSuite developers moving from SuiteScript into storefront development, administrators who want to understand how Commerce configuration affects the website, and technical teams troubleshooting a customization that works locally but not on the live domain.
You do not need previous SuiteCommerce experience, but basic knowledge of JavaScript, HTML, CSS, and NetSuite navigation will help.
| Key idea: Treat SuiteCommerce as one connected commerce system. When something fails, trace the request from the browser through the application, configuration, data, server service, permissions, and deployment state. |
See How a SuiteCommerce Page Comes Together
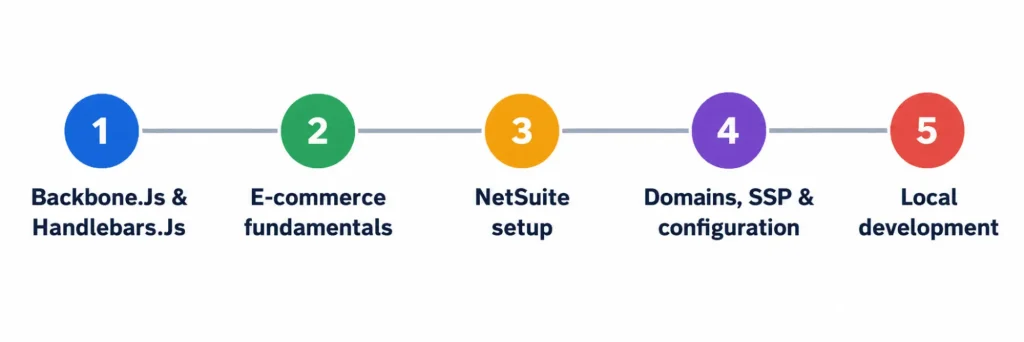
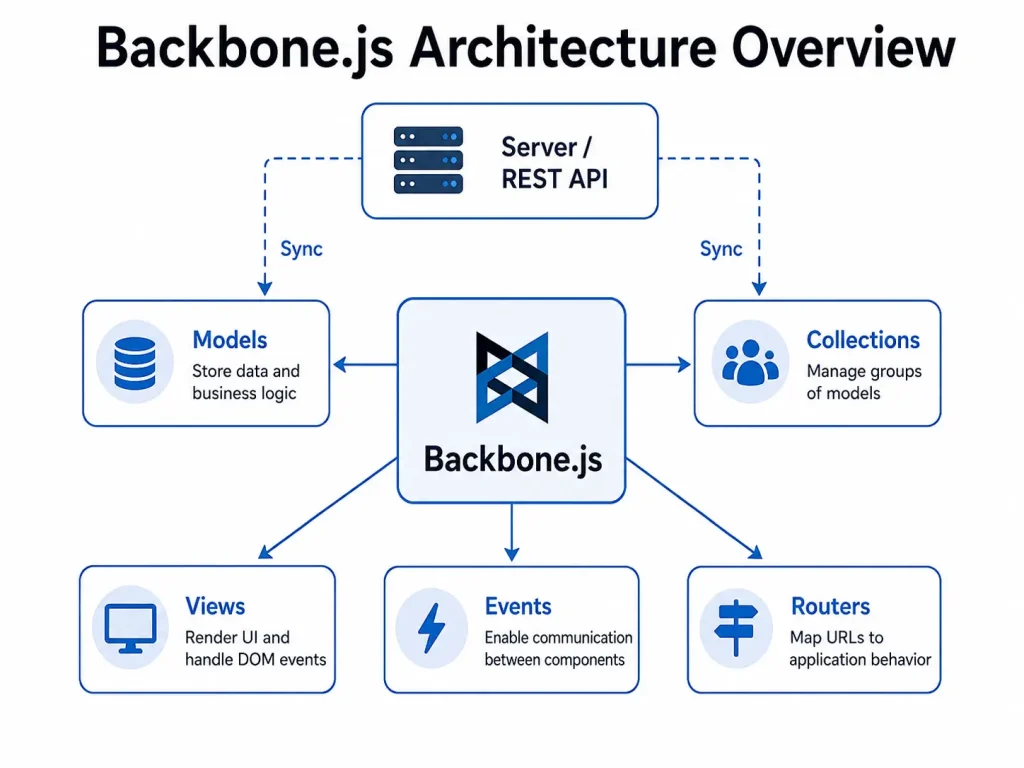
SCA uses familiar web technologies, but each one has a specific responsibility. Backbone.js organizes browser-side behavior into models, collections, views, routers, and events; Backbone, The Primer provides a useful introduction to these concepts. Handlebars.js renders the view context as HTML, while SuiteCommerce modules connect those pieces to platform APIs and components exposed through the Frontend Extensibility API.
At a high level, NetSuite supplies the data, a model holds it, a view prepares it, a template displays it, and events respond to the shopper’s actions.
Core Backbone.js concepts
| Concept | Role in SuiteCommerce |
|---|---|
| Model | Represents a business object or response, stores its data, and can fetch or save it. |
| Collection | Manages a group of models such as search results, cart lines, or product lists. |
| View | Renders a template, listens for browser events, manages child views, and prepares the template context. |
| Router | Maps storefront URLs to actions and views without requiring a full page reload. |
| Events | Allows modules to react to changes while keeping components loosely coupled. |
How Handlebars keeps templates data driven
A Backbone view prepares a context object, and a Handlebars template converts that context into HTML. Expressions such as {{name}} render values, {{#if}} and {{#each}} control blocks, and SuiteCommerce helpers such as translate support platform behavior without placing business logic inside the template.
<article class="product-card">
  <h2>{{name}}</h2>
  {{#if isInStock}}
    <button data action="add-to-cart">{{translate 'Add to Cart'}}</button>
  {{else}}
    <span>{{translate 'Out of Stock'}}</span>
  {{/if}}
</article>| Practical takeaway: Backbone controls how the page behaves; Handlebars controls how prepared data appears. Keeping those responsibilities separate makes extensions easier to test and maintain. |
Follow the Shopper from Discovery to Self-Service
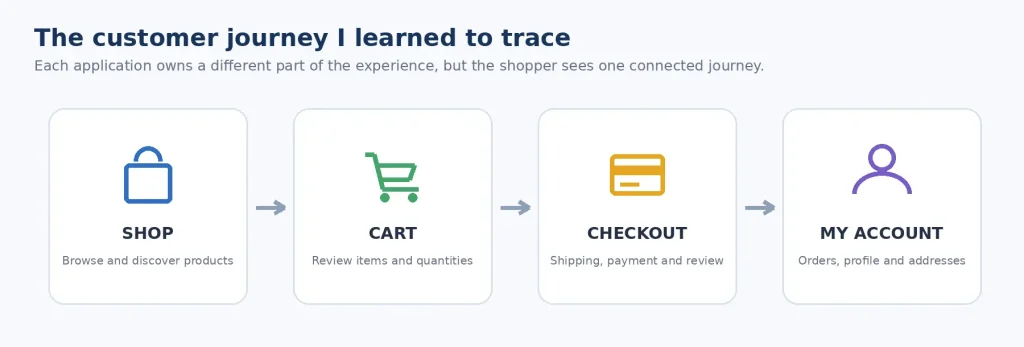
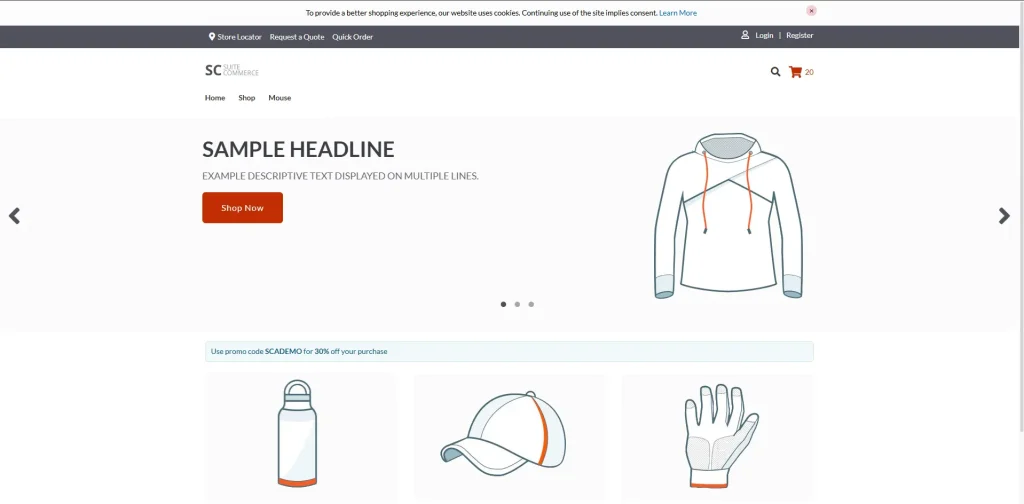
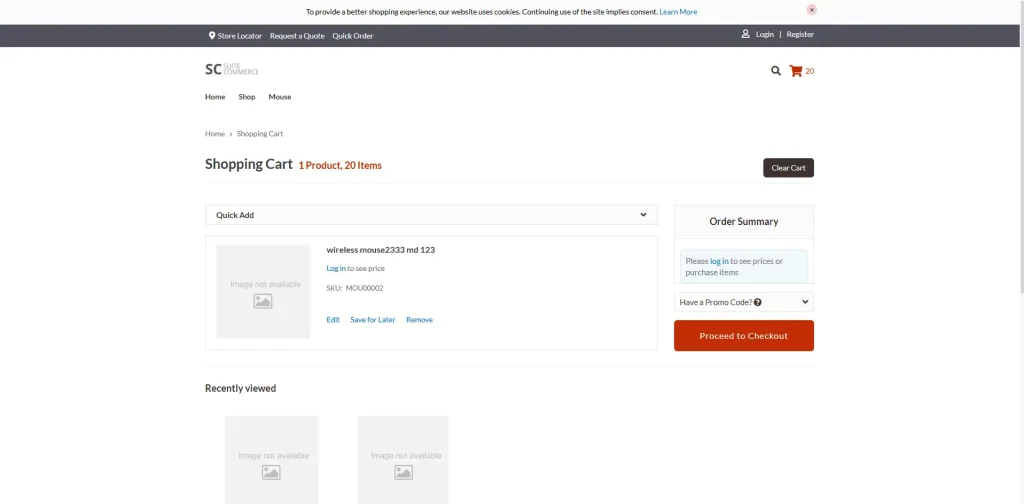
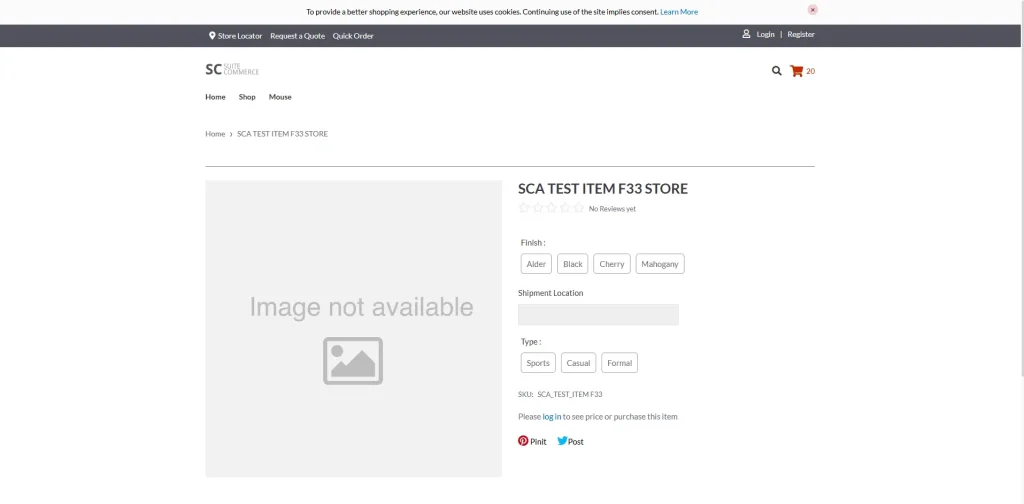
The technical layers make more sense when they are connected to the shopper journey. A customer discovers items in Shopping, adds products to the cart, completes the order in Checkout, and later uses My Account for orders, addresses, profile details, quotes, and other self service features. Oracle’s SuiteCommerce Customer Management documentation explains the customer facing capabilities and account management options in more detail.
| Application | Main responsibility | What developers should understand |
|---|---|---|
| Shopping | Product discovery and cart building | Categories, search, facets, PDPs, pricing, inventory, and Add to Cart |
| Checkout | Completing an order | Shipping methods, addresses, payment, validation, and order review |
| My Account | Post purchase self service | Orders, returns, quotes, profile details, addresses, and account specific pages |
Although these are separate application areas, the shopper should experience them as one continuous site. Themes, extensions, configuration, domains, and touchpoints must therefore target the correct application without creating inconsistent behavior between Shopping, Checkout, and My Account.
Prepare NetSuite for its First Storefront
Before building or troubleshooting a storefront, confirm that the NetSuite account is prepared for Commerce. Start with Oracle’s Enable Features and Set Preferences and Commerce Features guidance, then follow Install Your Commerce Website Applications for the application and bundle installation sequence. The broader Commerce documentation can be used when a prerequisite or feature varies by Commerce product.
Account readiness checklist
- Confirm that the required SuiteCommerce product is provisioned for the account
- Enable the required Web Presence features
- Install the Commerce website applications, Extension Management Bundles, and the required themes or extensions
- Create or review the Web Site Setup record before configuring domains and applications
- Set up the initial field sets and search index so the frontend receives the required item data
- Use a sandbox and enable only the features required by the implementation. Feature availability and labels can vary by account and release.
What important features to enable
Before configuring the storefront, go to Setup > Company > Enable Features > Web Presence and verify the Commerce features required for the implementation. The screenshots below group the relevant settings under the Web Site, Publishing, and Access sections.
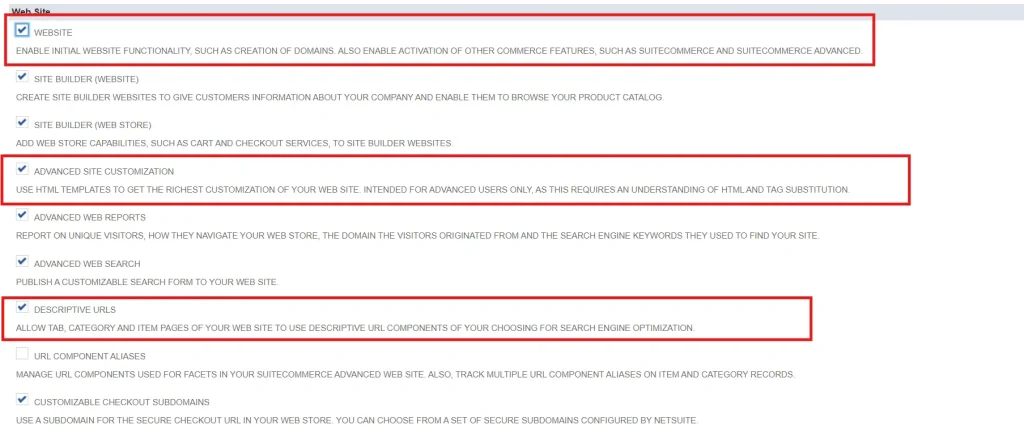
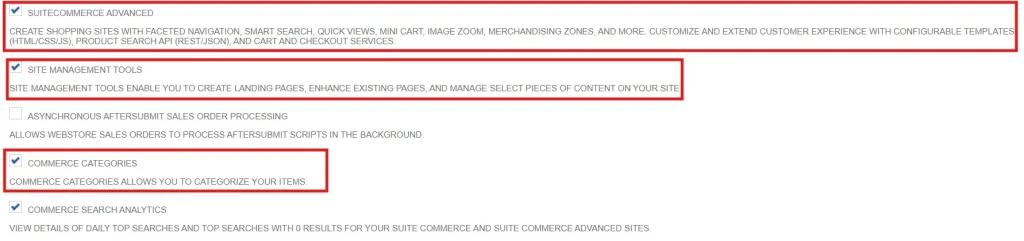
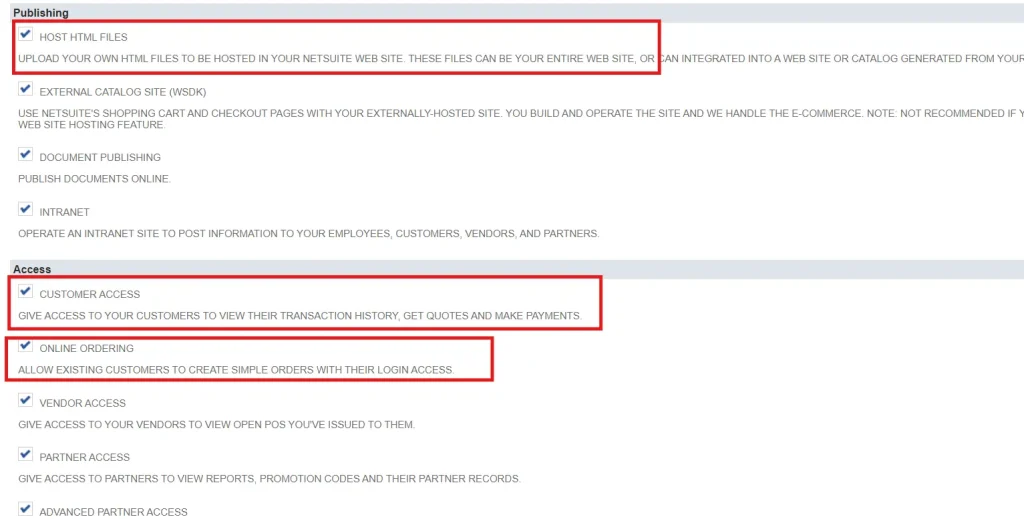
Before setting up the storefront, confirm that SuiteCommerce Advanced has been provisioned for the NetSuite account. Then go to Setup > Company > Enable Features and verify the required options described in Oracle’s Enable Features and Set Preferences guide and the broader Commerce Features documentation.
| Feature | Purpose |
|---|---|
| Web Site | Enables core website functionality, including domain setup, and allows Commerce products such as SuiteCommerce and SuiteCommerce Advanced to be enabled |
| Advanced Site Customization | Allows HTML templates to customize the website’s appearance |
| Descriptive URLs | Enables readable URLs for website tabs, categories, and item pages to support navigation and search optimization. A domain must be configured first. |
| SuiteCommerce Advanced | Provides Shopping, Checkout, and My Account functionality with advanced customization through HTML, CSS, JavaScript, the Product Search API, and cart and checkout services |
| Site Management Tools | Provides an administrator interface for managing content, creating landing pages, and enhancing storefront pages. SuiteCommerce or SuiteCommerce Advanced must also be enabled |
| Host HTML Files | Allows HTML files to be stored in the NetSuite File Cabinet and published on the website, including support for NetSuite smart tags |
| Customer Access | Gives customers online access to invoice and payment information and is required for Online Ordering |
| Online Ordering | Allows customers to place orders online. Customer Access must also be enabled. |
| Commerce Categories | Enables hierarchical categories and subcategories for storefront navigation, merchandising, and category landing pages |
| Important: Do not enable features only because they appear in a screenshot. Confirm licensing, dependencies, and implementation requirements for the specific account first. |
Configure the Web Site Setup Record
The Web Site Setup record is the account level control point for a particular storefront. Depending on the implementation, it controls the hosting root, website price level, item visibility, descriptive URLs, shipping estimator, scripts, search index, field sets, touchpoints, domains, and other behavior. Use Oracle’s Comprehensive Web Site Setup Reference to review each subtab and field while configuring the record.
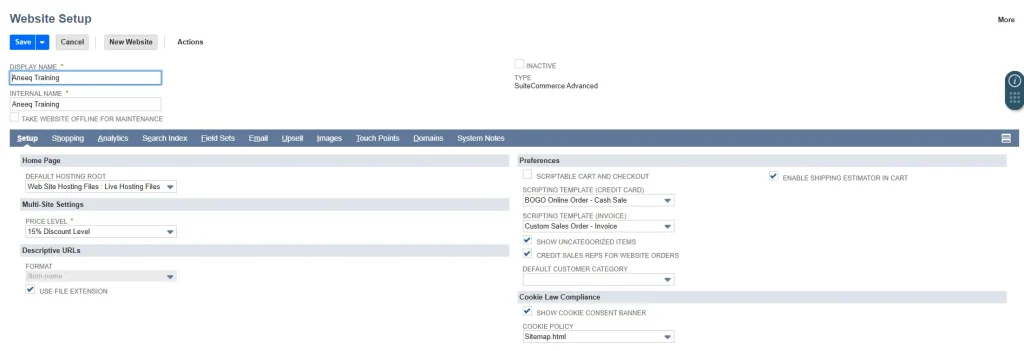
Configuration changes should be tested one at a time. Record the original value, apply the change in a sandbox, test the relevant customer journey in a private browser session, and then either keep the verified setting or revert it.
Website Configuration changes behavior without code
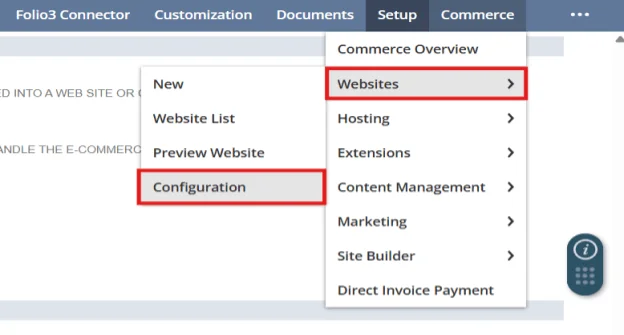
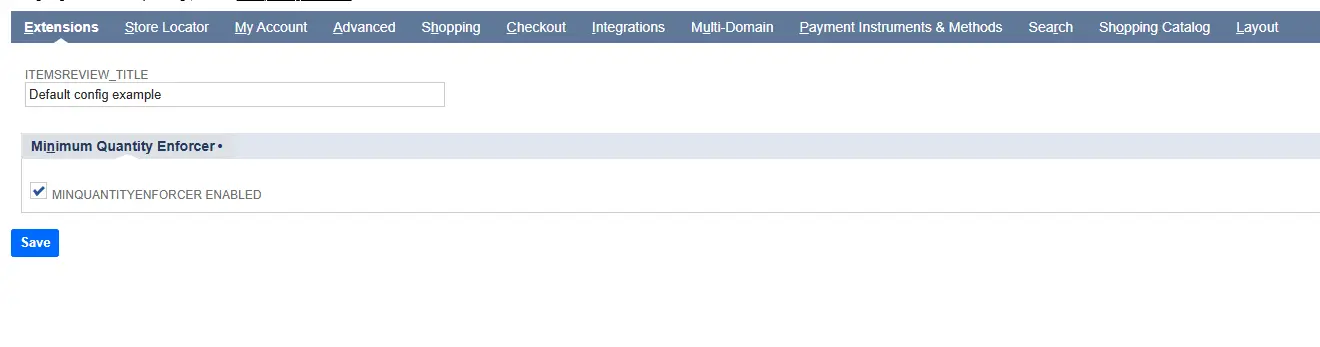
Go to Commerce > Websites > Configuration to open the domain specific SuiteCommerce Configuration record. This area controls many settings for Shopping, Checkout, My Account, search, extensions, themes, SEO, and integrations without requiring a source code change.
Decide Which Item Data Reaches the Storefront
Imagine that a product has a custom specification filled in correctly on its NetSuite item record, but the value never appears on the storefront. The template may not be the problem. The field may simply not be included in the field set used by that page.
Field sets act as a controlled bridge between NetSuite item records and the storefront. They decide which information Shopping, category pages, Product Detail Pages, recommendations, and My Account can receive.
Field sets determine which NetSuite record fields are exposed to the Commerce website. If a template expects a value that is not included in the correct field set, the frontend may receive no value even when the field is populated on the item record.
| Initial field set | Storefront responsibility |
|---|---|
| Search | Supplies item data for search results and category pages |
| Details | Supplies Product Detail Page data. If this ID changes, the matching backend configuration must also change. |
| Matrix child sets | Provide prices, availability, options, and other data for matrix item children |
| Related and correlated items | Supply product data for recommendation and merchandising areas |
| Order | Provides item information used by My Account order history |
| Type Ahead / Items Searcher | Support predictive search and item selection experiences |
Safe setup sequence
1. Open the Web Site Setup record and note the site ID shown in its URL
2. Follow Set Up Initial Field Sets, copy Oracle’s initial field-set script, and replace its placeholder siteID with the correct website ID
3. Review the Product Reviews and Pickup In Store flags before execution
4. Open Customization > Scripting > Script Debugger and select SuiteScript API Version 1.0
5. Run the script, verify the created rows on the Field Sets subtab, and then continue with the initial search-index setup described in Search Settings Overview. Use the Item Search API reference to understand the data returned to storefront search and category pages, and review Item Images when image fields or naming conventions are involved.
Keep the Field-Set Script Updated
Treat the initial field-set script as a maintained configuration record rather than a one time setup utility. Whenever a field is added to, removed from, or renamed in a field set, update the script so it remains aligned with the active website configuration. This becomes particularly important when migrating the storefront between accounts or environments. A field added manually in the source account may be missed in the destination account if the migration relies on an outdated script. Maintaining the latest field-set definitions in version control makes it easier to reproduce the configuration and confirm that all required item data is exposed after migration.
| Warning: Oracle’s initial field set script runs only in the SuiteScript 1.0 debugger. Editing or deleting required field sets can compromise site behavior, so preserve the existing setup and test in a sandbox. |
Connect Domains, Touchpoints, and SSP Applications
A storefront can be deployed correctly and still open the wrong Shopping, Checkout, or My Account application. This usually happens because the domain and its touchpoints are connected to a different SSP application than the developer expected.
Domains identify where customers access the site, while touchpoints determine which SuiteCommerce application handles each part of the customer journey.
A Commerce domain is more than a DNS entry. DNS sends the shopper to NetSuite, the domain record associates the hostname with the Commerce implementation, and touchpoints direct application URLs to the appropriate Shopping, Checkout, and My Account SSP applications.
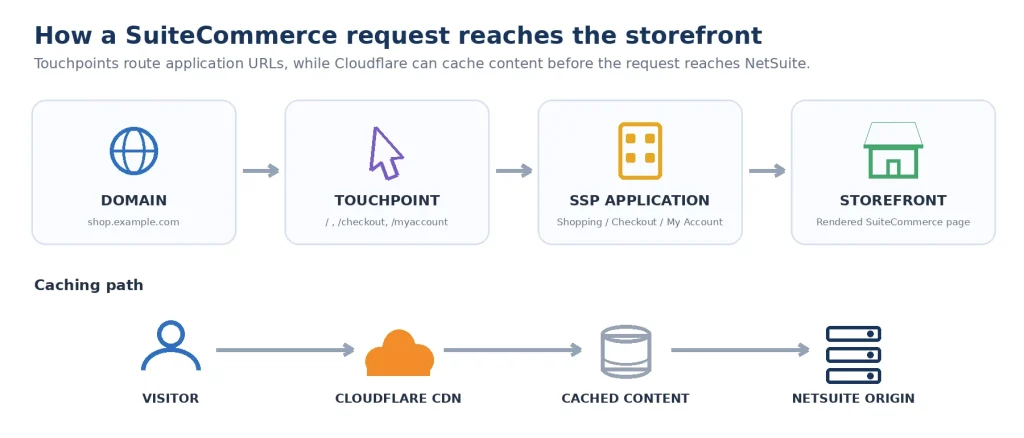
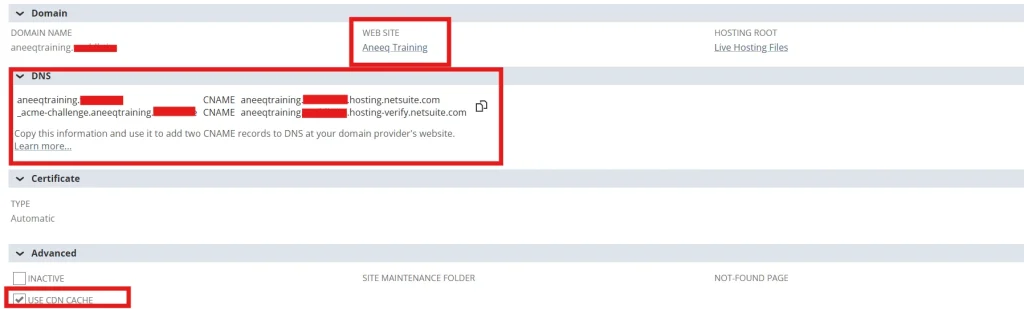
| Critical configuration rule: Touchpoints can be configured manually in the touchpoints sublist or populated through the assignment actions available at the Website or Domain level. Both approaches ultimately define which SSP application handles each storefront URL. Configure only the touchpoints required by the implementation and verify that every Shopping, Checkout, and My Account URL points to the intended SSP application. For example, if the storefront does not require My Account access, that touchpoint can be omitted. Because these details are easy to overlook, always review the active Website, Domain, and SSP configuration instead of applying a universal touchpoint setup. |
How caching affects troubleshooting
Caching improves storefront performance, but it can also make troubleshooting confusing. After deploying or activating an extension, the storefront may continue loading an older JavaScript bundle, template, stylesheet, configuration response, or cached page. This does not always mean that the deployment failed. The browser, CDN, Commerce cache, or website search index may still be serving an earlier version.
- Test the domain in a private browser session
- Inspect page source and network requests to confirm the expected extension assets are present
- Check the Extension Manager status before clearing caches
- Trigger cache invalidation when required, especially after the first activation for a domain or when the storefront continues to load an older asset version
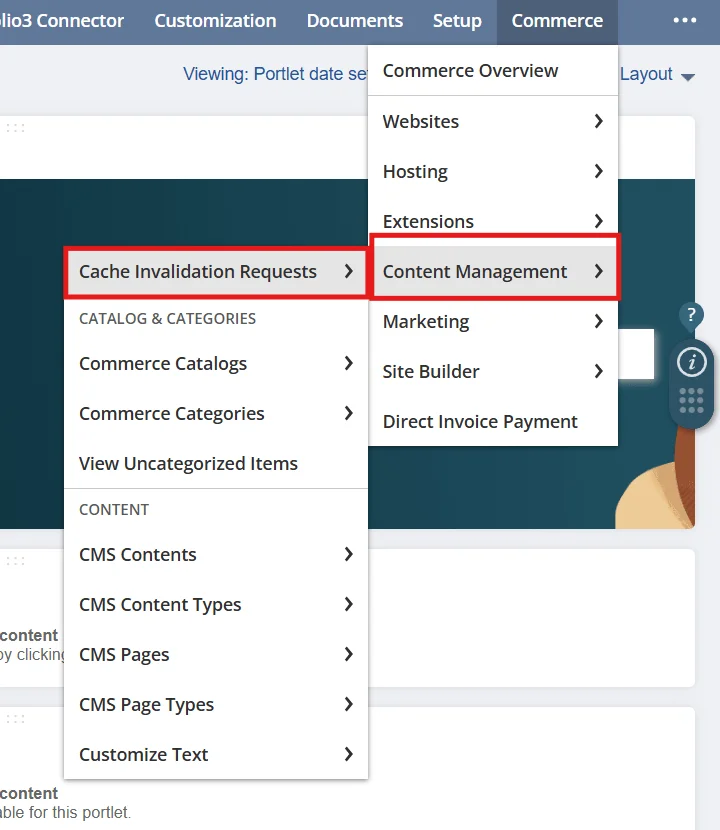
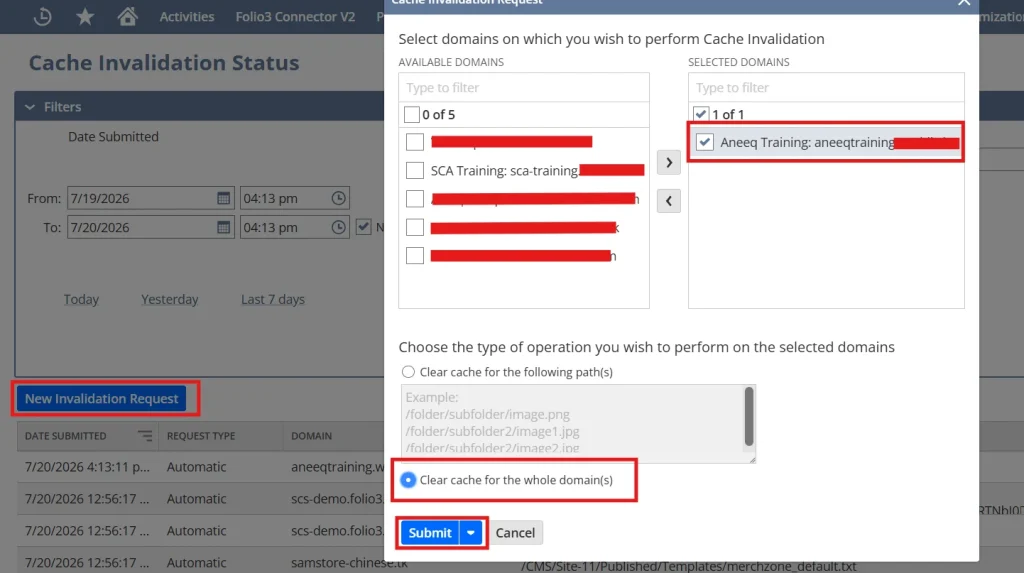
Submit a Cache Invalidation Request
To invalidate the cache, go to:
Commerce > Content Management > Cache Invalidation Requests
After opening the page:
- Click New Invalidation Request
- Move the affected domain into the Selected Domains list
- Choose one of the available invalidation options:
- Clear cache for the following path(s) when only specific files, folders, or URLs need to be refreshed
- Clear cache for the whole domain(s) when the storefront continues serving stale content across the domain
- Click Submit
- Return to the Cache Invalidation Status page and confirm that the request has completed
Cache Invalidation and Search Index Rebuilding Are Different
Item data follows a separate troubleshooting path. SuiteCommerce uses the website search index to expose item information to product searches, category pages, facets, and Product Detail Pages.
When product fields, prices, categories, availability, images, facets, or custom item values are updated, NetSuite normally updates the index. However, if the new item information does not appear on the storefront, check the search index status and refresh or rebuild the website search index when required.
Removing Locked Fields
A lock icon on a custom item field indicates that the field is still referenced by an active SuiteCommerce field set. While that dependency exists, NetSuite prevents the field from being edited or deleted. Remove the field set reference first, and rebuild the website search index only if the lock does not clear immediately.
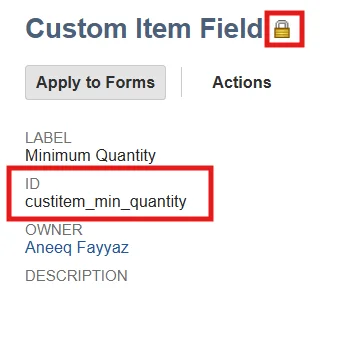
- Confirm the locked field. Open the custom item field and note its label and script ID. In this example, the field is Minimum Quantity (custitem_min_quantity).
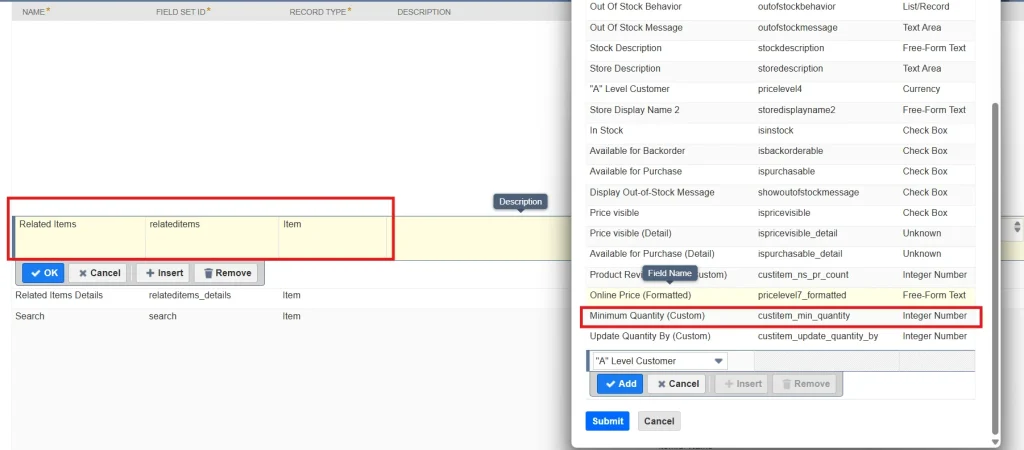
- Remove the field set reference. Go to Commerce > Websites > Website List, edit the relevant website, and open the Field Sets subtab. Locate the custom field in every applicable field set, select it, click Remove, and save the Web Site Setup record.
3. Check whether the lock has cleared. Reopen the custom item field after saving the field-set change. If the record opens in edit mode, the dependency has been removed and the field can now be edited or deleted.
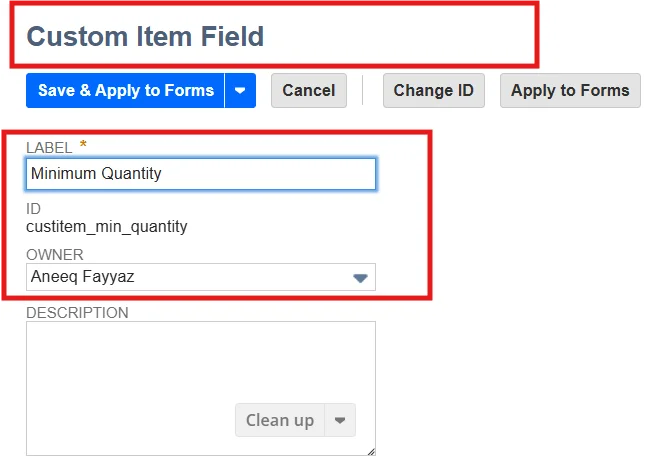
4. Rebuild the search index only if required. If the lock still appears after the field has been removed from all field sets, rebuild the website search index, wait for the rebuild to complete, and then reopen the field
| Important: The active Web Site Setup record and the maintained source definition must remain synchronized. |
To manually rebuild the website search index, go to:
Commerce > Websites > Website List
Then:
- Click Edit next to the relevant website
- On the Web Site Setup page, select Actions > Rebuild Search Index
- Review the rebuild-limit message and click OK

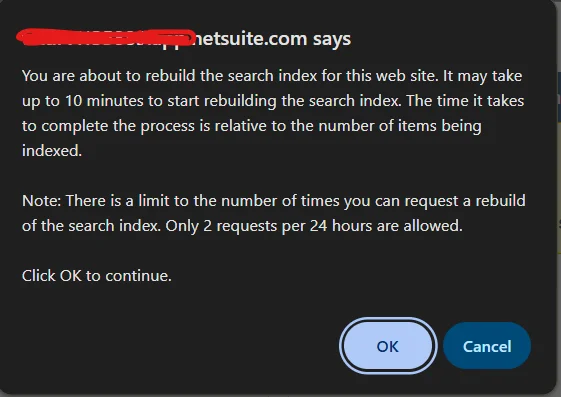
Oracle notes that the rebuild may take up to 10 minutes to begin, depending on the number of indexed items, and that only two manual rebuild requests can be submitted within a 24-hour period.
| Practical distinction: A successful deployment does not guarantee that the browser is loading the newest assets, and an item record update does not always mean that the latest indexed data is already available on the storefront. Check caching and indexing as separate layers before changing the code. |
Build and Preview Your First Local Customization
SuiteCommerce development becomes much easier when changes can be tested locally before they affect a website activation. The local developer tools let you fetch the current site resources, work on an extension, and preview the result without redeploying every small change.
Before customizing SuiteCommerce, follow Oracle’s Install Node.js instructions and confirm the version supported by your Commerce release. Then use the official Gulp Commands reference for fetch, local, deploy, and other developer-tool commands. For authentication changes in newer tooling, review Token-Based Authentication Updates for Developer Tools.
A Node version manager is especially useful when developers switch between SCA releases. Once the compatible runtime is active, fetch the site resources, install dependencies, and start the local server.
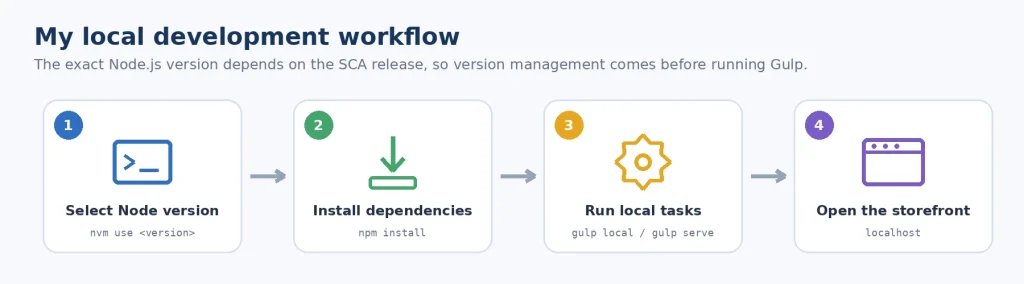
nvm use <version supported by your Commerce release>
npm install
gulp extension:fetch
gulp extension:local| Local is not live: Frontend code can work locally and still fail after deployment when an extension is not activated, a service lacks permission, the implementation version is incompatible, the domain points to another SSP application, or cached assets are still being served. |
Understand Aconcagua vs. Kilimanjaro and Earlier Releases
The Aconcagua (2018.1) release introduced the Extension Framework, Extensibility API, Extension Manager, and theme and extension developer tools. This changed the recommended customization model for SuiteCommerce Advanced. Before choosing a customization approach, check the Current Release documentation for the version running in the target account.
| Release family | Recommended approach | Why it matters |
|---|---|---|
| Kilimanjaro (2017.2) and earlier | Customize the SCA source with custom modules, overrides, wrappers, and application dependencies | Provides flexibility, but upgrades and moving customizations between sites require more manual work |
| Aconcagua (2018.1) and later | Use themes for presentation and extensions for functionality, configuration, and server side services through the Extension Framework | Customizations are packaged, versioned, deployed to the account, checked for compatibility, and activated per domain |
SCA still allows access to source code, but extensions are the safer default for upgradeable, portable customizations. SuiteCommerce (sometimes called SuiteCommerce Standard) uses a managed bundle, so its core source is updated by NetSuite and custom behavior is delivered through themes and extensions.
Understand What Each Extension File Actually Does
An extension may initially look like a large collection of folders, but each folder answers one simple question: What appears on the page? How does it behave? Where does its data come from? And what server-side logic does it require?
A baseline extension is created in the local Workspace. The generated files depend on the options selected during creation, but a typical module with a view, template, styling, configuration, and server services looks like this.
| Workspace/ └── AneeqItemReviews/ ├── manifest.json ├── assets/ └── Modules/ └── ItemReviews/ ├── JavaScript/ │ ├── Folio3.AneeqItemReviews.ItemReviews.js │ ├── ItemReviews.View.js │ ├── ItemReviews.Model.js │ └── ItemReviews.SS2Model.js ├── Templates/ │ └── folio3_aneeqitemreviews_itemreviews.tpl ├── Sass/ │ └── _itemreviews.scss ├── Configuration/ │ └── ItemReviews.json ├── SuiteScript/ │ ├── ItemReviews.ServiceController.js │ └── ItemReviews.Model.js └── SuiteScript2/ ├── ItemReviews.Service.ss └── ItemReviews.Model.js |
| File or folder | Purpose |
|---|---|
| manifest.json | Stores extension metadata, supported applications and versions, entry points, and files included during compilation |
| Entry point JavaScript | Exposes mountToApp(container) and registers the extension with the relevant SuiteCommerce components |
| View | Controls UI behavior, events, child views, and the context passed to the template |
| Template (.tpl) | Uses HTML and Handlebars expressions to render the storefront interface |
| Sass | Contains extension styles compiled with the active theme |
| Frontend model | Calls the service endpoint and holds data used by the view |
| SuiteScript service | Receives supported HTTP operations and returns data to the frontend model |
| Backend model | Keeps validation, searches, and create/update logic separate from the HTTP service handler |
| Configuration / assets | Expose administrator editable settings and store static resources used by the extension |
Use JSON Configuration Files for administrator-editable settings, the Frontend Extensibility API for supported frontend components, and Override a Template File when learning how template customization is structured.
The frontend entry point is independent of the SuiteScript version
The main entry point remains a browser side JavaScript module whether the backend service uses SuiteScript 1.0 or 2.x. The manifest tells SuiteCommerce which entry point should load for Shopping, Checkout, or My Account, and SuiteCommerce calls mountToApp(container). The frontend model and server service pair change with the SuiteScript version; the primary extension entry point does not.
return {
  mountToApp: function (container) {
    var layout = container.getComponent('Layout');
    // Register views, events, or components here.
  }
};
SuiteScript 1.0 vs. SuiteScript 2.x service structure
| Area | SuiteScript 1.0 | SuiteScript 2.x |
|---|---|---|
| Server folder | Modules/<Module>/SuiteScript | Modules/<Module>/SuiteScript2 |
| Service file | <Module>.ServiceController.js | <Module>.Service.ss |
| Frontend model | <Module>.Model.js | <Module>.SS2Model.js |
| API style | Legacy nlapi* APIs and the Commerce ServiceController pattern | AMD modules with N/* APIs and a server side .ss endpoint |
| Runtime | NetSuite server | NetSuite server through the SuiteScript 2.x SSP application |
| Design principle: Keep the service thin. Validate the request, call a backend model for record work, and return a predictable response. This makes authorization, testing, and error handling easier to reason about. |
Create, Test, Deploy, and Activate an Extension
Deployment and activation are separate operations. Deployment validates and uploads a versioned package to the NetSuite account, while activation makes a compatible version available to a selected website and domain through Extension Manager. Follow Develop Extensions for the extension development and deployment workflow, and the Gulp Commands reference for the exact command syntax.
gulp extension:create
gulp extension:fetch
gulp extension:local
gulp extension:deploy- Run gulp extension:create and choose the module files required by the customization, including SuiteScript 2.x when a .Service.ss endpoint is needed
2. Run gulp extension:fetch so the workspace contains the active theme and extension resources required for local testing
3. Run gulp extension:local and test every targeted application Shopping, Checkout, and My Account. Use the -preserve-manifest option flag when you have manually edited manifest.json and need the local command to retain those changes.
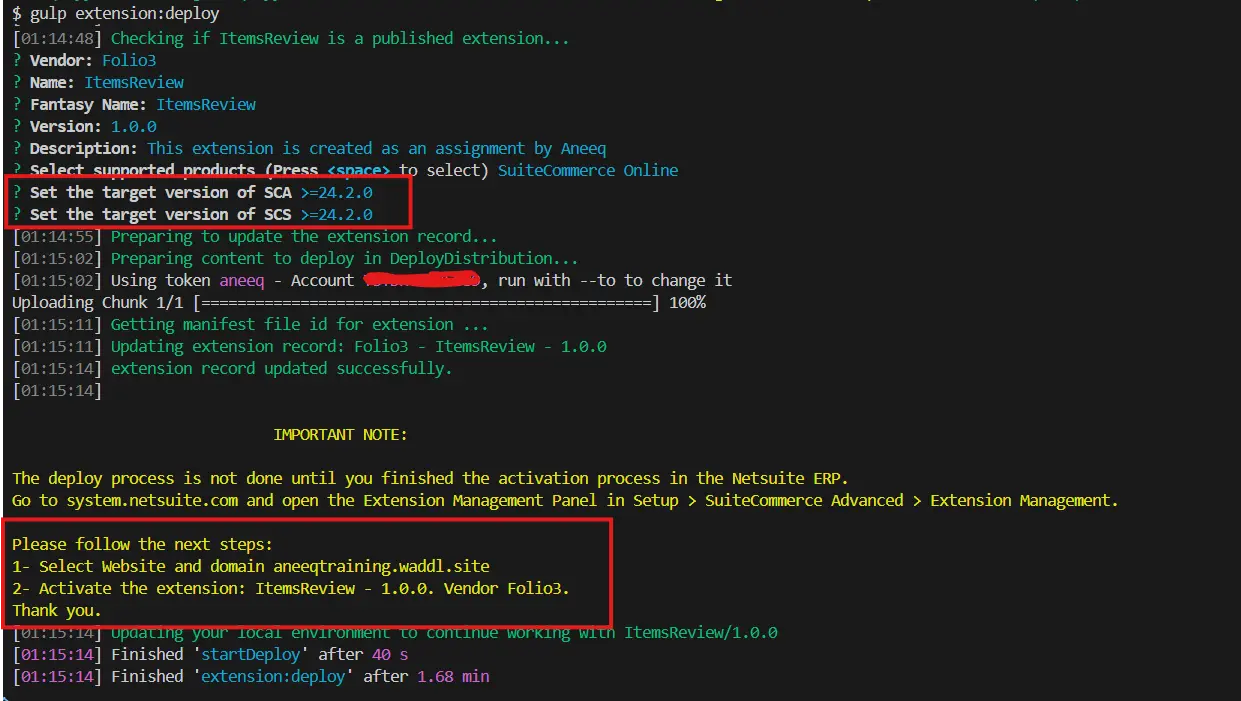
4. Run gulp extension:deploy and provide the authentication, account, website, vendor, extension version, supported product, and target release information requested by the tool. Before fetching or deploying, create a least-privilege role by following Create a Custom Role with Fetch and Deploy Permissions.
5. In NetSuite, go to Commerce > Extensions > Extension Manager. Create a new activation for the website and domain, or edit the existing activation.
6. Open the Extensions tab, select the new version, click Activate, and wait for the activation status to complete
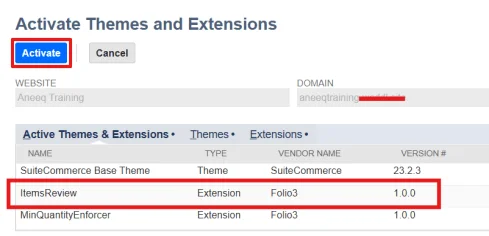
7. Test on a development domain first. Verify page source, browser console output, network requests, service responses, configuration values, and cache behavior before updating the live domain
| Compatibility rule: The extension’s manifest must declare a target product and release compatible with the site’s Commerce implementation. Extension Manager lists only compatible versions; an incorrect target version may prevent the deployed extension from appearing for activation |
Configure Permissions for a SuiteScript 2.x .Service.ss File
A SuiteScript service can exist in the account and still return a Permission Violation. Three settings must align:
- The audience permitted to execute the service
- The role selected under Execute as Role
- The record, field, search, and transaction permissions assigned to that role
Apply these permissions to the runtime service file for the active extension version under Live Hosting Files. Editing the local workspace file, bundled source file, generated deployment artifact, or an inactive extension version will not change the live endpoint.
1. Go to Documents > Files > File Cabinet > Web Site Hosting Files > Live Hosting Files > SSP Applications
2. Open the SSP application linked to the domain, then browse to Development > extensions > <vendor> > <extension> > <version> > services
3. Edit <Module>.Service.ss and open the Permissions subtab
4. Enable the permission and select an Execute as Role. Use a custom least-privilege role with only the permissions required by the service; do not depend on Administrator access. For customer-facing access, review Create the Website Customer Center Role and adapt its permissions to the service’s actual record operations.
5. Configure who can execute the service:
- For a service that anonymous storefront visitors must call, select Run Script Without Login
- For authenticated customers only, leave Run Script Without Login cleared. Do not grant anonymous execution unless the service is designed to safely expose its response publicly
6. Do not confuse Run Script Without Login with Available Without Login.
- Available Without Login primarily controls whether a File Cabinet file such as an image, stylesheet, downloadable document, or other website asset can be accessed without a NetSuite session
- Run Script Without Login authorizes anonymous visitors to execute a service through its Permissions settings
- For executable, the Permissions subtab determines whether the request returns the script response or a Permission Violation
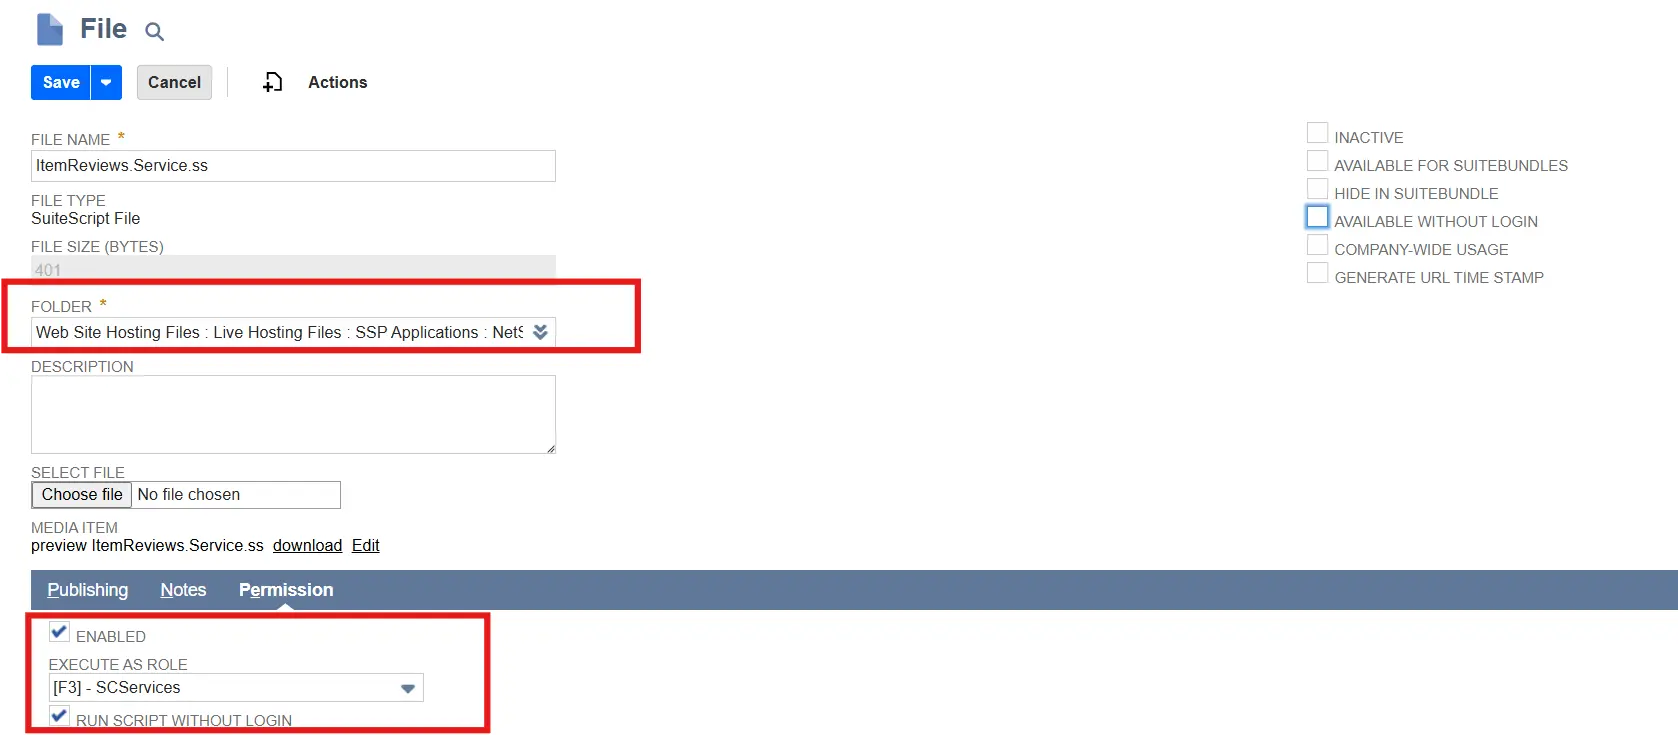
| Security note: File level execution permission does not replace NetSuite role permissions. The Execute as Role must be able to access every record type and operation the service performs. |
When the Extension Works Locally but Not Live

The SC ExtMech custom record types used by Extension Manager. The Activation record stores the website and domain activation request, the Extension record stores metadata for each deployed extension, and the To Process record stores the individual background jobs created for an activation.

The SC ExtMech To Process list shows the background jobs associated with an activation. Each row records a processing stage, such as manifest loading, JavaScript compilation, SSP libraries, Sass, templates, configuration, or impact changes. The activation reference links the jobs back to the same activation record. When an activation remains stuck in In Progress, review this list to identify the job that has not reached DONE before deciding whether the activation should be reset and rerun.

Extension activation records and their current processing status. If an activation is started for multiple domains at the same time, a record can occasionally remain stuck in In Progress. After confirming that the process is no longer running, an administrator can change the affected activation record to Error and rerun the activation.

The SC ExtMech Extension list showing the deployed ItemsReview extension and its metadata, including target products, vendor, and version.
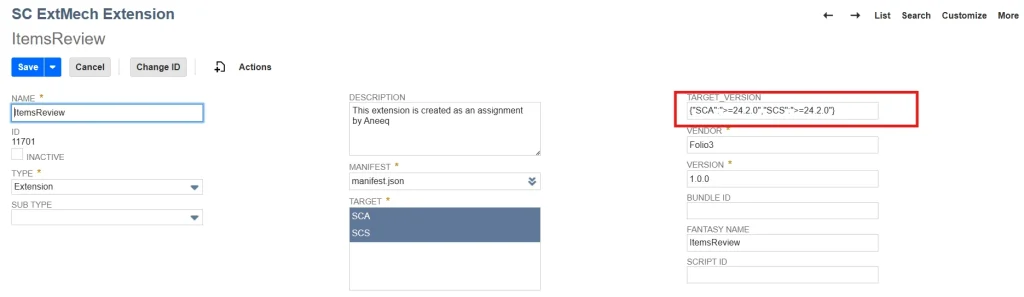
The ItemsReview extension metadata record. The Target Version value controls the Commerce release compatibility declared for the extension. When a deployed extension does not appear in Extension Manager, verify the values on the extension metadata record.
Editing Active Runtime Files for SuiteScript 1.0 and 2.x
After an extension has been activated, NetSuite places runtime files inside the active SSP application. These files can be useful for controlled troubleshooting because a small change can sometimes be tested without running gulp extension:deploy again. The exact runtime file depends on the SuiteScript service model.
For SuiteScript 2.x, open the active versioned service file under Documents > Files > File Cabinet > Web Site Hosting Files > Live Hosting Files > SSP Applications > <active SSP application> > Development > extensions > <vendor> > <extension> > <version> > services. Open the .Service.ss file and use the Media Item Edit option to update its contents.
For SuiteScript 1.0, extension server modules are compiled into the active SSP application’s ssp_libraries_ext.js file. Navigate to Documents > Files > File Cabinet > Web Site Hosting Files > Live Hosting Files > SSP Applications > <active SSP application> > Development, then open ssp_libraries_ext.js. A temporary code correction made in this generated file can be tested without redeploying the extension.
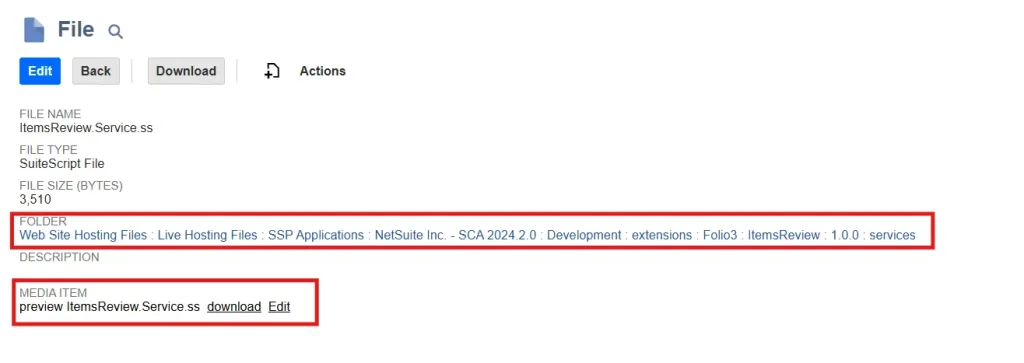
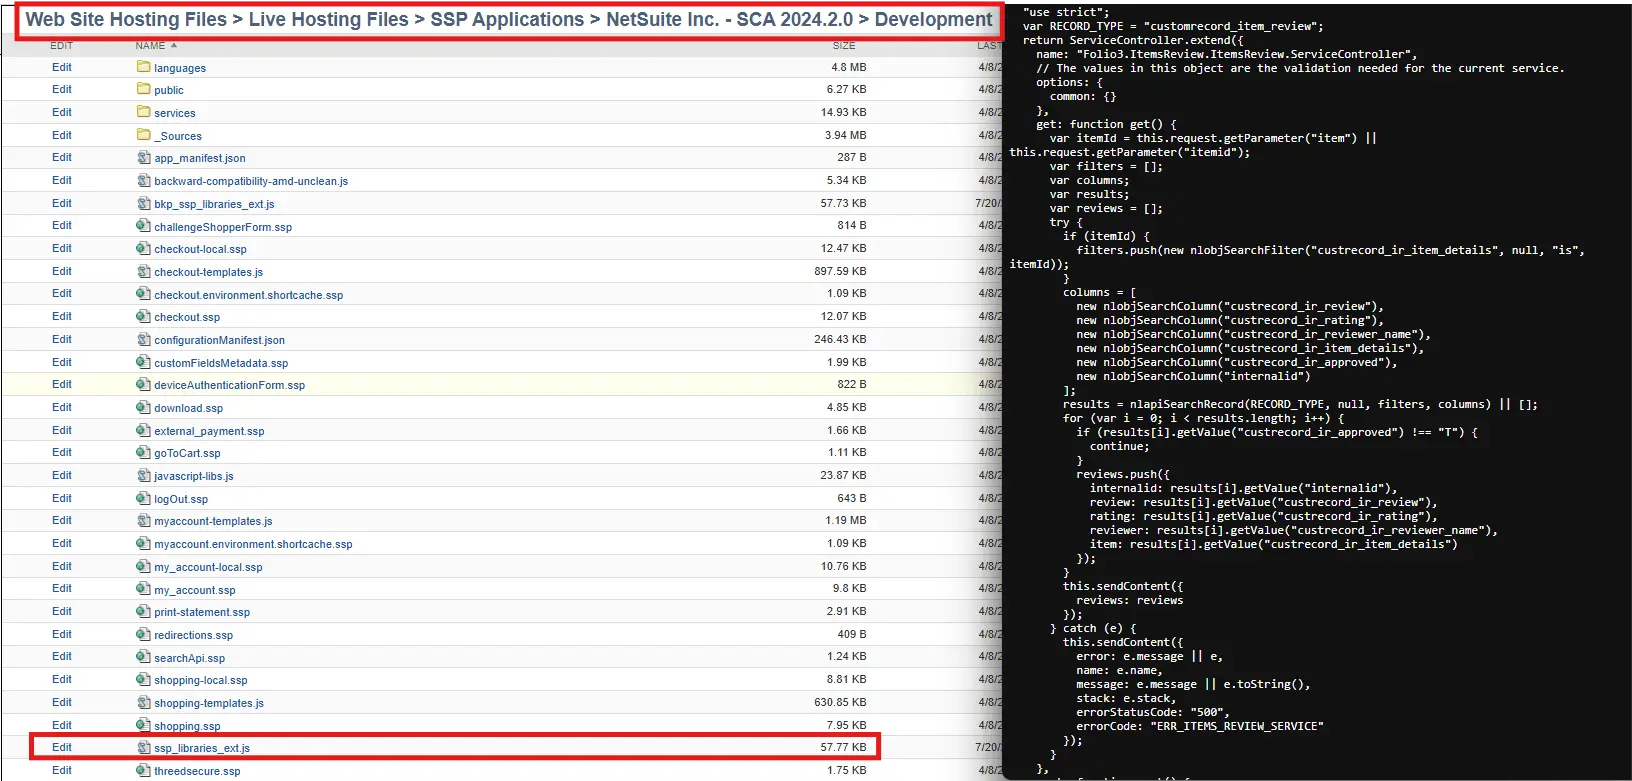
| Important: Direct runtime editing is suitable only for temporary debugging or an urgent controlled fix. The generated file may be overwritten by the next deployment, activation, or Commerce update. Always apply the confirmed correction to the local extension source and complete the normal deployment and activation workflow afterward. For frontend JavaScript, Sass, templates, manifest, or configuration changes, use the standard build, deploy, and activate process because those assets may require compilation. |
Additional browser and caching considerations:
When working with Scriptable Cart, always test changes in a private or incognito browser session. Scriptable Cart can retain browser, session, and cart-related data, which may cause the storefront to continue showing older behavior even after the code has been updated. Testing in a private session helps confirm whether the issue is caused by caching rather than the customization itself.
Advanced Storefront Diagnostics
The following techniques are useful when the storefront behaves differently from the expected SuiteCommerce Advanced behavior. They help separate base-application behavior, website configuration, extension compatibility, search settings, and analytics tracking before code is changed.
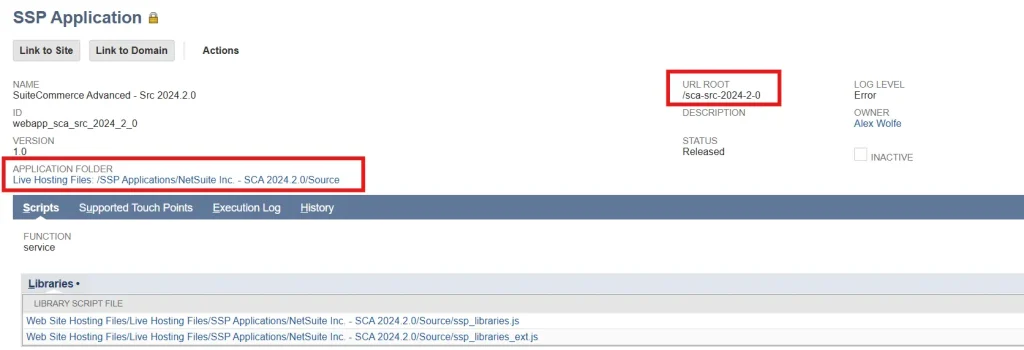
Compare the Customized Storefront with the SCA Source Application
An SCA implementation can expose source application URLs such as /sca-src-<release>/checkout.ssp and /sca-src-<release>/my_account.ssp. These URLs provide a useful comparison with the activated storefront when determining whether an unexpected behavior comes from the base or from the customization.
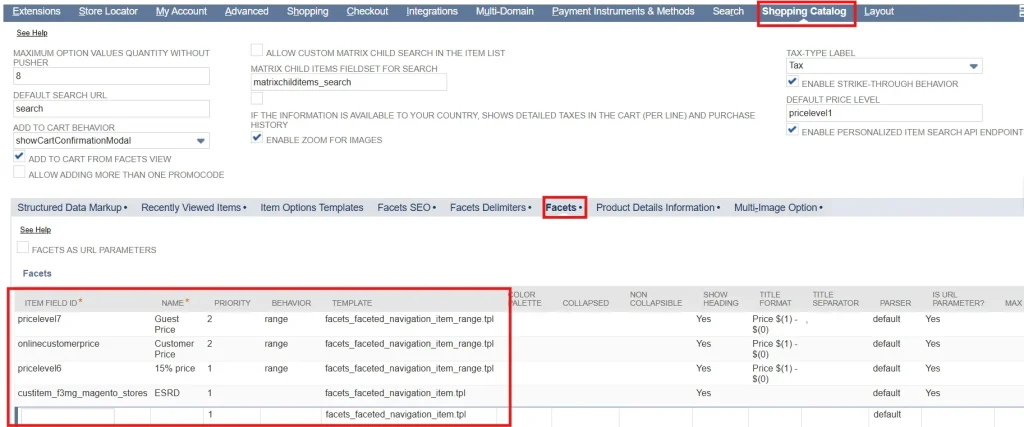
Configure Facet Presentation from Website Configuration
Facet labels and presentation can be configured without editing storefront templates. Navigate to Commerce > Websites > Configuration > Shopping Catalog > Facets and review the settings for the selected website and domain.
The facet configuration can control values such as the displayed name, URL component, template, display behavior, and other supported presentation options. Before changing frontend code, confirm that the facet is available in the search index and configured correctly in this area.
Verify Search, Facet, and Sort Field Eligibility
The Search Fields, Facet Fields, and Sort Fields dropdowns on the Web Site Setup record do not expose every item field. NetSuite filters each list to the item fields that are applicable to that specific search index function. A field can therefore be available for a field set or another purpose without being eligible for keyword search, faceting, or sorting.
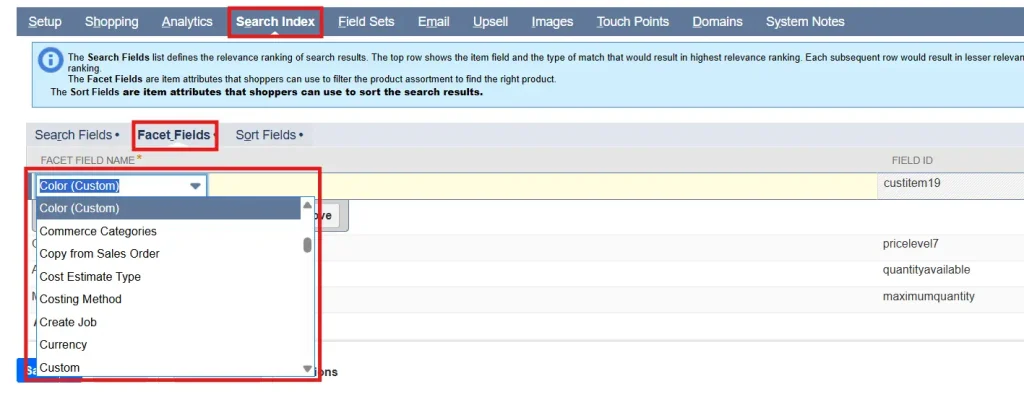
This filtering is especially important for custom item fields. Oracle states that free-form-text custom item fields cannot be used as facet fields.
Check Extensibility Layer Safe Mode
Navigate to Commerce > Websites > Configuration > Advanced > Extensions and review the Extensibility Layer Safe Mode setting. This setting helps identify extensions that import, override, or extend unsupported private core modules instead of using supported Extensibility API components.
When Extensibility Layer Safe Mode is enabled, an unsupported customization may generate a warning or an error. An extension that produces an error may not load, which makes this setting useful when developing
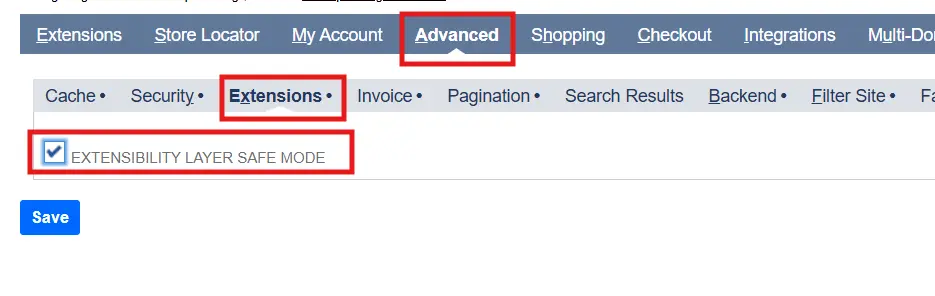
Oracle documents this setting for SuiteCommerce Advanced 2020.2.1 and later, as well as SuiteCommerce. It is enabled by default for SuiteCommerce sites and disabled by default for SuiteCommerce Advanced sites. Enabling it helps identify extensions that bypass the supported Extensibility API layer.
How extlaypatch.js Supports Safe Mode
Reference file: SCA Core/gulp/library/extlaypatch.js
The SCA developer tools use this central file to classify the JavaScript modules that an extension can import or customize. It supports the Extensibility Layer checks by separating stable extension layer dependencies from private SCA core modules. The file does not switch Safe Mode on or off; the isSafeMode configuration property in ExtensibilityLayerPatch.json controls whether the checks are active.
Supported extension layer modules: The extLayModules array includes dependencies such as PageType.Base.View, SCView, SCModel, Utils, Backbone, jQuery, and underscore. These modules are treated as part of the supported Extensibility Layer.
Temporarily allowed core modules: The coreModulesWhiteList array contains legacy internal modules that remain available for backward compatibility. An extension can still load when it uses one of these modules, but Safe Mode warns that the dependency can become unsupported in a future release.
The following focused excerpt shows representative dependencies from the two classifications and how they apply to ItemsReview. The shortened arrays are illustrative; the complete release specific lists remain in the referenced SCA core file.
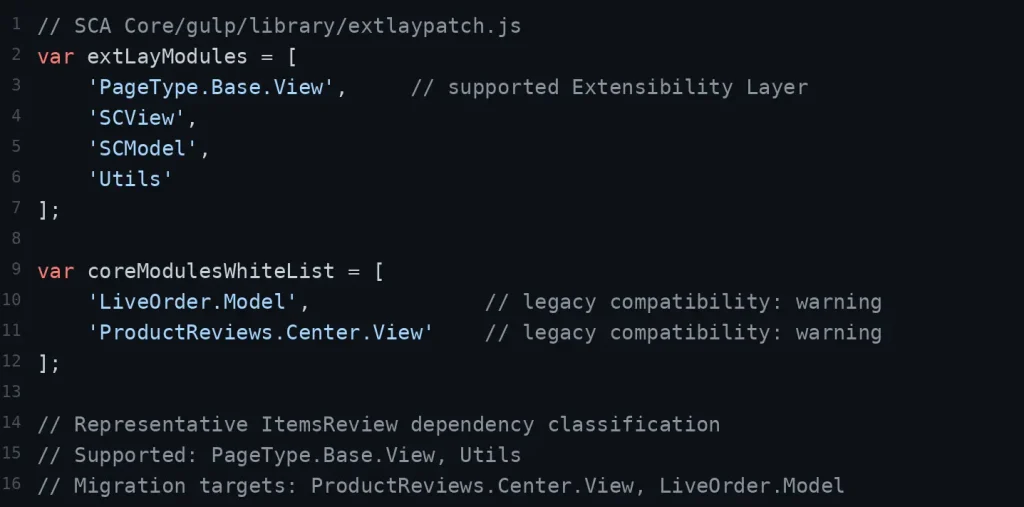
Safe Mode applies these classifications as follows:
- Supported Extensibility Layer dependencies load normally
- Whitelisted legacy core dependencies generate warnings but continue loading
- Unapproved private core dependencies generate errors and prevent the affected extension from loading; the storefront remains available
Inspect Storefront Context and Analytics Events
The browser console can provide useful runtime information before server-side code is investigated. Use SC.ENVIRONMENT to inspect the storefront context exposed by the active Commerce application. Depending on the release and page, it may contain configuration, site context, currency, permissions, and other environment values.
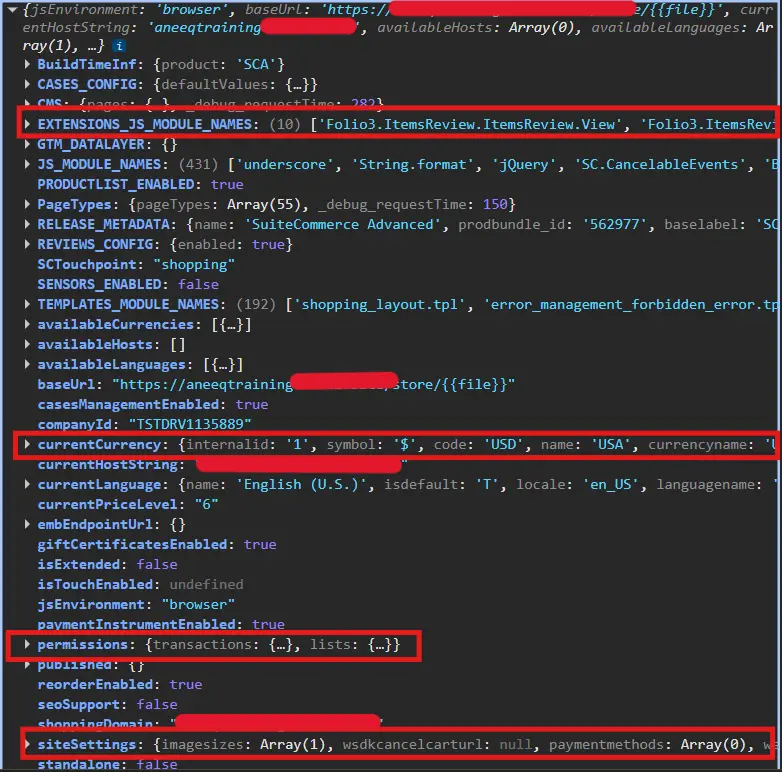
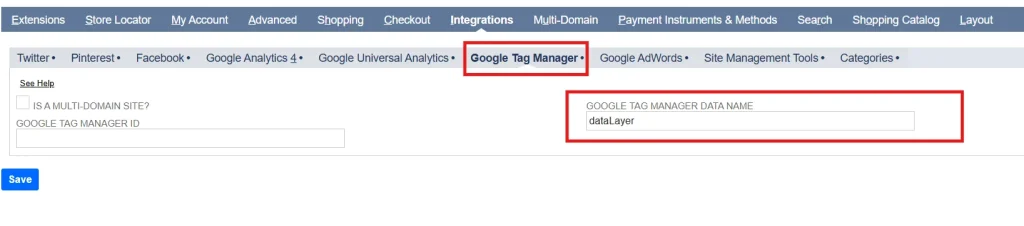
For analytics troubleshooting, inspect window.dataLayer in the browser console to confirm whether expected page, product, cart, checkout, or transaction events are being sent to Google Tag Manager or another analytics integration.
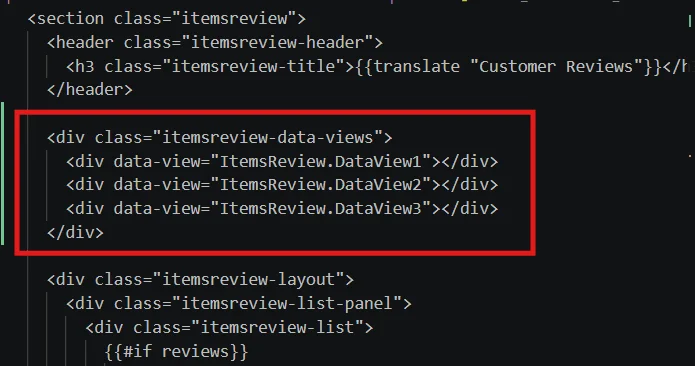
Multiple Data Views and Rendering Order
When multiple data views are registered, their DOM projection follows the order in which they are defined. The rendering sequence is therefore predictable and should not be described as dependent on asynchronous execution. Developers can control the final display order by arranging the data-view definitions in the required sequence.

Register Custom Layout for CMS Pages
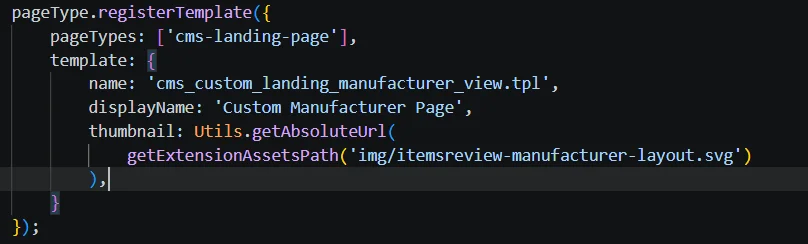
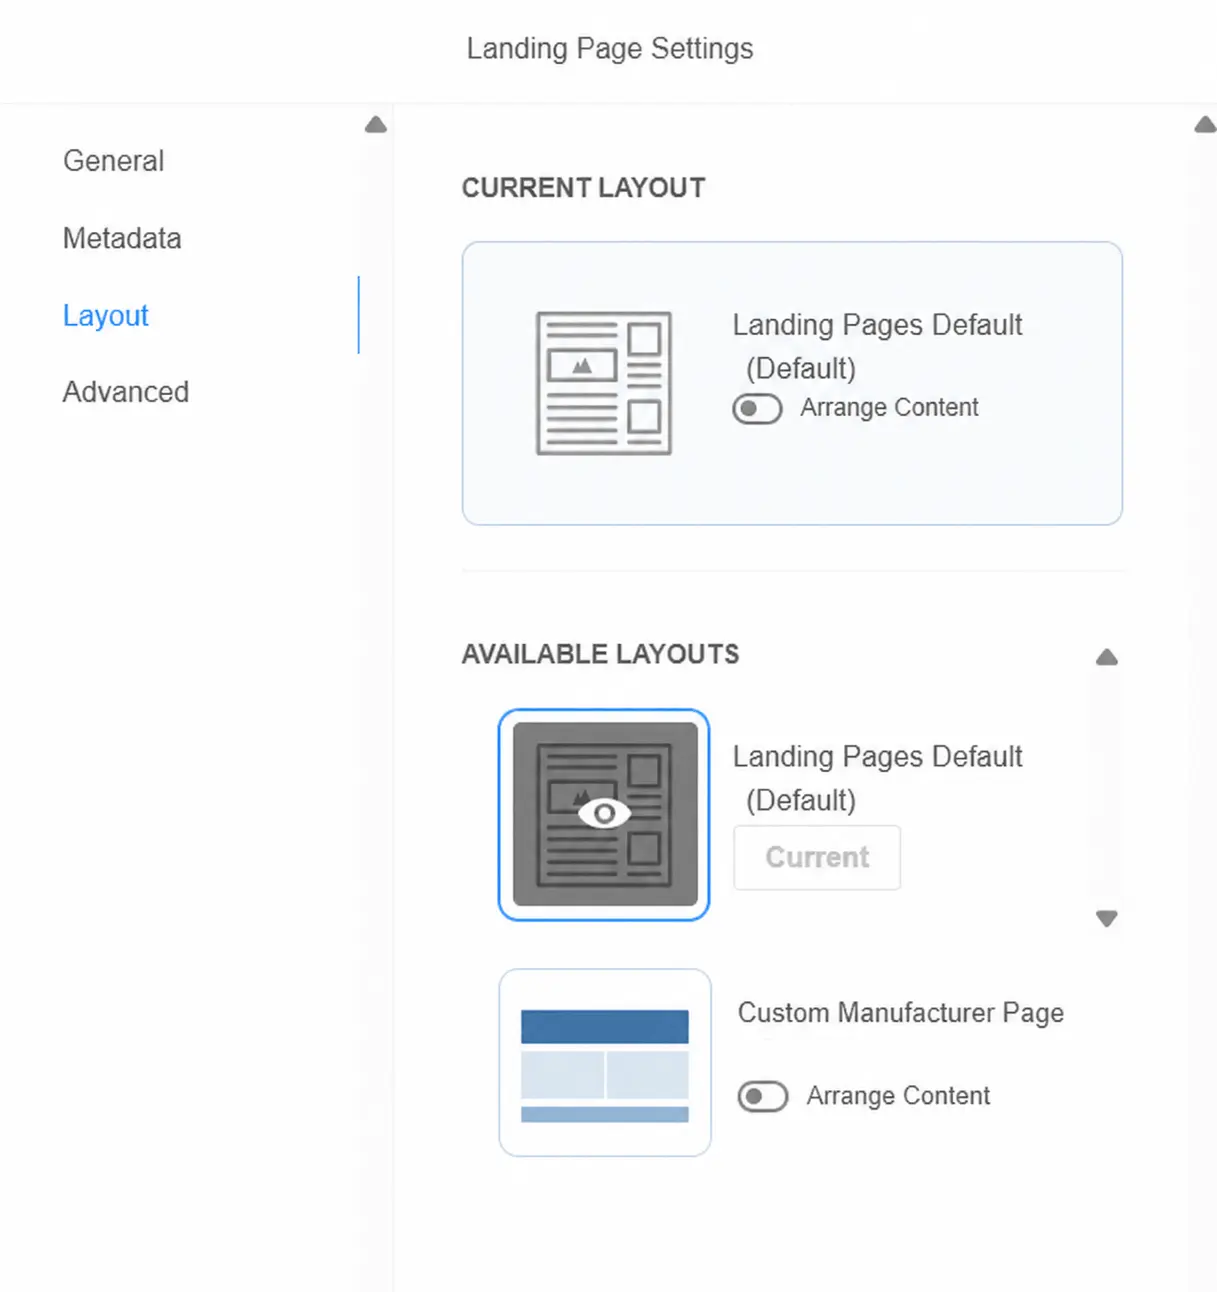
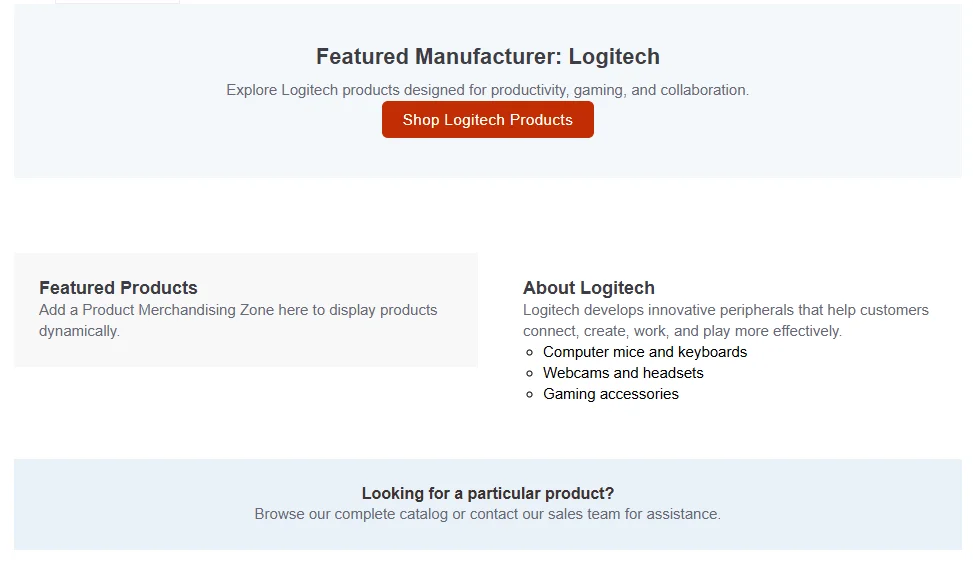
An extension can register a custom template for an existing CMS page type. The registered template becomes available to content authors when they configure a page in Site Management Tools (SMT). This enables developers to provide purpose built layouts for campaign pages, manufacturer pages, service pages, and other specialized storefront experiences. The extension must be activated for the appropriate domain and tested with the intended SMT content areas and layout settings.
In this example, the extension entry point registers the Manufacturer template for the standard cms-landing-page page type. This makes the Custom Manufacturer template available as an alternative layout for CMS landing pages.
When configuring a landing page, the Layout settings display both the standard Landing Pages Default layout and the extension provided Custom Manufacturer Page layout.
Merchandising Zones: Native SCA Feature and SuiteCommerce Standard Workaround
Oracle’s Product Merchandising bundle lets merchants display dynamic groups of complementary, cross-sell, or up-sell products in storefront merchandising zones. The developer prepares the zone and its template, while an administrator defines the merchandising rule through a matching Merchandising ID, field set, filters, sorting, and result limits. Oracle officially makes this available only with SuiteCommerce Advanced. Oracle: Product Merchandising
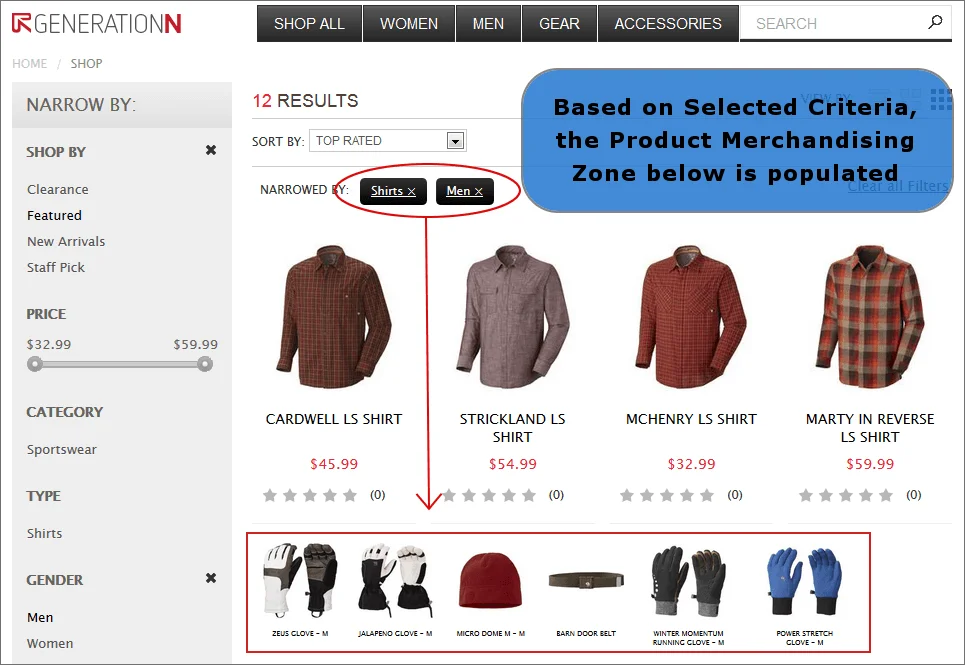
In the native SCA workflow, the storefront template calls the merchandising rule, which queries the Item Search API.
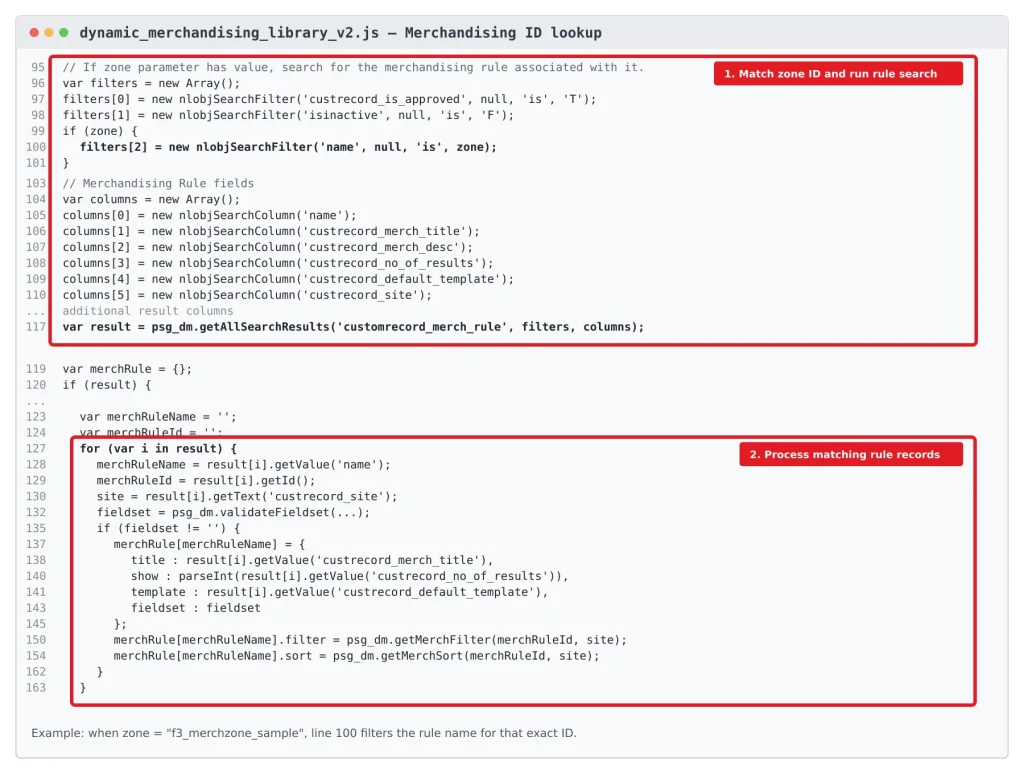
Workaround for the SuiteCommerce Standard Limitation
SuiteCommerce Standard (SCS) does not officially expose the complete Product Merchandising bundle. The implementation is the workaround that reproduces the storefront presentation through custom code.
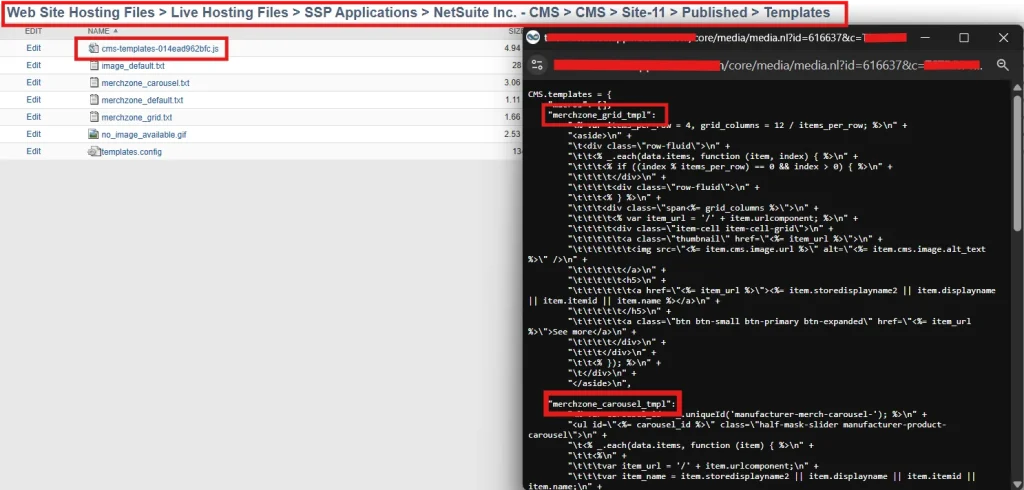
Web Site Hosting Files > Live Hosting Files > SSP Applications > NetSuite Inc. – CMS > CMS > Site-<WEBSITE_ID> > Published > Templates
The folder contains the generated cms-templates-<hash>.js bundle, in which CMS templates are stored as string values under keys such as merchzone_grid_tmpl and merchzone_carousel_tmpl. The template value configured on the merchandising rule against these ids determines which template to be rendered. For the carousel implementation, see Carousel Template Example.
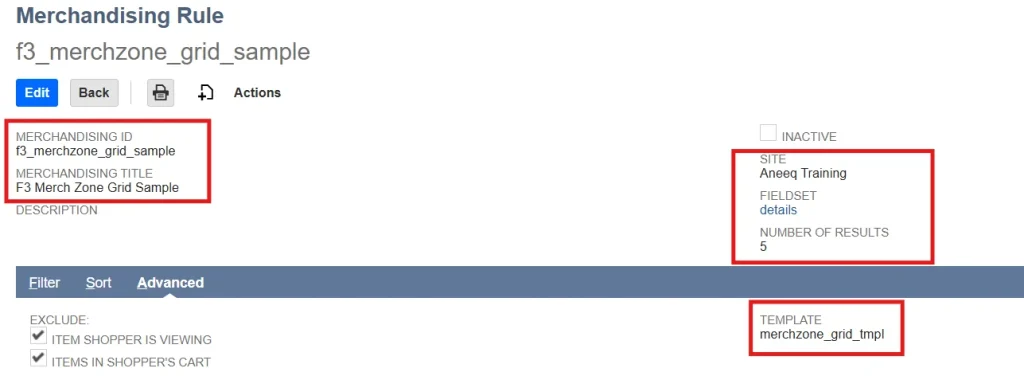
Next, open the Merchandising Rules list from Setup > SuiteCommerce Advanced > Merchandising Rules. Each rule stores the Merchandising ID, website, field set, result limit, and template name used by the CMS component.
Create a separate rule for each presentation. The grid rule references merchzone_grid_tmpl, while the carousel rule references merchzone_carousel_tmpl.
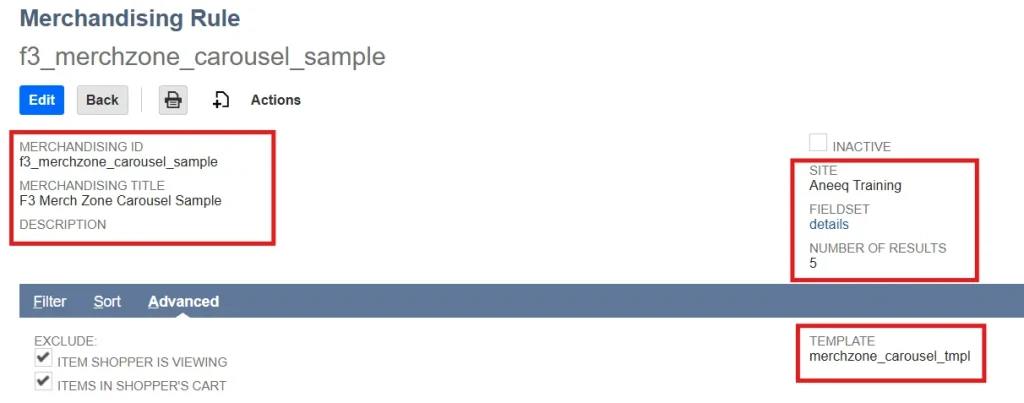
The carousel rule can use the same website, field set, result limit, and item-selection criteria, but it returns merchzone_carousel_tmpl as its presentation template.
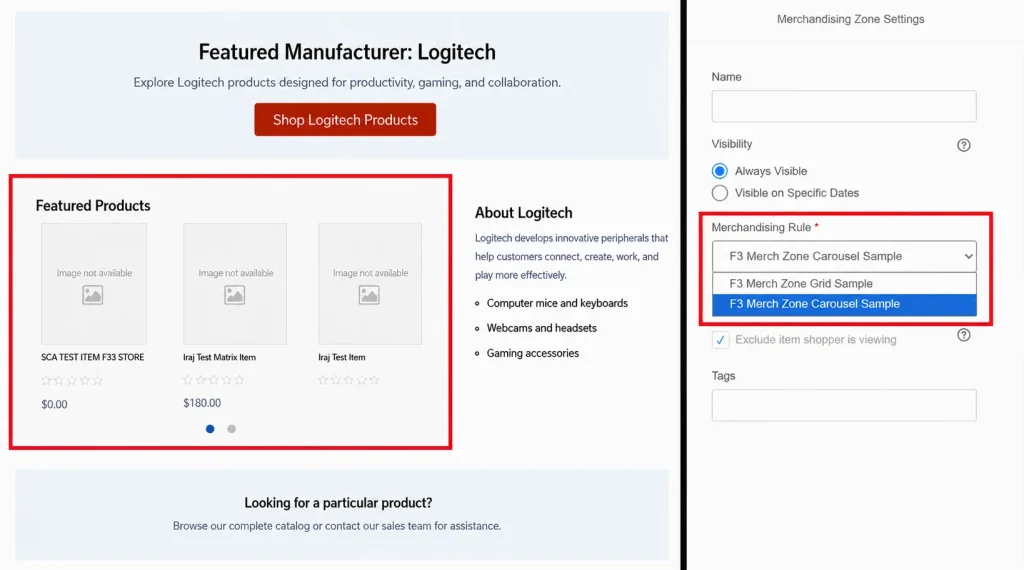
On the Manufacturer Page, selecting F3 Merch Zone Carousel Sample causes the CMS component to render the matching products with the carousel template.
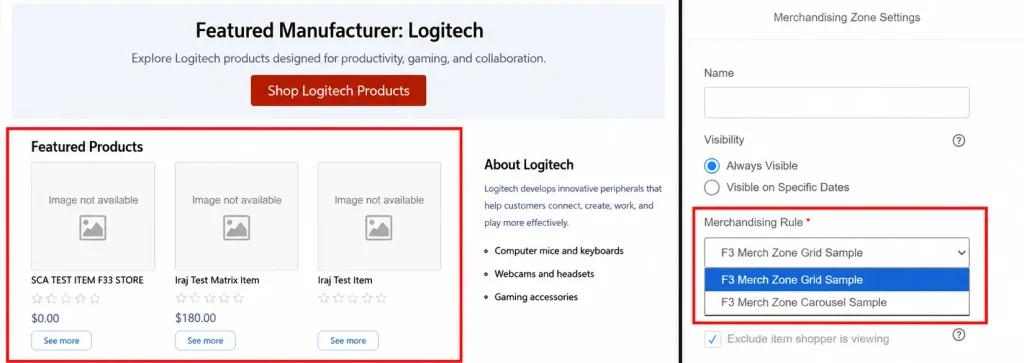
Selecting F3 Merch Zone Grid Sample changes the same CMS area to the fixed grid template.
Important: As with Scriptable Cart changes, CMS updates and other SuiteCommerce storefront modifications should be tested in a fresh private or incognito browser session. Otherwise, browser or storefront caching may continue serving stale assets or content, making a successful update appear unavailable.
Conclusion
Successful SuiteCommerce Advanced development is less about memorizing individual files and more about understanding how the layers work together. Backbone views and Handlebars templates shape the interface, field sets supply the data, website configuration controls behavior, domains and touchpoints route requests, SSP applications run server functionality, extensions package customizations, and roles determine what those services can do.
That end to end view also creates a reliable troubleshooting method: identify the customer journey that failed, confirm the active application and domain, inspect the data exposed to the frontend, verify the deployed extension version and service permissions, and only then focus on the code itself.
Related Reads
Continue building your NetSuite development knowledge with these practical Folio3 guides. They cover API integrations, MCP tools, authentication, development workflows, and real world implementation patterns that complement the SuiteCommerce concepts discussed in this guide.
Getting Started
• A Complete Setup Guide for NetSuite AI Connector
• A Setup Guide for NetSuite AI Connector with Postman: API Integration Tutorial
• Getting Started with NetSuite SuiteTalk REST API in Postman
• NetSuite MCP OAuth 2.0 Token Generator Tool
• SuiteScript Essentials: A Developer’s Getting Started Guide
• Open Source for Dummies: A Beginner’s Open Source Journey
MCP and Client Integrations
• IDE Integration Guide for NetSuite MCP Tools in Cursor & VS Code
• Connecting MCP with ChatGPT: A Complete Guide
• Connecting MCP Tools with Qwen
• Connecting ChatGPT Business with NetSuite via MCP: The Future of Enterprise AI Integration
• OAuth 2.0 in NetSuite: Complete Setup Guide (Client Credentials Flow)
Advanced and Architecture
• Building Custom Tools for NetSuite AI Connector: Development Guide
• Dual API Integration: Using NetSuite MCP Tools with OpenAI and Anthropic
• NetSuite MCP Challenge: Implementation Case Study & Results
• MCP Input Formats Compared: Token Usage Analysis for NetSuite MCP Tools
• Integrating NetSuite MCP Tools with AI-Powered CLI Tools
• WhatsApp Triggered AI Agent for NetSuite Using n8n and MCP Tools