

SuiteCommerce extensions let teams add storefront behavior without directly modifying the core Commerce application. Oracle describes the SuiteCommerce Extensibility API as a boundary between extension code and the application layer, which reduces coupling and makes upgrades safer. This guide applies that model to a practical Item Reviews extension for the product details page (PDP).
For account setup, website configuration, domains, field sets, caching, and broader site level troubleshooting, use Folio3’s illustrated SuiteCommerce development guide alongside this extension development focused walkthrough.
Architecture at a glance
SuiteCommerce extensions follow a modular architecture built on Backbone.js and Asynchronous Module Definition (AMD) on the frontend, paired with SuiteScript v1 / v2 on the backend. The diagram below shows how the two sides communicate.
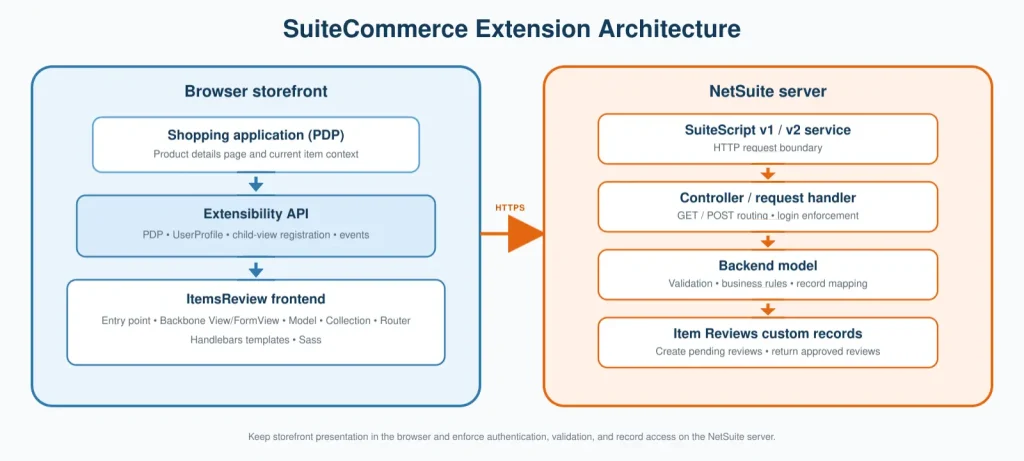
| Layer | Responsibility | Main files in this example |
|---|---|---|
| Extension entry point | Gets PDP and UserProfile components, then mounts the child view | Folio3.ItemsReview.ItemsReview.js |
| Presentation | Renders the form, review list, loading state, preview, and feedback | ItemsReview.View.js and .tpl files |
| Client data | Represents one review and the approved-review collection calls the service | ItemsReview.Model.js and Collection.js |
| HTTP boundary | Routes storefront GET and POST requests to the selected backend implementation | SuiteScript 1.0: assets/services/ItemsReview.Service.ss and SuiteScript/ItemsReview.ServiceController.js SuiteScript 2.x: SuiteScript2/ItemsReview.Service.ss |
| Record logic | Validates data, searches approved reviews, and creates pending records | SuiteScript 1.0: SuiteScript/ItemsReview.Model.js SuiteScript 2.x: SuiteScript2/ItemsReview.Model.js |
| Deployment metadata | Registers JavaScript, templates, Sass, services, and target versions | manifest.json |
Prepare NetSuite and the local developer environment
Oracle’s Get Started with Extensions workflow covers the same lifecycle used here: create or fetch a baseline, develop, test locally, deploy, and activate for a domain.
1.1 Install and configure the Extension Developer Tools
The Extension Developer Tools are delivered in an installed SuiteCommerce bundle. First identify the bundle ID, and then use that ID to open the bundle’s folder in the File Cabinet. Oracle’s Reviewing the Installed Bundles List and Set Up Extension Developer Tools pages describe these steps.
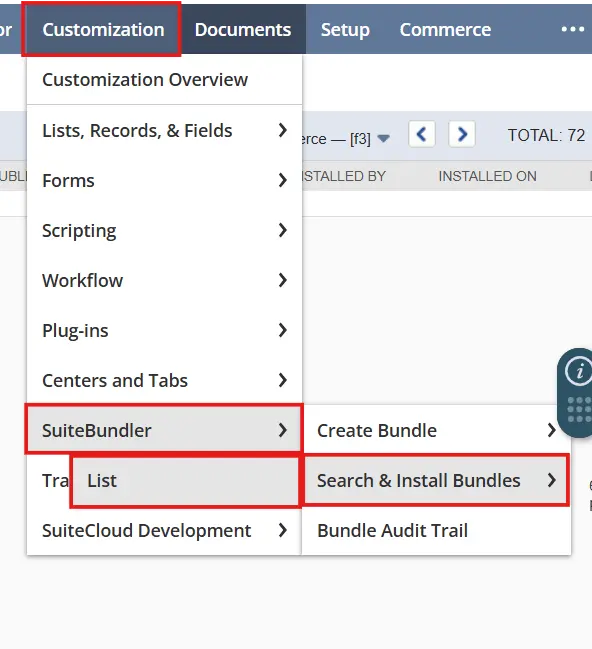
- In NetSuite, go to Customization > SuiteBundler > Search & Install Bundles > List
- Locate SuiteCommerce Extension Management in Installed Bundles and note its Bundle ID. The example below uses 521562, always use the ID displayed in your account
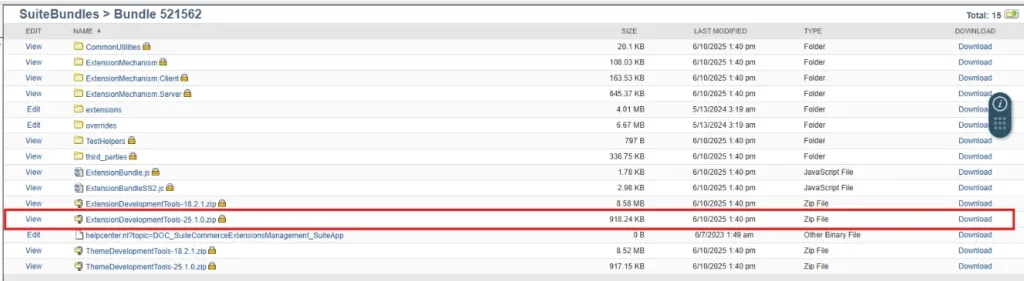
- Go to Documents > Files > File Cabinet > SuiteBundles > Bundle <Bundle ID>
- Download the latest ExtensionDevelopmentTools-<version>.zip that matches your Commerce implementation. The screenshot below shows ExtensionDevelopmentTools-25.1.0.zip inside Bundle 521562
- Extract the ZIP into a dedicated local development root. Do not move, delete, rename, or manually modify any of the Extension Development Tools’ core files or folders included in the ZIP, such as @sc-utils, gulp, .env, .npmrc, gulpfile.js, package.json, and package-lock.json. These files form the toolkit’s required structure. Only work within the designated extension development folders created or managed through the toolkit commands
- Install the supported Node.js and Gulp.js prerequisites. Oracle’s official setup procedure uses npm install to install the required packages. If the downloaded developer-tools package includes a valid package-lock.json that is consistent with package.json, you can use npm ci instead for a clean and reproducible installation. Unlike npm install, npm ci installs the dependency tree recorded in the lockfile without modifying package.json or package-lock.json. It also removes any existing node_modules directory and stops with an error if the package file and lockfile are inconsistent. Use npm install when the lockfile is missing or when dependencies intentionally need to be added or updated. After the dependencies have been installed successfully, run
gulp --tasksto confirm that the SuiteCommerce extension commands are available
The Developer Tools version, Extension Management bundle version, extension release number, and installed SuiteCommerce or SCA release are separate values and do not need matching numbers. The version property in manifest.json identifies the extension release, while target_version declares supported Commerce releases. Oracle’s Update Themes and Extensions guidance specifically states that a SuiteApp version has no programmatic connection to theme and extension versioning; it does not mean that every combination of tools and Commerce releases is compatible.
An older extension may work with a newer SuiteCommerce or SuiteCommerce Advanced release when target_version includes that release, but this is not a guarantee of runtime compatibility. APIs, modules, templates, dependencies, and overridden components may still change. Use a supported Developer Tools version, review release changes, and test the extension in a development or sandbox account before activation. Oracle’s Declare Target Versions guidance explains how Extension Manager filters incompatible extensions.

1.2 Authenticate and fetch the active site context
Run the fetch command from the top-level Extension Developer Tools directory. Oracle’s fetch procedure explains that the command retrieves the active theme required for compilation and can also fetch active custom extensions.
gulp extension:fetch
The first token-backed operation asks whether to reuse a saved token or create a new one. The Oracle token-based authentication flow uses an authentication ID as a local alias for an account-and-role combination.
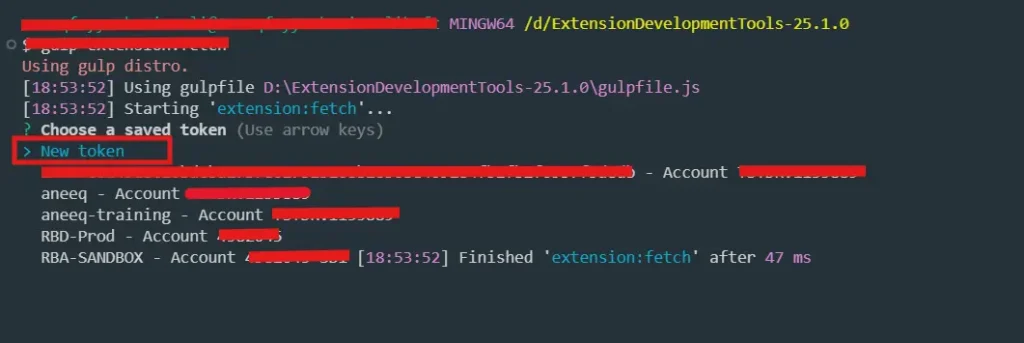
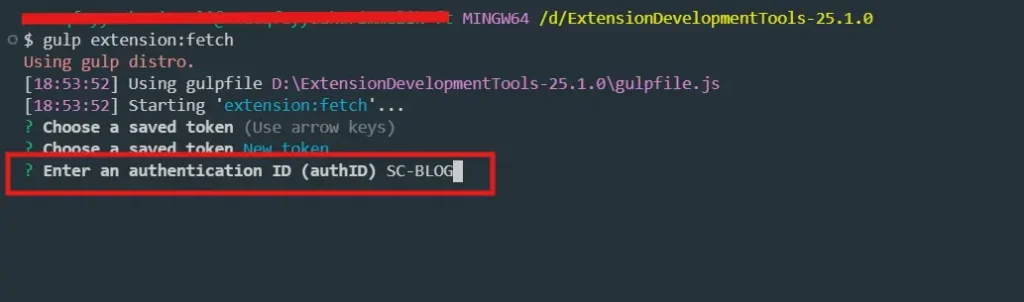
The command then opens NetSuite in a browser. Sign in if necessary, select the correct account and role, and choose Allow. By default, Oracle identifies Administrator and SCDeployer as roles with the required fetch/deploy permissions, although a least-privilege custom role is preferable for day-to-day work.
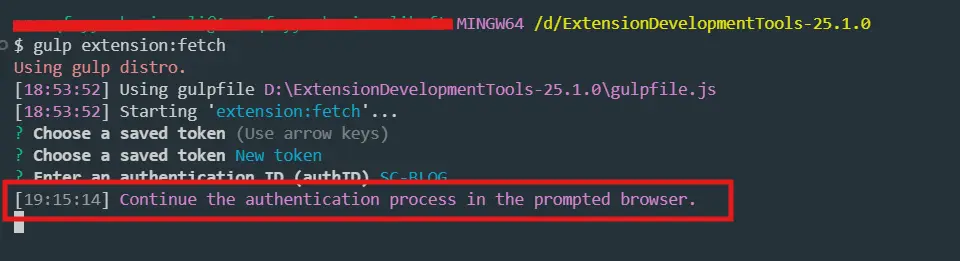
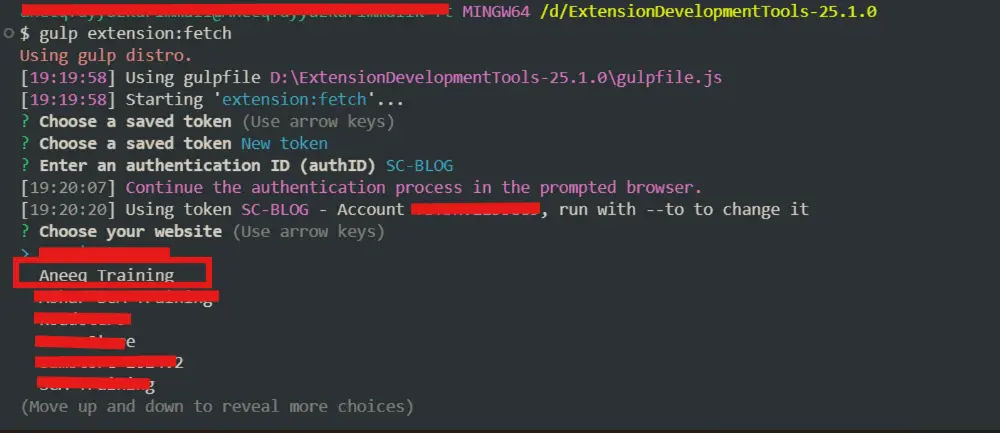
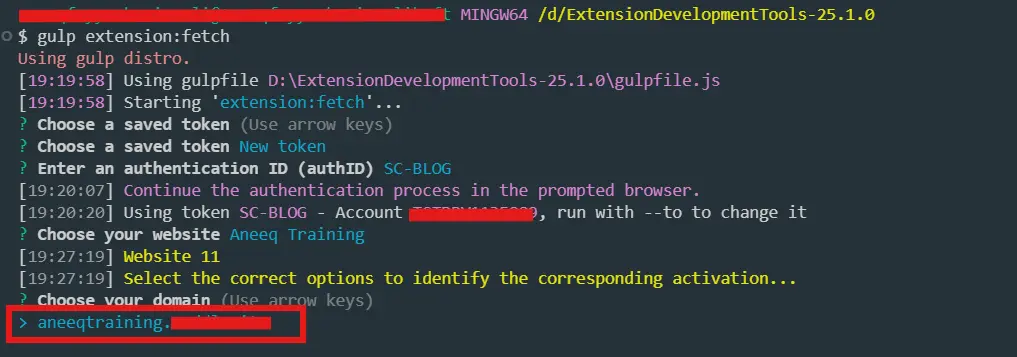
Protect work in progress Oracle warns that fetching an active custom extension can overwrite files in the local workspace. Commit or back up current work before fetching. For account-specific domains, use the account parameter documented in the Extension Developer Gulp command reference.
Create the ItemsReview extension
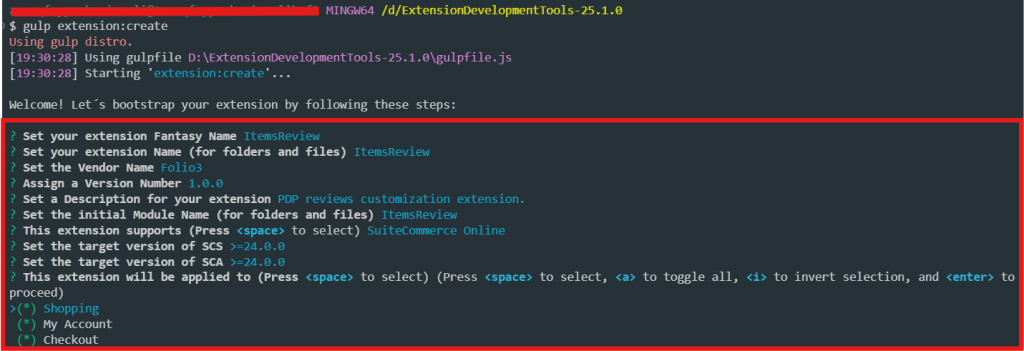
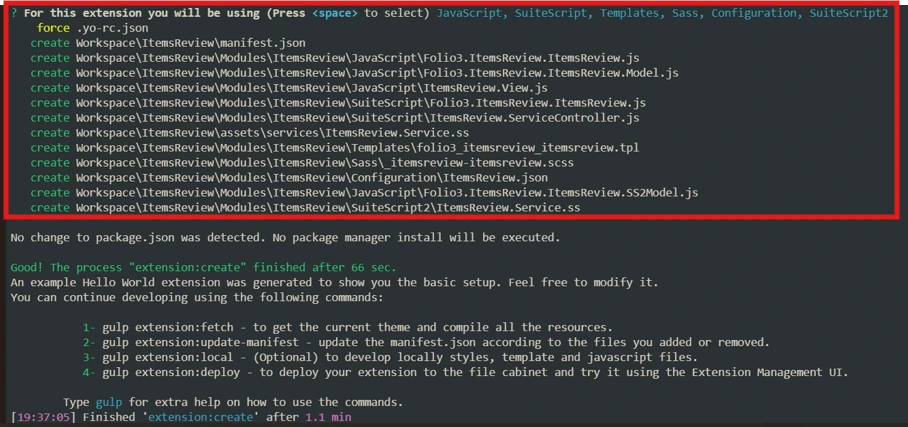
Use the baseline generator instead of assembling the directory by hand. Oracle’s Create a Baseline Extension procedure confirms that the generator can scaffold JavaScript, templates, Sass, configuration, SuiteScript 1.0, and SuiteScript 2.0 resources under Workspace.
gulp extension:create
For this example, the extension fantasy name is ItemsReview, the vendor is Folio3, the initial module is ItemsReview, the Shopping application is selected, and the target versions are set to 24.0.0 or later. Select only the file types the feature actually needs, the screenshots include both SuiteScript choices so the legacy and modern service paths can be compared.
2.1 Understand the generated workspace
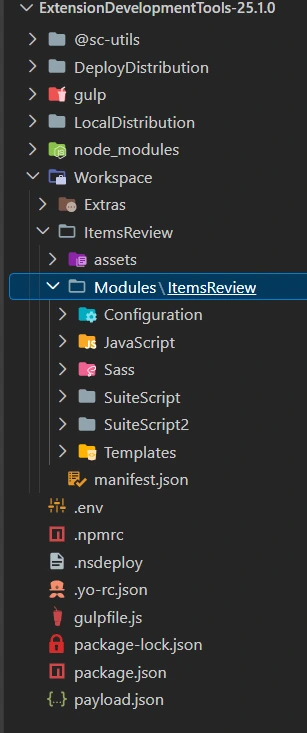
Oracle’s Extension Development Files and Folders reference separates editable source from generated build output. Work in Workspace/ItemsReview. Treat LocalDistribution, DeployDistribution, node_modules, and Workspace/Extras as generated or environment specific content.
2.2 Start the local development server
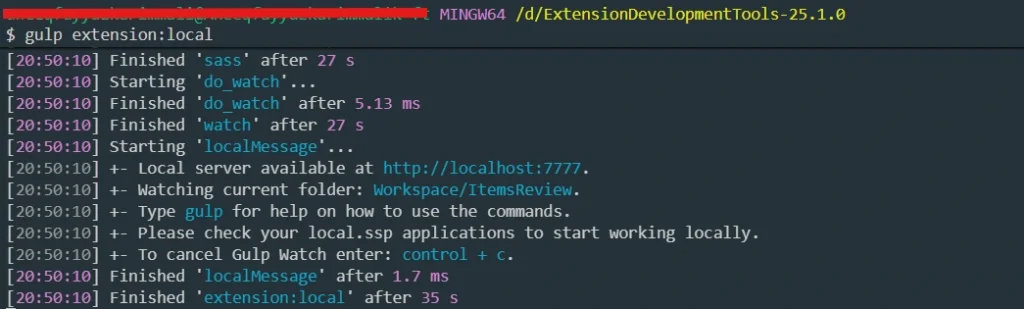
gulp extension:local
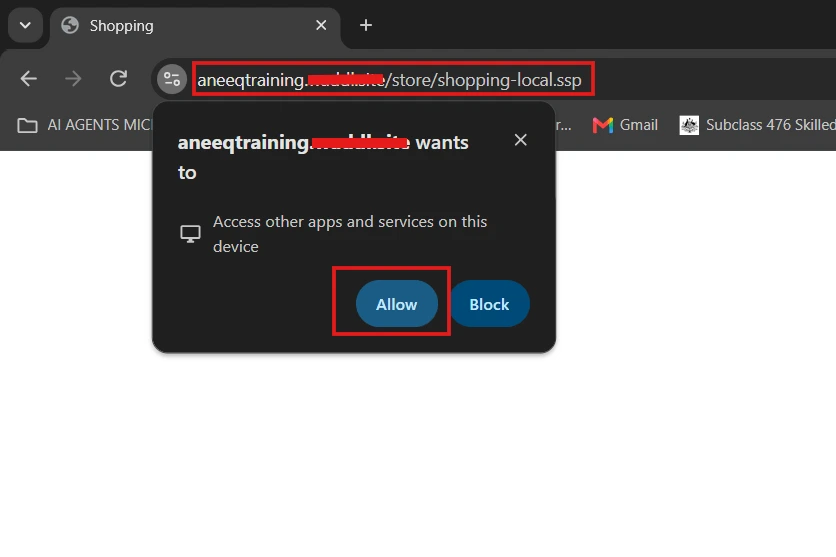
The local testing procedure compiles the extension into LocalDistribution, starts a watch task, and serves the local Shopping application. The browser may request permission to communicate with the local service, confirm that the displayed origin is the expected Commerce domain before allowing it.
The browser displays “Hello World!”, which is included in the default baseline code generated by the extension developer tools.
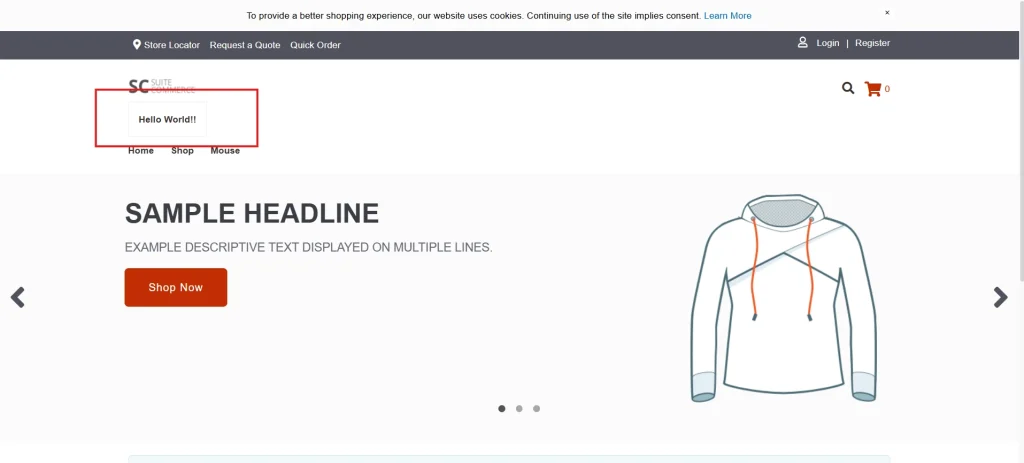
Backend testing caveat A local server can test frontend changes immediately, but Oracle notes that SuiteScript services and configuration JSON must first be deployed and activated because those resources execute in the NetSuite account, not in the local Node server.
Define the review data model and access rules
Create the custom record type in NetSuite before the service attempts to create review instances. Oracle’s custom-record setup documentation covers fields, access type, permission lists, and UI settings. SuiteScript can create and update instances of an existing custom record type, but it cannot create the custom record type itself, as clarified in Oracle’s Custom Record scripting reference.
| Field | Suggested type | Server-side rule |
|---|---|---|
| Review | Free-Form Text | Required. Trim whitespace, reject empty text, and enforce the field’s maximum length. |
| Rating | Free-Form Text | Required. Convert to a number and accept only whole numbers from 1 to 5. Reject other values. |
| Item Details | List/Record | Required. Validate a positive integer item ID and verify that it identifies an active item accessible on the storefront. |
| Person Name | Free-Form Text | Required. Trim whitespace, reject an empty name, and enforce the field’s maximum length. Treat this as a display name, not proof of identity. |
| Approved | Check Box | Always set to false when creating a review. Ignore any approval value supplied by the browser. Approval belongs to the internal moderation process. |
| Title | Free-Form Text | Required. Trim whitespace, reject an empty title, and enforce the field’s maximum length. |
Use the record IDs from your own account in the FIELDS map. Configure the record with Use Permission List when role-based access is required, give the service execution role only the minimum view/create permissions, and keep approval with an internal moderator role. Client-side hiding is a user-experience choice, the server must still enforce authentication and field validation.
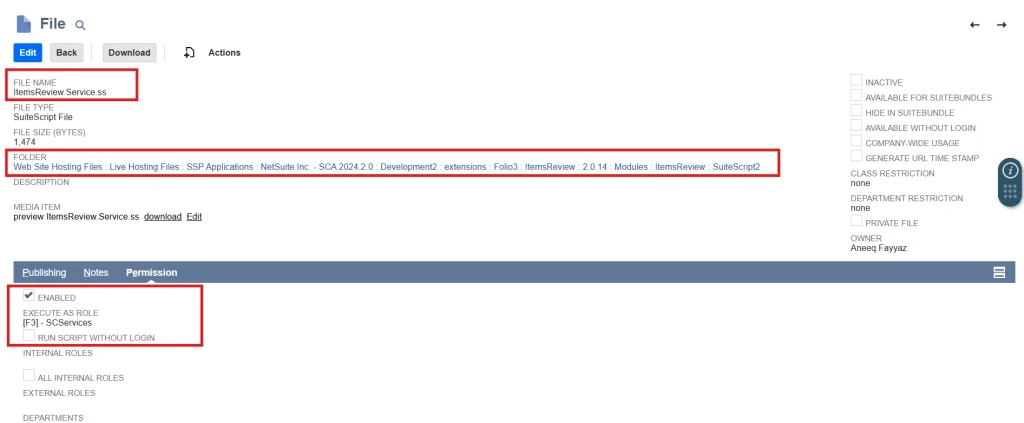
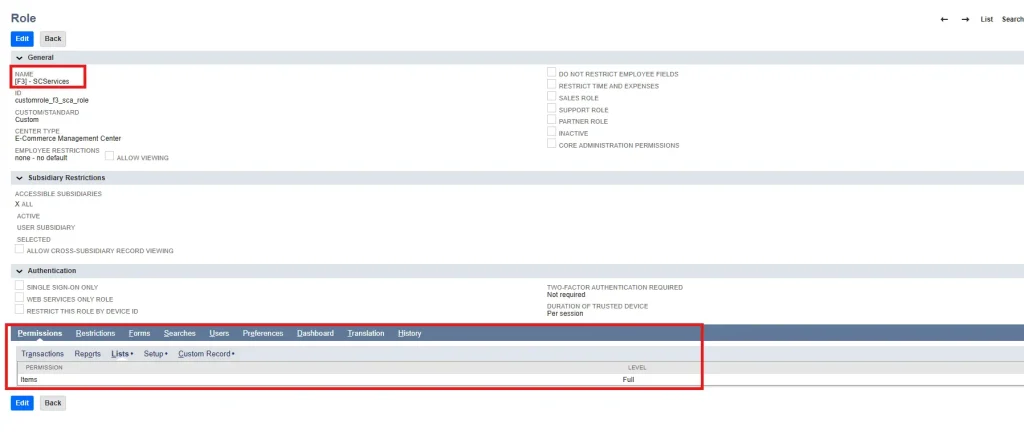
Verify the file-level Permission subtab separately from the custom-record permissions. In this example, ItemsReview.Service.ss is enabled, executes as the dedicated [F3] – SCServices role, and has Run Script Without Login selected. The execution role must still have only the item and Item Reviews custom-record permissions required by the backend. If the implementation requires authenticated reviewers, retain server-side authentication such as requireLogin: true; do not rely on the file checkbox as an authorization control.
Use the custom record type and field script IDs from your own account, e.g. customrecord_item_review identifies the custom record type, while the custrecord_ir_* values identify its fields. These IDs must match those configured in the target NetSuite account.
Set the Item Reviews custom record’s Access Type to Use Permission List. On its Permissions subtab, add the role with the minimum access required by this implementation, e.g. we are using [F3] – SCServices. For this feature, grant View access to Items and Create access to Item Reviews. Grant Edit access separately to the internal moderator role responsible for approving reviews. These are the feature specific permissions, not the complete permission set of the SCServices role.
Configure ItemsReview.Service.ss separately: enable the file, set Execute as Role to [F3] – SCServices, and select Run Script Without Login only when the endpoint must accept guest requests. This setting allows the request to reach the service, it does not replace custom record permissions or server-side authentication and validation. Oracle documents these file level settings separately under Execute as Role permissions.
Mount the review center on the PDP
The extension entry point is the correct place to obtain documented frontend components. Oracle’s Instantiating API Components guidance uses container.getComponent() and recommends checking for null before calling a component. In this implementation, the entry point obtains PDP and UserProfile, resolves the shopper profile asynchronously, and mounts the review center only after that state is known.
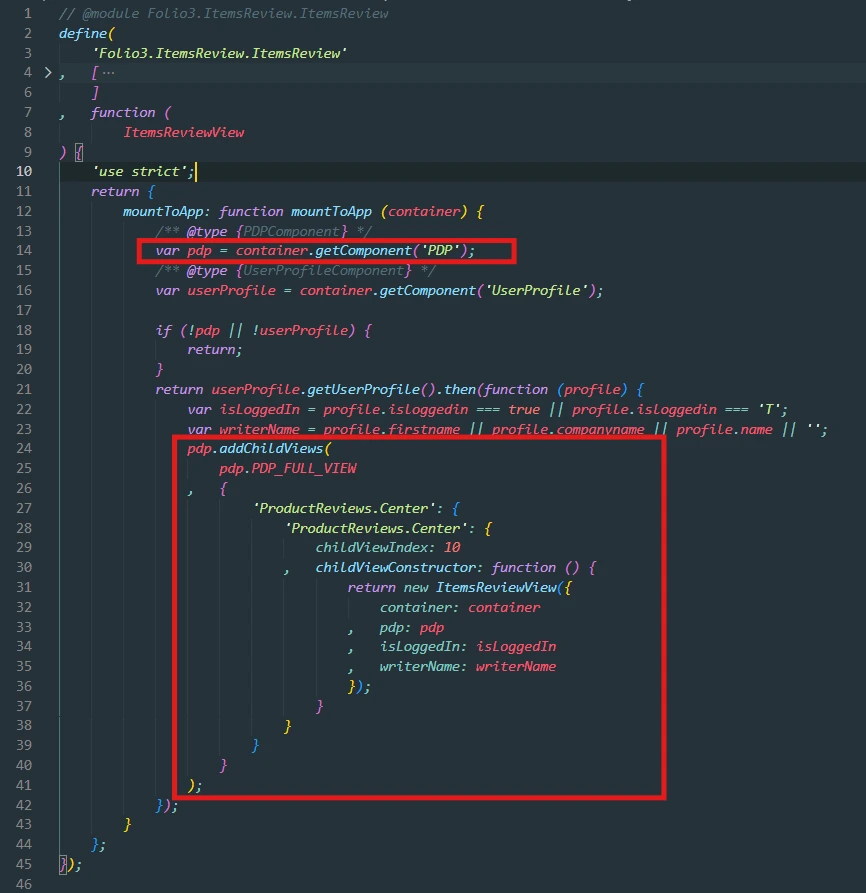
Entry point note: The entry-point module must expose mountToApp(), and its define() call must use an AMD module id following the <Vendor>.<Extension>.<Module> convention that matches the file registered as javascript.entry_points in manifest.json
The PDP component is scoped to the product details page and exposes getItemInfo(), while UserProfile exposes getUserProfile(). Oracle’s component documentation confirms that the returned profile contains the isloggedin flag used in the screenshot. Passing isLoggedIn and writerName into the view keeps session detection at the entry point and presentation behavior inside the view.
4.1 Why addChildViews is used
addChildView() and addChildViews() are the two Extensibility API methods for registering a child view in an existing placeholder. addChildView() is the short syntax: it targets the component’s default main view and appends the child view to the views already registered in the specified placeholder. addChildViews() is the verbose syntax: it lets you select a specific main view, assign a child-view ID, and control placement with childViewIndex. To replace an existing child view, use addChildViews() and register the custom view in the same placeholder with the same child-view ID as the view being replaced. See Oracle’s Add a Child View and Replace a Child View documentation.
In ItemsReview, pdp.addChildViews(pdp.PDP_FULL_VIEW, …) uses ProductReviews.Center as both the placeholder ID and the child-view ID. This is the documented replacement pattern. It replaces the existing ProductReviews.Center registration when that registration exists, otherwise it registers a new child under that ID. childViewIndex: 10 controls its position, it is not what causes the replacement. The index is 10-based: a value below 10 places the child view before the existing content, while a value above 10 places it after the existing content. When registering multiple child views, assign each one a different index.
The extension’s folio3_itemsreview_product_reviews_center.tpl contains the HTML rendered by the ItemsReview child view. The data-view=”ProductReviews.Center” mount point belongs to the parent PDP template in the active theme, so it does not appear in the extension template.
Other placement options:
- Add without replacing an existing registered child view: use addChildViews() with a unique child-view ID. Use childViewIndex to control its placement relative to the existing content
- New placeholder: If the PDP template does not contain the required data-view, locate the original template under Workspace/Extras and copy it into the extension’s Templates directory. Add the new data-view placeholder to the copied template, then override the PDP view’s template property so that it uses the extended template
- Modify the template: Another option is to place the data-view in a local theme template directly under Workspace/Extras. While this works locally, making it work in production requires adding it directly to the theme template. However, this pattern is strongly discouraged due to high coupling
- CMS area: target an existing data-cms-area by prefixing its value with cms:, for example pdp.addChildView(‘cms:header_banner_top’, …)
Organize the frontend module
The JavaScript directory separates the extension entry point, item-review view, frontend model, and collection. This mirrors the module anatomy produced by the developer tools and keeps presentation, state, and transport concerns independent.
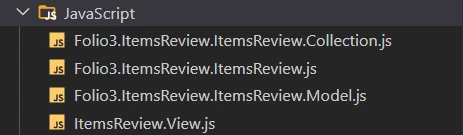
The Extension Developer Tools generate the baseline extension structure and its core files. In this example, Collection.js was added manually later to manage the approved review list and is not part of the generated scaffolding.
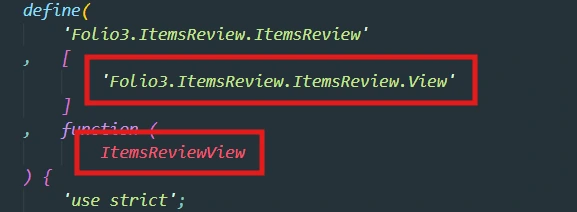
AMD dependency names and callback parameters are positional: the first module in the dependency array is supplied as the first function argument, and so on. A mismatch can load successfully but bind the wrong module to a variable, producing difficult runtime errors.
Preserve the generated entry point: In this guide, keep the entry point filename Folio3.ItemsReview.ItemsReview.js and its AMD module name Folio3.ItemsReview.ItemsReview unchanged. The javascript.entry_points.shopping property in manifest.json references Modules/ItemsReview/JavaScript/Folio3.ItemsReview.ItemsReview.js.
You can modify the implementation inside this file, including mountToApp(container), without renaming it. Changing the filename or AMD module name without updating the corresponding references can prevent the extension from loading and initializing. Keep helper file names and AMD module names consistent. For each helper module, use the same base name for its JavaScript filename and AMD module name, and make sure its dependency name matches the name used by importing modules. Although AMD does not require these names to match, keeping them consistent makes modules easier to trace and debug.
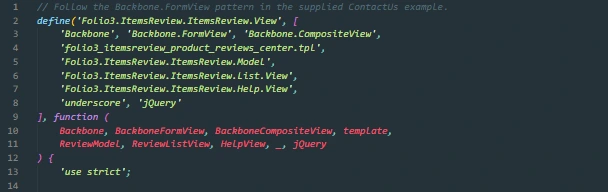
5.1 Initialize product and review state
The view receives the PDP instance and login state from the child-view constructor. It calls pdp.getItemInfo() to identify the current item, creates the item model used by the product card, creates the approved-review collection, and initializes the loading, preview, and feedback state.
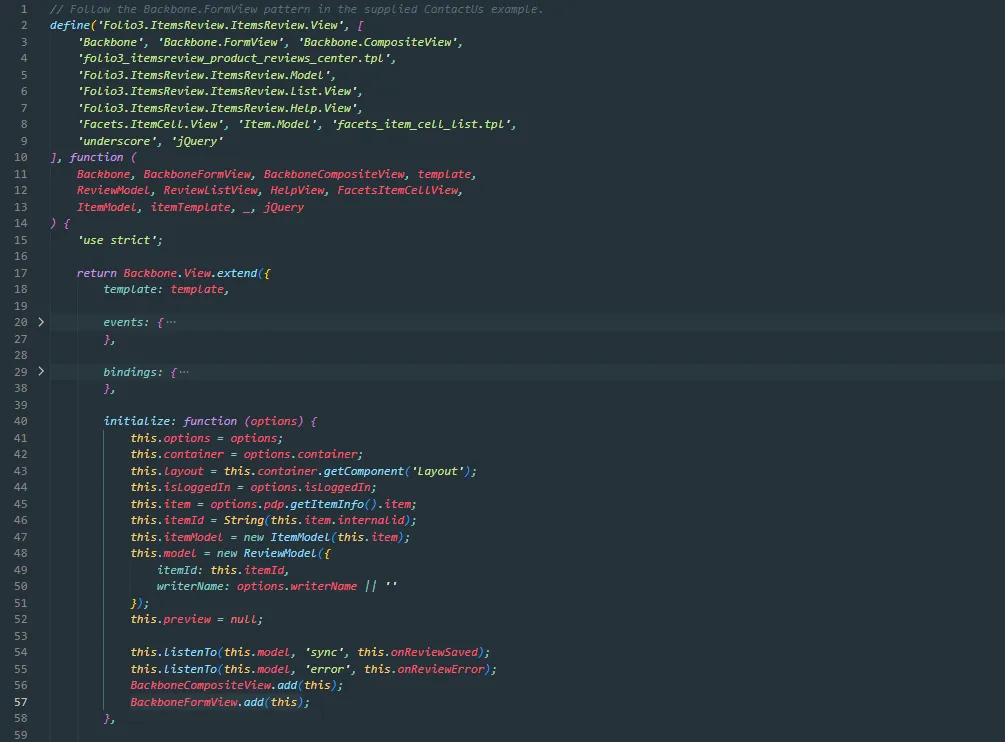
Initialize the form model, declare the bindings hash, and call BackboneFormView.add(this), then separately call BackboneCompositeView.add(this) since this view also declares childViews for the review list and item cell subviews. Map the form’s submit event directly to saveForm.
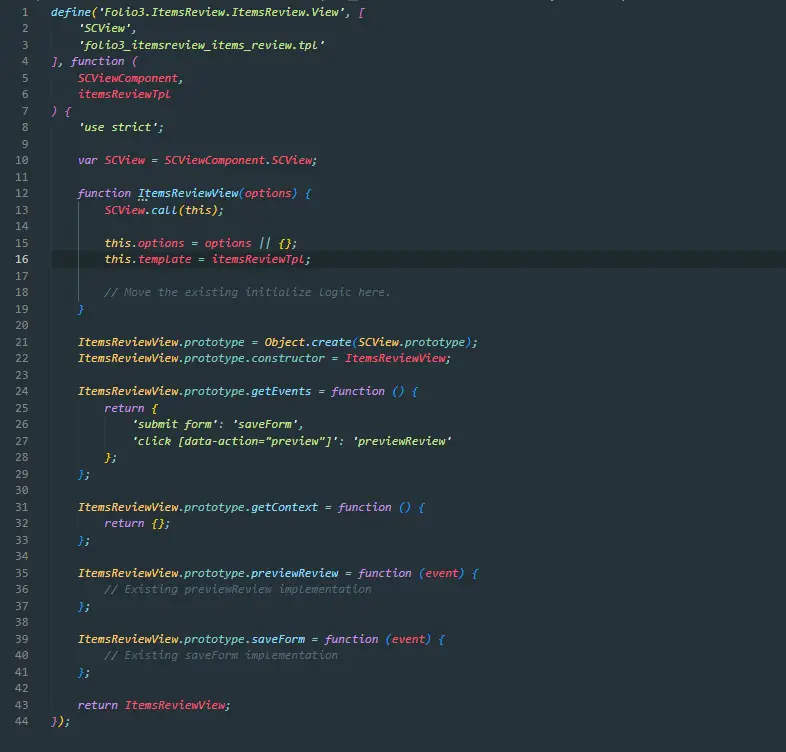
SCView compared with Backbone.View.extend Backbone.View.extend is the legacy pattern for SCA 2020.1 and earlier. For SuiteCommerce or SCA 2020.2 and later, use the documented SCView constructor and prototype pattern rather than SCView.extend({ … }). Extract the class with var SCView = SCViewComponent.SCView, call SCView.call(this), inherit with Object.create(SCView.prototype), and restore the child constructor. Move the events map to getEvents(), child views to getChildViews(), and implement getContext().
5.2 Build the frontend Model and Collection
The frontend model and collection use the same service endpoint, but they represent different client side responsibilities. The model represents a review and owns its form defaults and client validation. The collection represents the approved reviews returned for the current item.
The frontend model represents a review
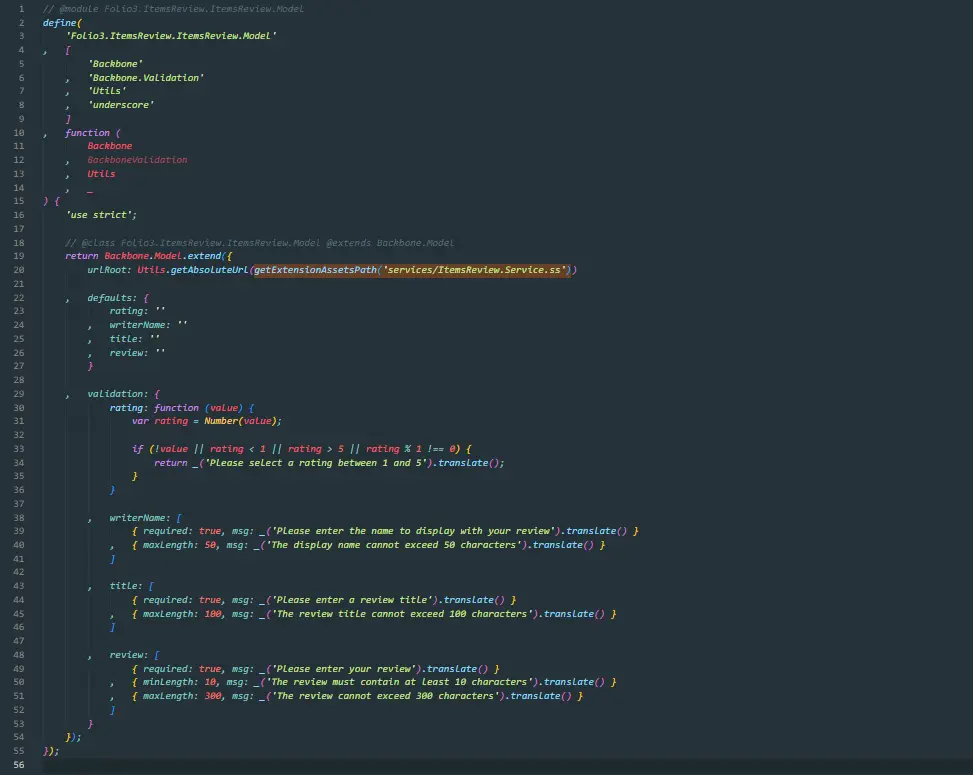
The model’s urlRoot points Backbone to ItemsReview.Service.ss. Because the submission model is new and has no internal ID, model.save() uses POST. The defaults keep the form state predictable, while the validation object provides immediate field-level feedback before a request is sent.
The collection represents approved reviews
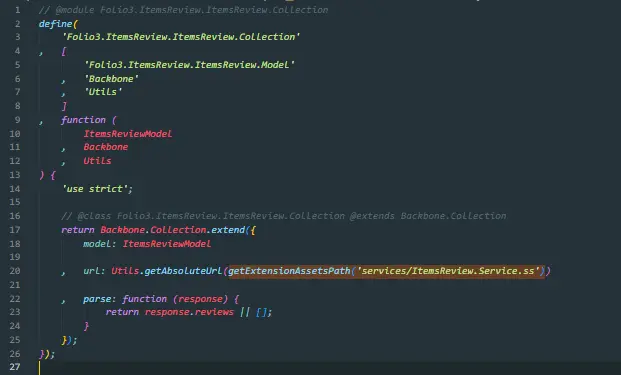
The collection declares ItemsReviewModel as its model type, so each object returned by the service becomes a review model. Its url points to the same endpoint, and parse() converts the service response from { reviews: […] } into the array Backbone expects.
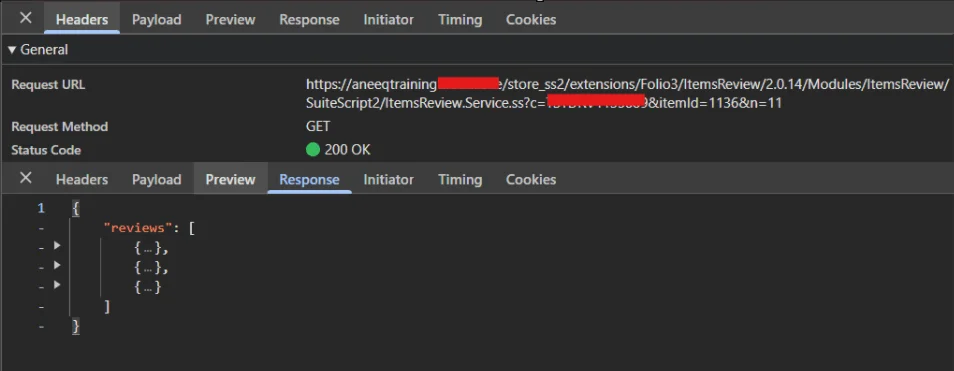
5.3 Load approved reviews: collection.fetch() to GET
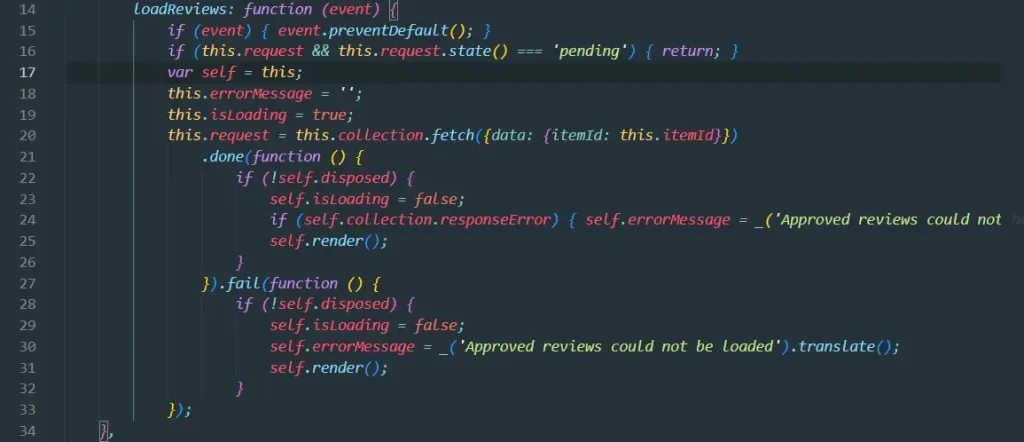
The view loads reviews after resolving the current PDP item ID. collection.fetch() performs a GET request against the collection URL and adds itemId as a query-string parameter. On success, Backbone passes the response through collection.parse(), updates the collection, and the view renders the approved reviews.
- The view calls loadReviews() after setting the current itemId
- collection.fetch() sends GET services/ItemsReview.Service.ss?itemId=<current item>
- The service controller reads itemId and calls ItemsReviewModel.list(itemId)
- The backend validates the item ID and searches only active, approved reviews for that item
- The service returns { reviews: […] }; collection.parse() extracts the array
- The resolved collection is exposed through getContext() and rendered by the template
5.4 Submit a review: model.save() to POST
Submission uses the form behavior supplied by Backbone.FormView. The submit event invokes saveForm, which prevents the browser’s default submission, connects validation, serializes the named form controls, and calls model.save(). The extension does not repeat this work in a separate submit handler.
Declare bindings for writerName, title, review, and rating. Give the HTML controls matching name attributes. A custom star selector must update its bound rating control so the submitted form contains the selected value.
Let the FormView submission path apply the model’s validation rules. Invalid input should produce field feedback without creating a review. Preview reads the current bound validation model and does not call saveForm or model.save(). The SuiteScript controller instead receives the parsed payload through this.data.
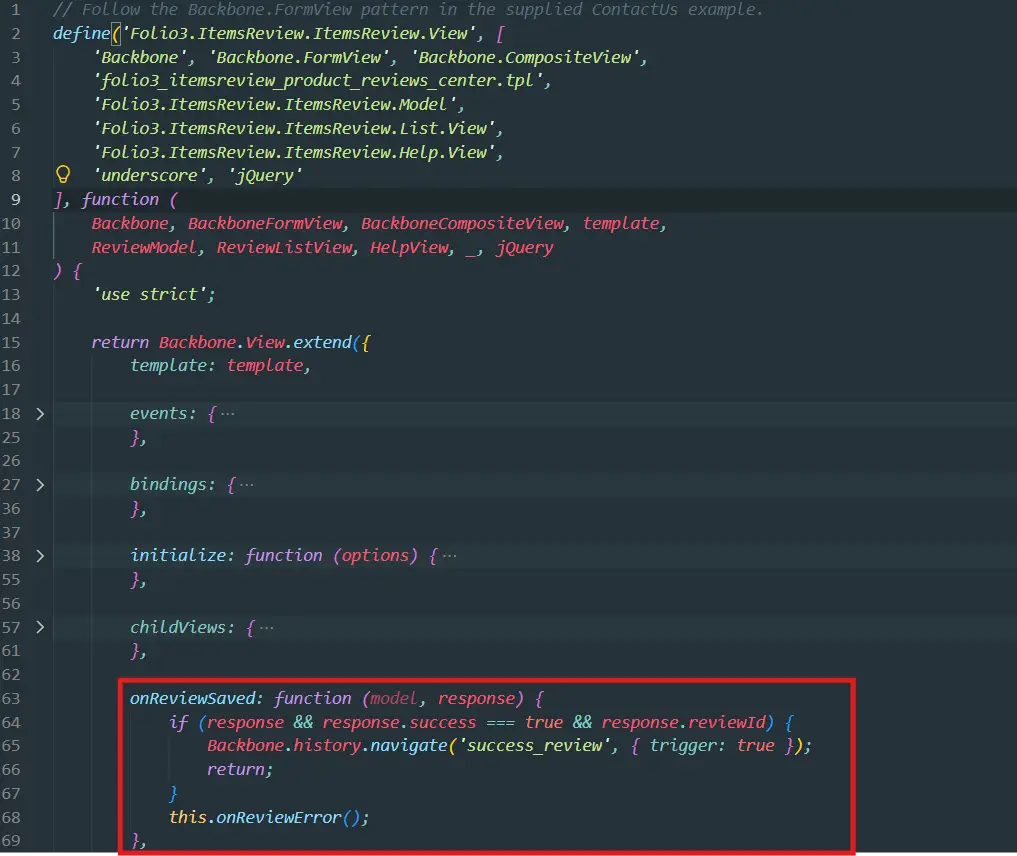
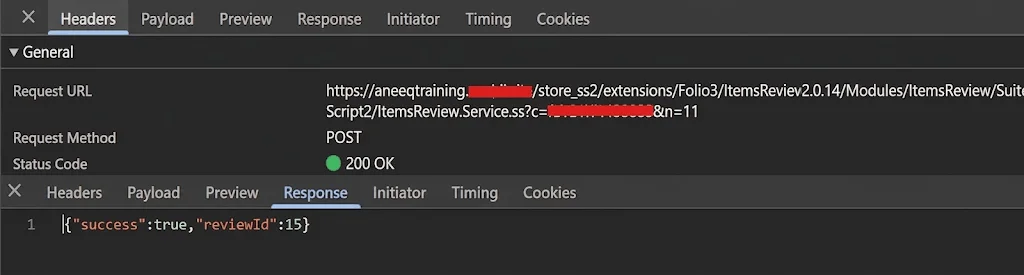
The backend validates the payload again, creates an unapproved review record, and returns { success: true, reviewId: … }.
Only after a successful response does the view navigate to success_review.
5.5 Bind events and validation to the form
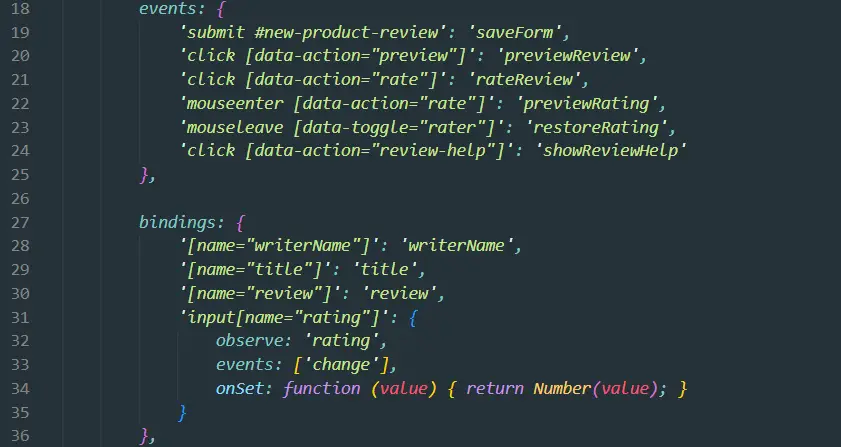
The events map delegates form submission to saveForm, Preview to previewReview(), rating interaction to its callbacks, and Review guidelines to showReviewHelp(). The bindings map connects the form controls to the validation model through the FormView integration. Keep one submit handler and let it own serialization and saving.
How to read the mappings
- The events map uses the pattern ‘DOM event + element selector’: ‘view callback method’
- In ‘submit #new-product-review’: ‘saveForm’, submit is the DOM event, #new-product-review is the local form selector, and saveForm is the callback method on the view
- In ‘click [data-action=”preview”]’: ‘previewReview’, click is the DOM event, [data-action=”preview”] is the element selector, and previewReview is the callback method on the view
For a simple binding, ‘[name=”title”]’: ‘title’ associates the title input with the title attribute on the bound validation model. The input must also have name=”title” so saveForm includes it during serialization. Do not add manual copying for these same fields.
Client validation should provide fast, field level feedback, but it is not a security boundary.
5.6 Build a deliberate view-to-template contract
The view stores only the PDP, container, login state, and current item that it needs later. Creating the review model for both shopper states removes repeated this.model checks from getContext(). The item is also stored once and reused when creating the item model, reading the item ID, and building the product URL. Static text created in JavaScript, such as Customer Reviews, uses _(…).translate() because the Handlebars {{translate}} helper is not available there.
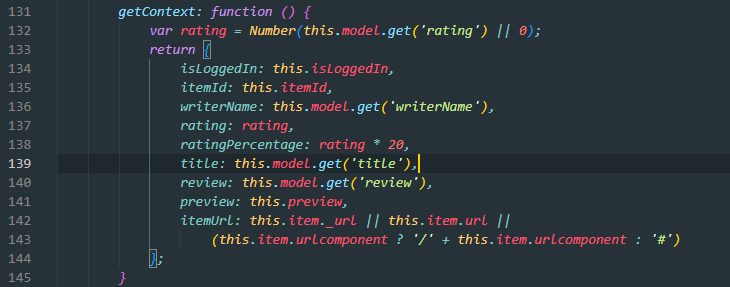
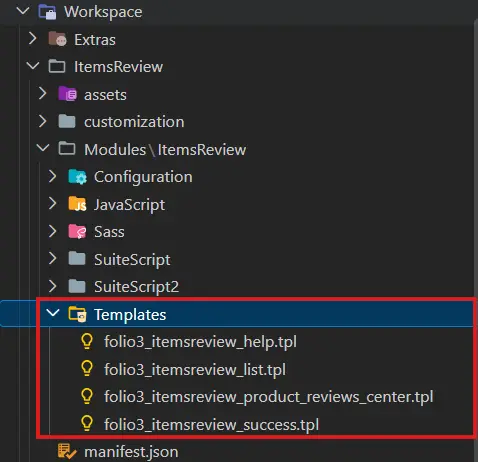
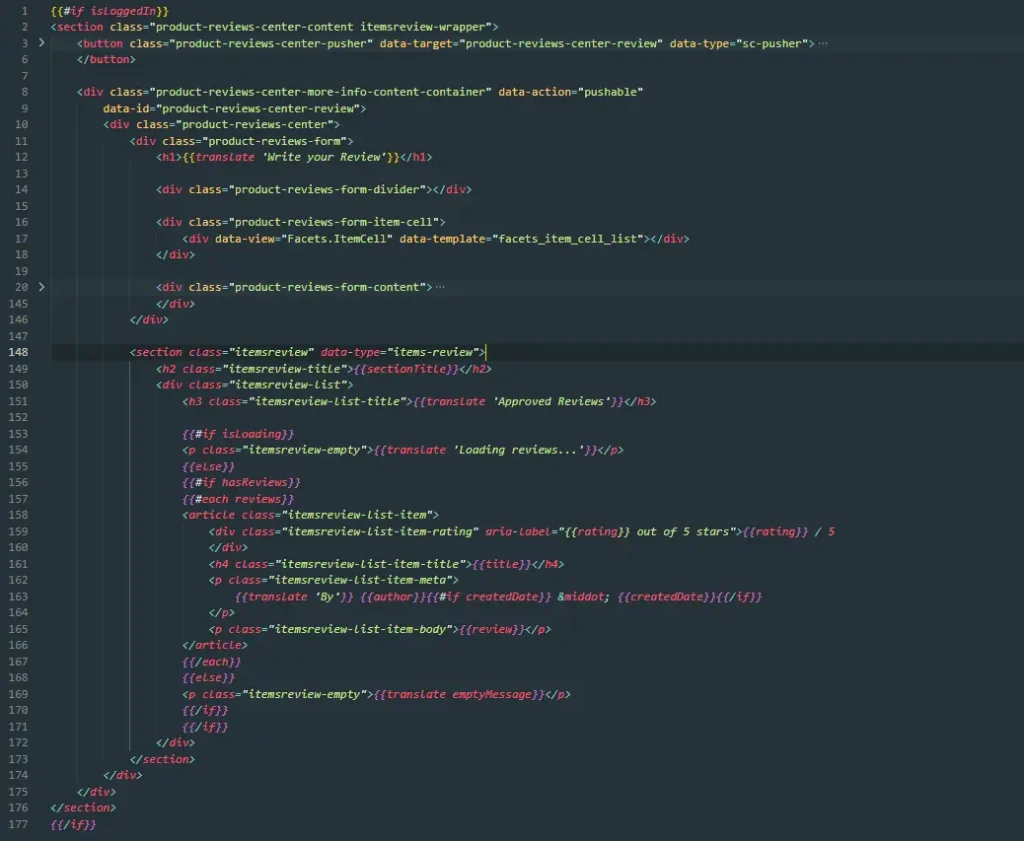
- Render the submission form only when isLoggedIn is true, both the review form and list is not visible for non logged in users.
- Use hasReviews to choose between the collection and the configured empty message
- Render a loading state while the collection request is pending, then re-render after success or failure
- Keep templates logic light: calculate display-ready values in getContext(), not in Handlebars expressions
- Use translation helpers for customer facing labels and messages instead of hard coded English where the site supports multiple languages
5.7 Learn the Handlebars patterns used by ItemsReview
SuiteCommerce compiles the .tpl files as Handlebars templates. The template does not fetch reviews or call the service itself, it renders the values returned by the view’s getContext() method. A name used inside {{…}} must therefore be present in that context or be provided by a registered SuiteCommerce helper.
Connect getContext() values to the template
The ItemsReview view prepares display ready values before rendering. The template can then insert those values without duplicating JavaScript logic:
getContext: function () {
    return {
        isLoggedIn: this.isLoggedIn,
        rating: Number(this.model.get('rating') || 0),
        ratingPercentage: Number(this.model.get('rating') || 0) * 20,
        reviews: this.collection.toJSON(),
        hasReviews: this.collection.length > 0,
        isLoading: this.isLoading
    };
}
Understand {{…}} and {{{…}}
Handlebars expressions insert values from the object returned by getContext() into a template. {{value}} uses double braces and HTML-escapes the value before inserting it into the page. For example, if review contains <strong>Great product</strong>, {{review}} displays the tags as text instead of interpreting them as HTML. This is the correct form for shopper-supplied values such as {{title}}, {{author}}, and {{review}}.
{{{value}}} uses triple braces and inserts the value as unescaped HTML. With the same example, {{{review}}} makes “Great product” bold because the browser receives the <strong> element. Use triple braces only for HTML that the application intentionally creates and sanitizes. Never use them for review titles, authors, or review text entered by shoppers because unescaped content can create a cross-site scripting risk.
In ItemsReview, keep normal data bindings on double braces. Triple braces are unnecessary unless a view or approved helper returns trusted markup specifically intended to be rendered as HTML. See the official Handlebars guide: HTML escaping.
Debug template context with {{log this}}
When developing or troubleshooting Handlebars templates, use {{log this}} to output the rendering context directly into the browser developer console:
{{! Log the entire context object returned by getContext() }}
{{log this}}
{{! Log a specific variable or array property }}
{{log reviews}}
This is the most direct way to inspect which properties, flags, or data models are available inside a .tpl file without writing temporary console.log() statements inside your JavaScript view.
Use standard Handlebars helpers
Addition to basic context bindings, there are built in Handlebars helpers to manage standard storefront tasks:
- Localization ({{translate ‘Text’}}): Passes string literals or dynamic context variables through NetSuite’s built-in translation dictionary
<h3>{{translate 'Approved Reviews'}}</h3>- Responsive Media ({{resizeImage url ‘size’}}): Modifies a NetSuite File Cabinet image URL to fetch pre scaled dimensions (e.g., ‘thumbnail’, ‘main’, ‘zoom’)
<img src="{{resizeImage item.imageUrl 'thumbnail'}}" alt="{{item.name}}" />- Currency Formatting ({{formatCurrency amount}}): Formats raw numeric values according to the active website currency, symbol placement, and locale formatting rules
<span class="price">{{formatCurrency item.price}}</span>- Logical Conditionals ({{#ifEquals val1 val2}}): Extends standard Handlebars #if blocks to evaluate direct equality comparisons in the presentation layer
{{#ifEquals rating 5}}
    <span class="badge">Top Rated</span>
{{/ifEquals}}
Use conditionals for storefront states
The review-center template uses #if and else blocks to select the correct interface state:
{{#if isLoading}}
    <p>{{translate 'Loading reviews...'}}</p>
{{else}}
    {{#if hasReviews}}
        <!-- render the approved reviews -->
    {{else}}
        <p>{{translate emptyMessage}}</p>
    {{/if}}
{{/if}}
The same pattern uses {{#if isLoggedIn}} to show the submission form only to signed-in shoppers and {{#if preview}} to render the review preview only after the view has prepared it.
Loop through the approved reviews
The reviews value is an array produced by this.collection.toJSON(). The #each block changes the current Handlebars scope to one review at a time:
{{#each reviews}}
    <h4>{{title}}</h4>
    <p>{{translate 'By'}} {{author}}</p>
    <p>{{review}}</p>
{{/each}}
Inside the loop, {{title}}, {{author}}, and {{review}} refer to properties of the current review. Keep filtering, validation, calculations, and permission decisions in the view or backend; the template should remain responsible for presentation. Use {{translate ‘Text’}} for customer-facing text written directly in the template, while JavaScript-created messages use _(…).translate().
5.8 Advanced patterns and useful SuiteCommerce internals
SuiteCommerce contains many useful APIs and internal patterns, but an extension guide does not need to catalogue all of them. The following examples are intentionally small and come directly from the working ItemsReview implementation.
ItemsReview registers named callbacks in mountToApp():
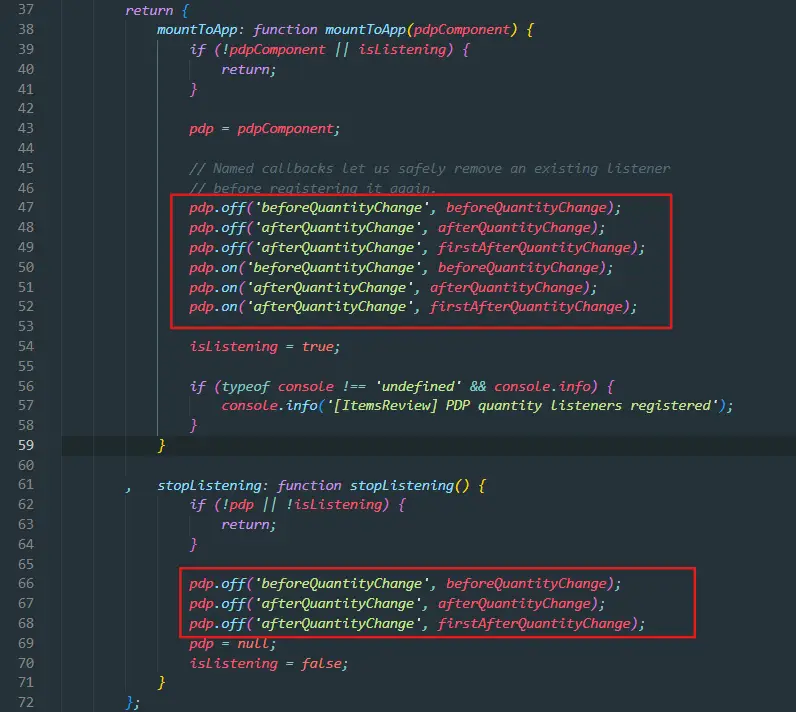
Using named functions matters because off() must receive the same callback reference supplied to on(). Removing an existing callback before adding it also prevents accidental duplicate registration.
Open a product details page for an item that displays the standard quantity control. Open the browser developer console, make sure Info messages are enabled, and filter for [ItemsReview]. The registration message appears when the extension mounts. Change the PDP quantity to trigger the before and after messages.

The exact event payload can vary by Commerce implementation, so inspect the logged value instead of assuming its shape.
Open content through the recommended Layout modal
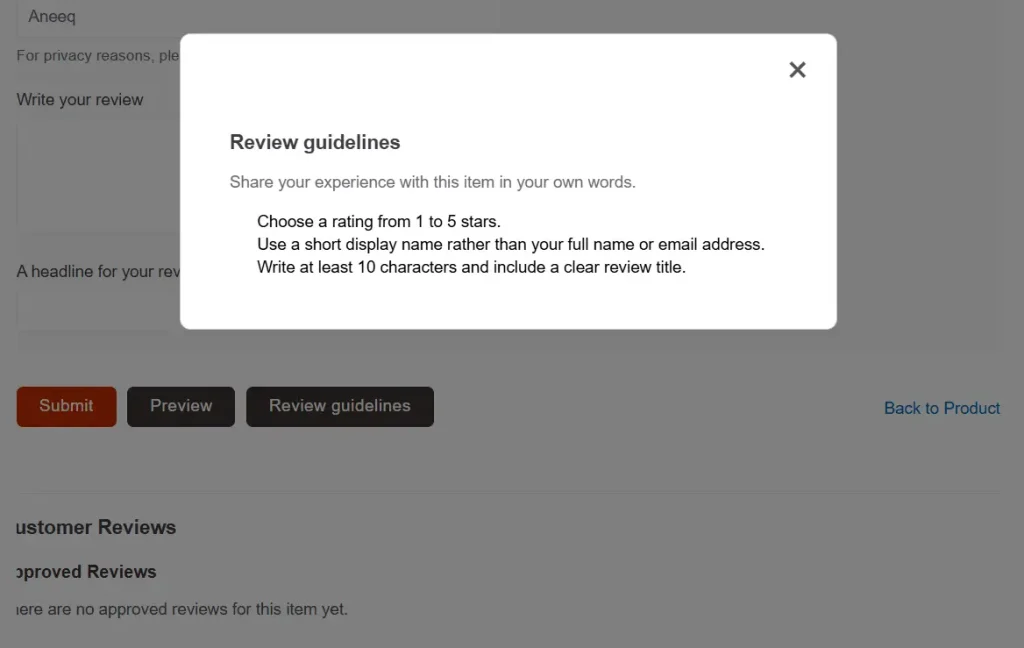
The Review guidelines action uses the Layout method for displaying a view as modal content:
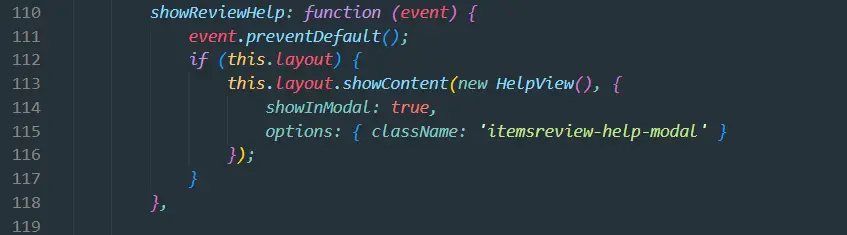
This keeps modal ownership with Layout and avoids internal patterns such as setting view.inModal directly. A route based modal link can be useful for navigable content, but Layout.showContent() is clearer when a button opens a purpose built extension view.
Keep DOM queries scoped to the current view
Inside ItemsReview.View, this.$(‘selector’) searches only within the current view’s root element. It is equivalent to this.$el.find(‘selector’). For example, setRatingFill() uses this.$(‘[data-toggle=”rater”]’) and this.$(‘[data-toggle=”rating-component-fill”]’) to locate and update only the rating controls rendered by the current ItemsReview view.
The rating example follows the same pattern:

Scoped selectors are safer than a global jQuery lookup when a page contains repeated controls or more than one extension instance. Use a global selector only when the behavior is genuinely page wide.
Declare dependencies instead of relying on alphabetical order
Within an extension, the AMD dependency array is the actual load contract. The ItemsReview entry point explicitly depends on the diagnostics module, so it is available before mountToApp() calls it:
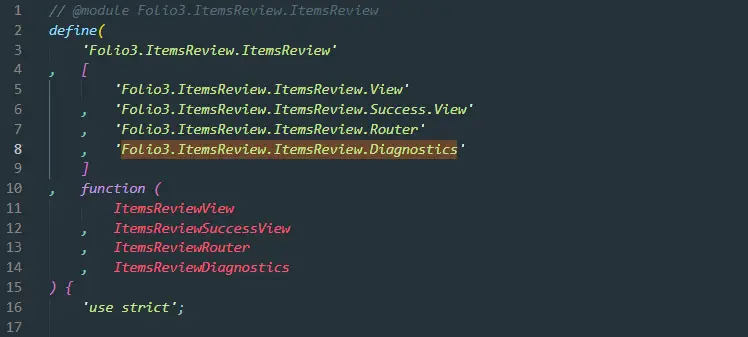
Dependency names and callback parameters are positional and must remain in the same order.
Assume you have two extensions: Abd (Extension 1) and Abc (Extension 2). Suppose Abd contains functionality that Abc needs to use, such as a helper AMD module function. By default, Abc will load before Abd due to alphabetical ordering. We can prevent this issue by naming them 001_Abd and 002_Abc, which makes the extension load order deterministic and much easier to troubleshoot.
In a development or sandbox environment, temporarily deactivate the custom extensions being investigated, then reactivate them one at a time in the numbered order. Complete the activation and test the affected functionality after each addition. This helps identify which extension introduces the issue or which combination of extensions causes a conflict. See Oracle’s Extensibility API Components, Use Multiple Modules in an Extension, and General Best Practices guidance.
Follow the request through the backend
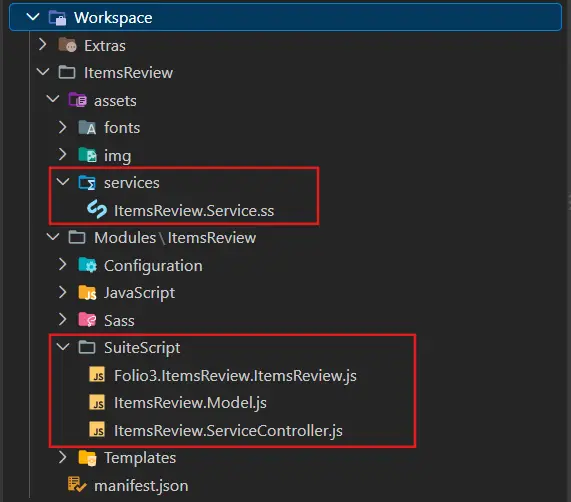
SuiteCommerce services form the HTTP boundary between frontend models and NetSuite record logic. Oracle’s Services and Backend Models overview describes this separation, and its Create a Service to Handle HTTP Requests procedure explains the service-controller architecture used in the screenshots.
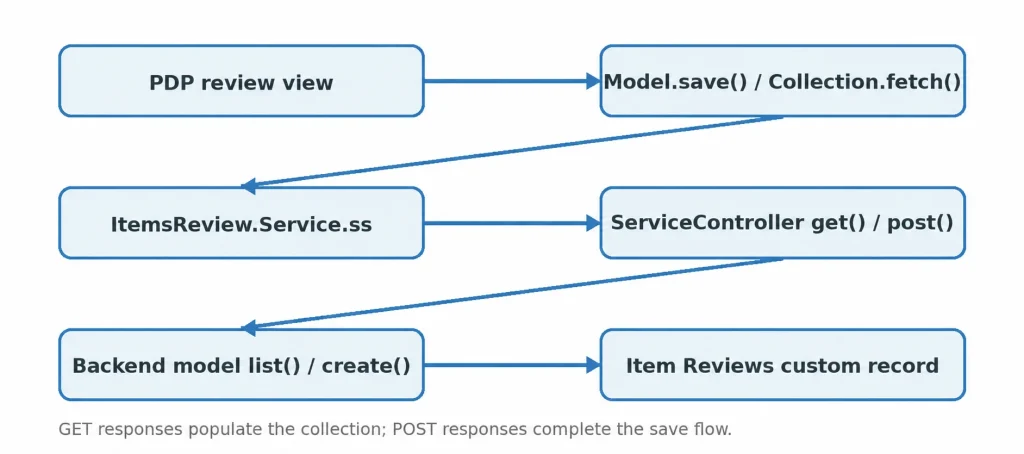
The endpoint is shared; the HTTP method determines which controller path runs. This is the key connection between the browser side Backbone objects and the SuiteScript backend.
| Frontend call | HTTP request | Controller method | Backend operation |
|---|---|---|---|
| collection.fetch() | GET with itemId | get() | list(itemId) |
| model.save() | POST with review JSON | post() | create(this.data) |
6.1 Create the Item Reviews custom record
Before implementing the backend model, create a custom record that will store submitted reviews. You can either do it manually or with the automated deployment via SDF.
Option 1: Automated Deployment via SDF (Recommended)
The downloadable ItemsReview sample codebase includes an SDF project structure under the customization/ directory containing the full XML schema for customrecord_item_review
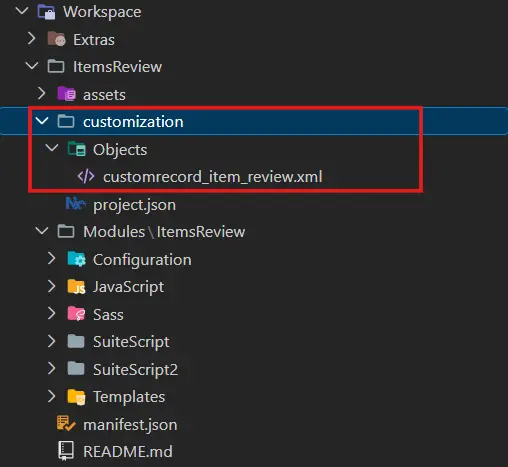
- Open a terminal in your local project root
- Navigate into the SDF project directory: cd customization
- Authenticate your target NetSuite account using SuiteCloud CLI: suitecloud account:setup
- Deploy the custom record object directly to your environment: suitecloud project:deploy
Option 2: Manual Setup via NetSuite UI
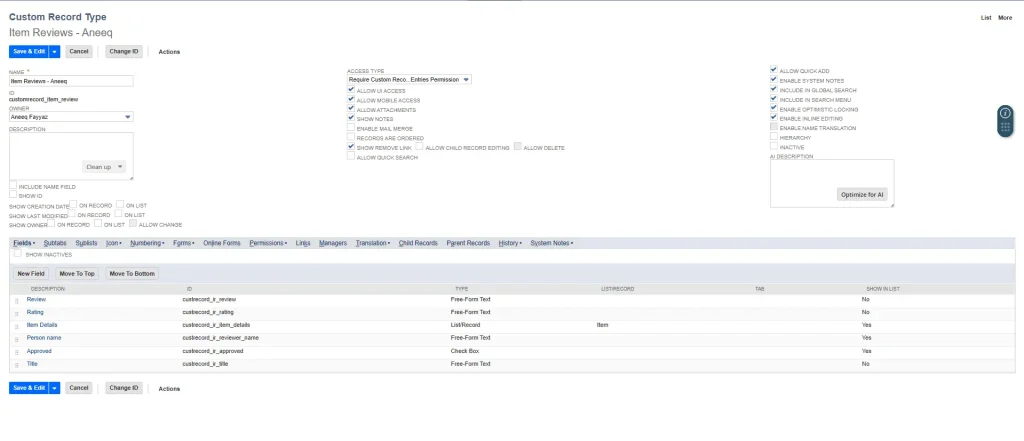
In NetSuite, navigate to:
Customization > Lists, Records, & Fields > Record Types > New
| Setting | Value |
| Name | Item Reviews – Aneeq |
| Script ID | customrecord_item_review |
| Access Type | Use Permission List |
Next, add the fields required by the ItemsReview backend:
| Field | Script ID | Type | List/Record |
| Review | custrecord_ir_review | Free-Form Text | — |
| Rating | custrecord_ir_rating | Free-Form Text | — |
| Item Details | custrecord_ir_item_details | List/Record | Item |
| Person Name | custrecord_ir_reviewer_name | Free-Form Text | — |
| Approved | custrecord_ir_approved | Check Box | — |
| Title | custrecord_ir_title | Free-Form Text | — |
The SuiteScript backend uses these script IDs when searching for approved reviews and creating new review records. If you use different IDs, update the field mapping in ItemsReview.Model.js accordingly.
Because the record uses Use Permission List, ensure that the SuiteCommerce service role and internal administrator/moderator roles have the required permissions configured. New reviews should be created with Approved set to false so they remain hidden until an administrator reviews them.
6.2 Keep the service and controller thin
ItemsReview.Service.ss is the web facing endpoint. Its job is to pass the request into the controller, business rules should not accumulate in this file. The controller declares requireLogin: true and routes GET to ItemsReviewModel.list(itemId) and POST to ItemsReviewModel.create(this.data). Oracle requires controller HTTP methods to be lowercase and to correspond to the incoming method.
For a GET request, the controller reads query parameters from this.request, for example this.request.getParameter(‘itemId’). For a POST request, the submitted payload is available through this.data. The controller returns the model result directly, unlike a Suitelet, it does not need to call response.write(JSON.stringify(…)) because the ServiceController handles the HTTP response serialization.
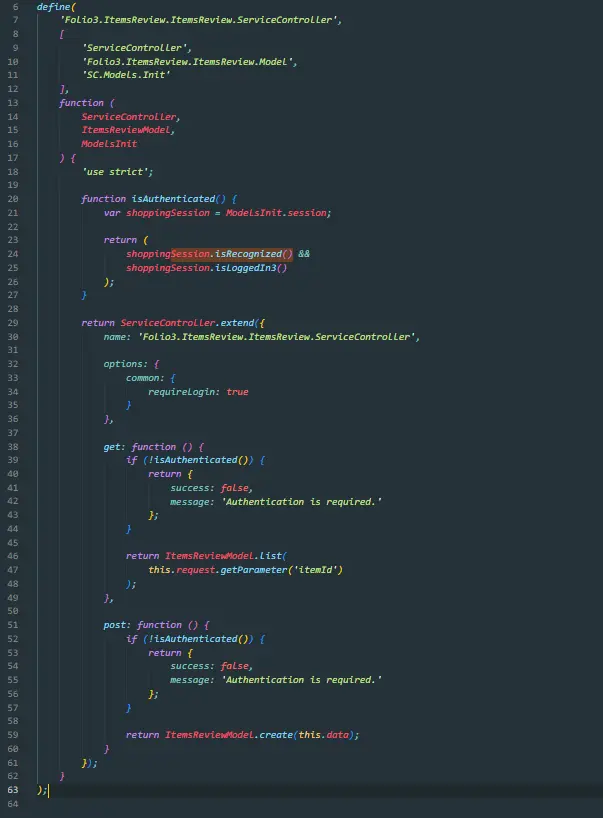
The SuiteScript 1.0 service controller accesses the server side ShoppingSession through SC.Models.Init.session. isRecognized() means NetSuite recognizes the shopper, which can include a remembered returning shopper. isLoggedIn3() verifies the stronger condition that the shopper is currently authenticated. Oracle documents both as methods of the server-side shoppingSession object. Oracle ShoppingSession documentation.
While both mechanisms enforce authentication in ServiceController, they execute at different stages of the request lifecycle:
- requireLogin: true (Framework Pre-filter): Evaluated by the base ServiceController before your method body executes. If the shopper is unauthenticated, NetSuite halts execution immediately and throws an HTTP 401 Unauthorized error.
- isAuthenticated() (Application Guard): Executes inside your get() or post() method via ModelsInit.session. It explicitly verifies both isRecognized() and isLoggedIn3(). Catching unauthenticated users at this layer lets you handle the failure gracefully by returning a custom 200 OK JSON payload (e.g., { success: false, message: ‘Authentication is required.’ }) rather than a hard network error.
Using both checks simultaneously creates a functional redundancy in the code. Because requireLogin: true evaluates first, unauthenticated requests trigger a 401 exception before isAuthenticated() is ever reached.
6.3 Put validation and record operations in the backend model
The backend model owns the custom record ID, the field map, validation helpers, the approved review query, and record creation. This is the right layer to normalize values and enforce the rules regardless of which frontend calls the service.
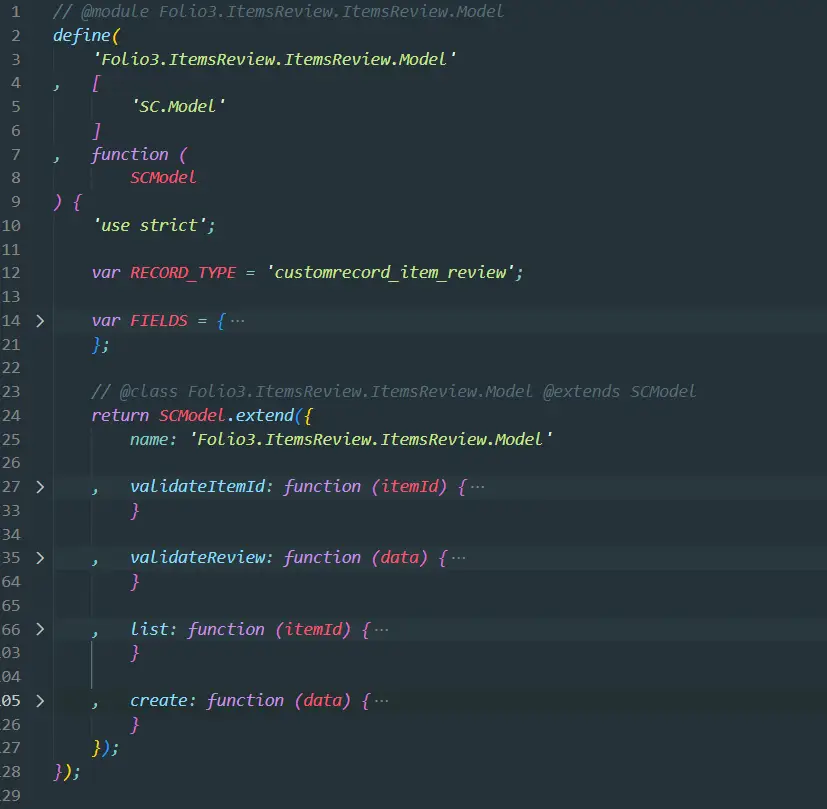
- Validate and normalize the item ID before using it in a search or record field
- Whitelist accepted request fields, ignore client supplied internal IDs, customer IDs, and approval flags
- Derive the submitting customer from the authenticated session if the record stores that relationship
- Force Approved to false on creation. A separate internal process should approve the record.
- Filter list results by both item and Approved = true, and return only fields required by the template
- Return consistent error objects and avoid exposing stack traces, record permissions, or internal implementation details to the storefront
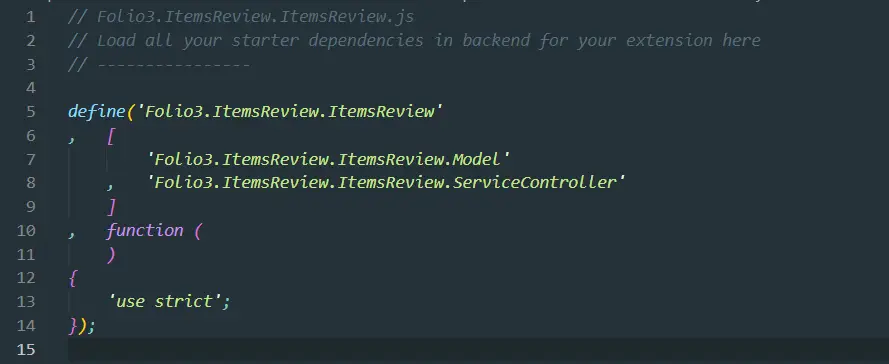
There are no arguments in the function() block because the dependencies are loaded and registered but are not used directly in this module.
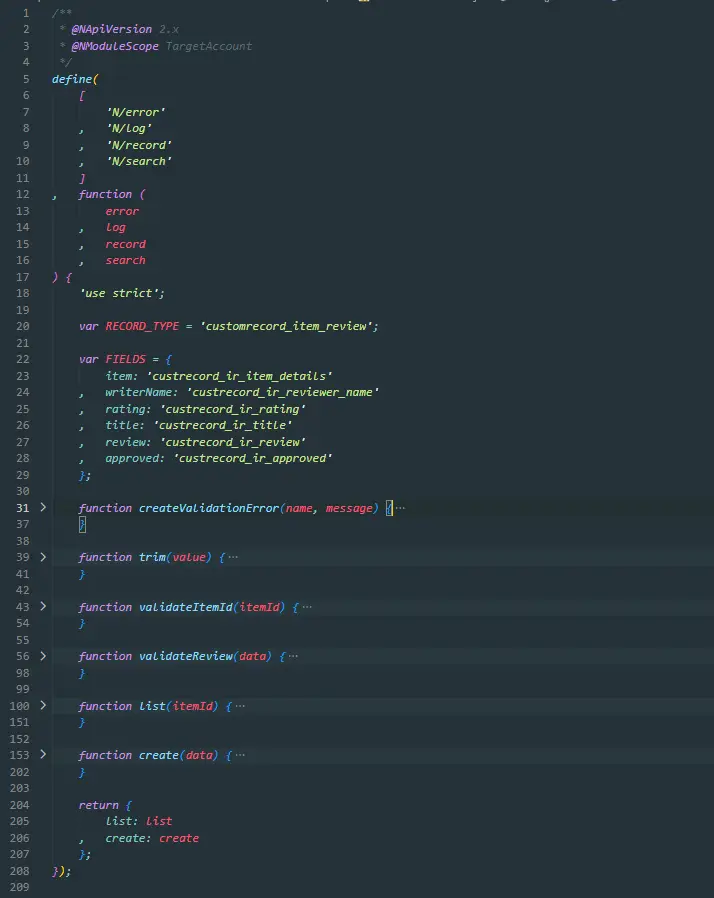
6.4 Prefer SuiteScript 2.x for new implementations
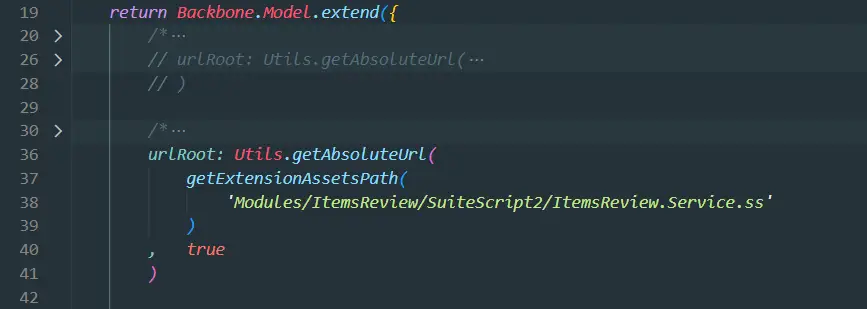
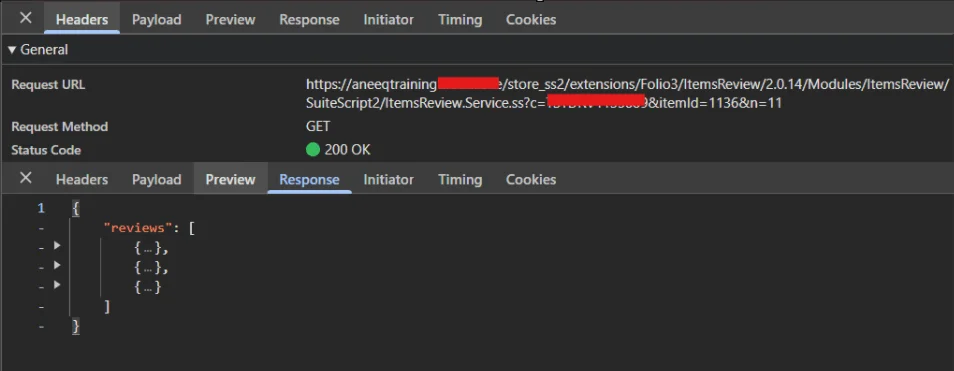
The generator can create a SuiteScript2 service for current Commerce versions. Oracle’s baseline guide explains that the frontend model should generate the service URL with getAbsoluteUrl() and set the SuiteScript 2.0 flag to true. The backend service can then use supported SuiteScript modules such as N/record to create review instances and N/search or N/query to retrieve approved reviews.
When generating the service URL for a SuiteScript 2.x service, pass true as the second argument to getAbsoluteUrl():
| Captured prototype | Recommended direction for a new current-version build |
|---|---|
| Backbone.View | SCView |
| Backbone.FormView | SCFormView |
| Backbone.Model / Collection | SCModel / SCCollection |
| SuiteScript 1.0 SC.Model | SuiteScript 2.x service with N/record and N/search or N/query |
| Backbone.Router success page | In-view success state or a registered Page Type |
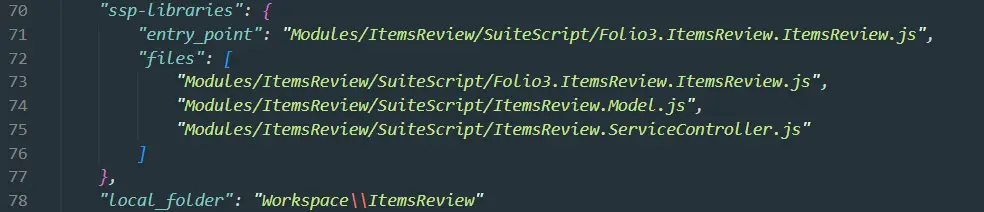
Do not mix the two backend paths accidentally. A SuiteScript 1.0 implementation belongs in the ssp-libraries section of the manifest, a SuiteScript 2.x service belongs in suitescript2.files, and its frontend absolute URL must be generated for the SuiteScript 2.x endpoint.
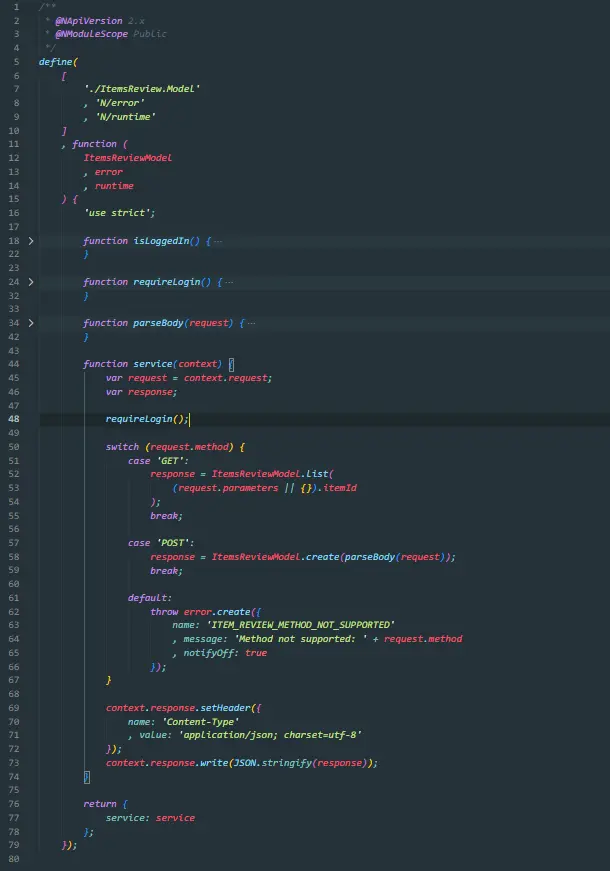
For retrieving itemId in this flow, the difference is how each implementation exposes the request parameters. In SuiteScript 1.0, the ServiceController provides this.request, so the item ID is retrieved with this.request.getParameter(‘itemId’). In SuiteScript 2.x, the service receives the request through the context object, so the same value is retrieved from context.request.parameters.itemId. Both approaches pass the itemId to ItemsReviewModel.list(), where the shared validateItemId() method checks that it is valid.
Register resources in manifest.json
The extension manifest is the build contract. Oracle’s Edit the Extension Manifest reference explains that it registers extension metadata and every JavaScript, template, Sass, configuration, asset, and SuiteScript resource included at compile time.
| Manifest area | What it should register for ItemsReview |
|---|---|
| javascript.entry_points | The Shopping entry point that mounts the PDP child view |
| javascript.application.shopping.files | Entry point, view, model, collection, and any success/page modules |
| templates.application.shopping.files | Review-center and success templates used by Shopping |
| sass.entry_points and files | The review module’s Sass entry point and imported partials |
| configuration.files | Review labels and messages exposed through the Commerce configuration record |
| ssp-libraries | SuiteScript 1.0 backend entry point, controller, and model shown in the screenshots |
| suitescript2.files | SuiteScript 2.x service files when the modern backend path is used |
| assets | Service assets, images, and fonts required by the extension |
Manifest overwrite warning The local and deploy tasks update manifest.json. If you intentionally maintain manual entries, use
gulp extension:local --preserve-manifestandgulp extension:deploy --preserve-manifest, then verify the compiled output contains every required file.
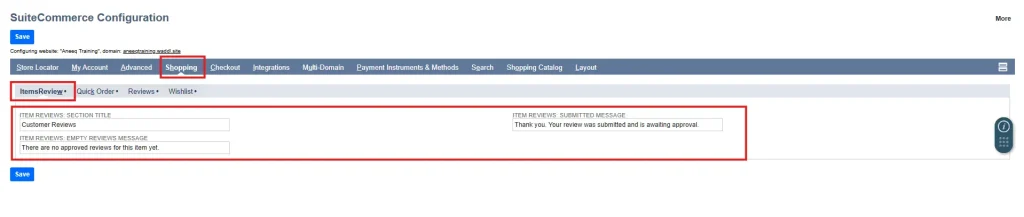
7.1 Place ItemsReview settings in Shopping > ItemsReview
The configuration JSON controls where extension settings appear in the SuiteCommerce Configuration record. Rather than creating a separate Extensions > Item Reviews area, this example adds the ItemsReview fields to the existing Shopping > ItemsReview location. This keeps review related settings together and demonstrates that an extension can add its own configuration fields to an existing supported configuration tab and subtab.
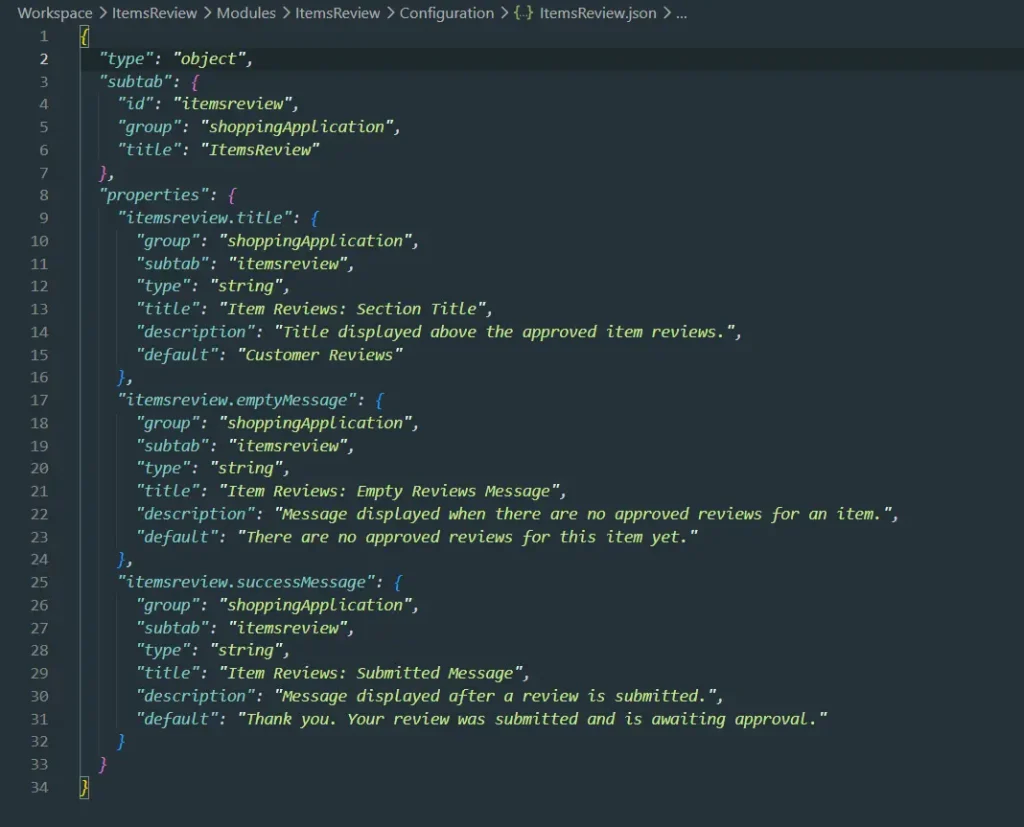
As shown here, extension-specific configuration fields can also be added to an existing configuration tab and subtab. For this example, the Item Reviews settings are placed under Shopping > ItemsReview. Oracle’s JSON configuration schema explains how the group and subtab identifiers determine where configuration properties appear. (Oracle JSON Configuration Files Schema)
Test the review experience end to end
Open a product details page through the local Shopping URL and verify that the review center appears in the intended placeholder. The form should receive the current item from PDP, prefill the profile-derived writer name, load approved reviews, and keep the Submit and Preview actions distinct.
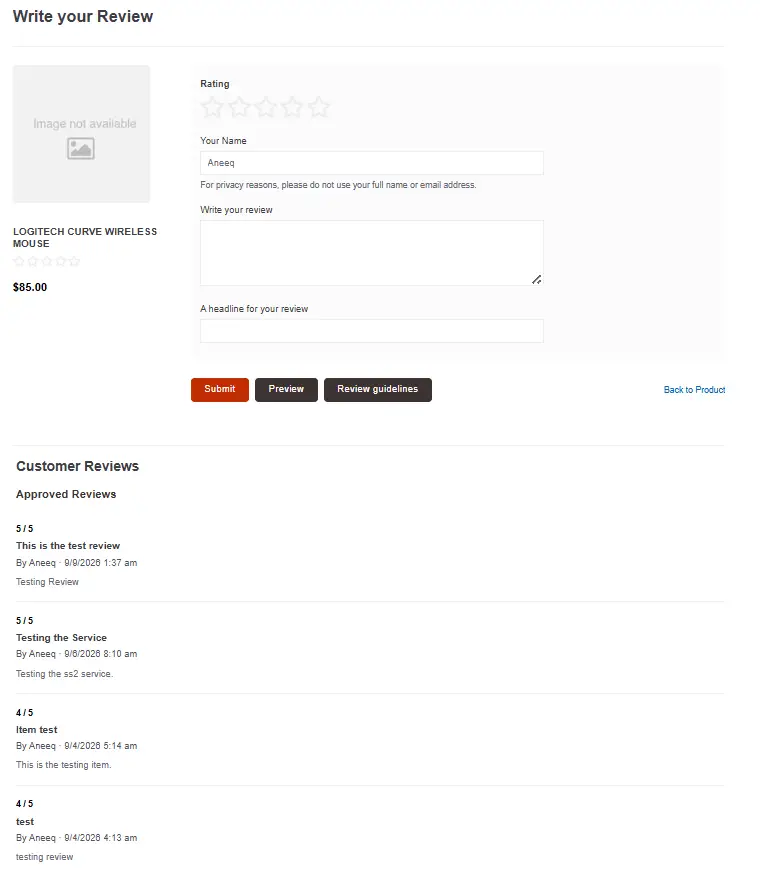
Submit the empty form to verify that required field validation is attached to the correct controls and that focus or navigation makes the first error easy to find.
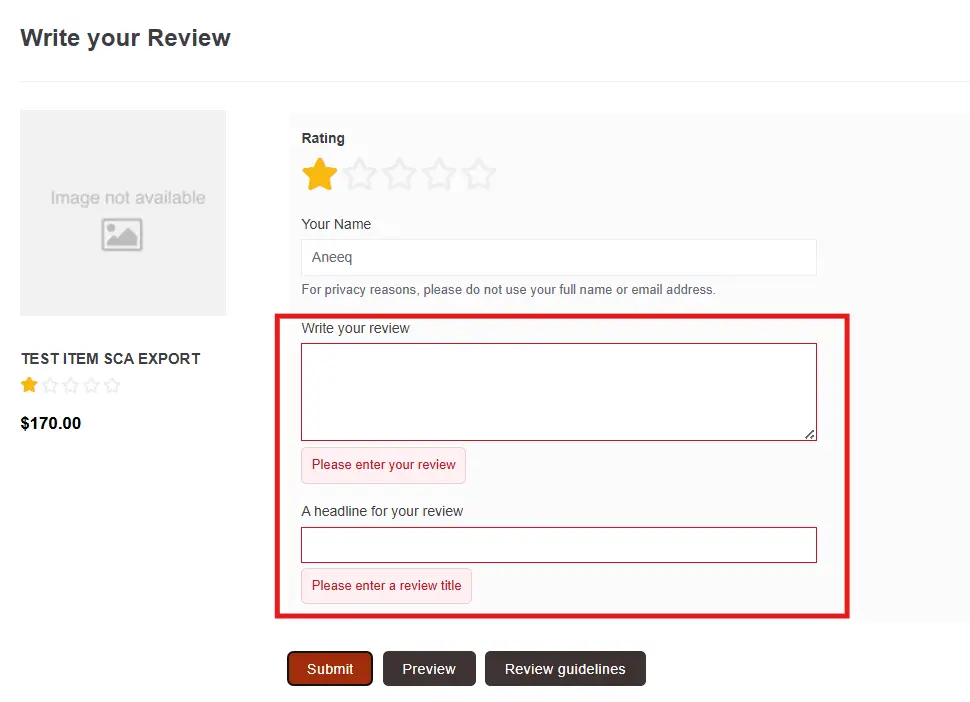
8.1 Verify successful record creation
Complete the required fields and submit a valid review while the browser Network panel is open. Confirm that the ItemsReview service returns a successful response and a reviewId only after the request completes. The returned internal ID provides a direct link between the storefront request and the NetSuite record used for administrative verification.
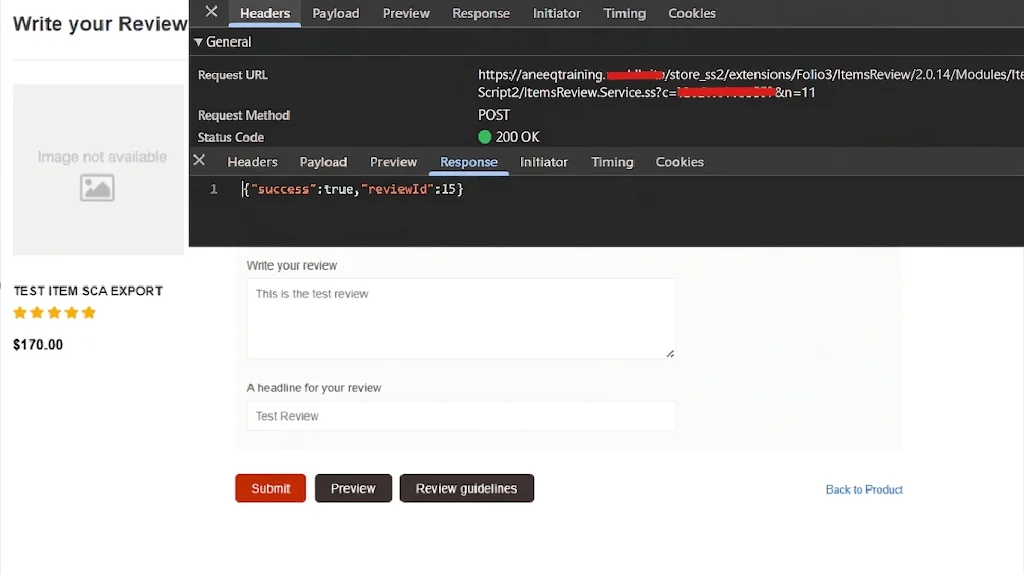
The reviewId is returned in this sample to make storefront-to-record verification easy during testing. In production, the service does not need to expose the internal ID to the shopper; it can be logged and reviewed through SSP execution logs when troubleshooting is required.
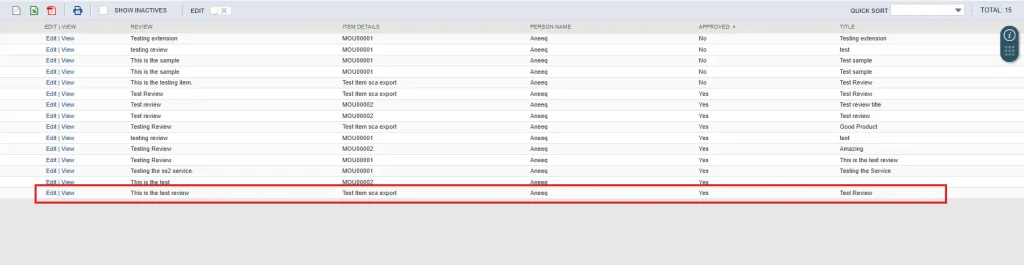
Next, open the Item Reviews list and locate the returned ID. Match the item and person, and confirm that Approved remains No, this verifies that the backend created one pending moderation record.
8.2 Handle the post submit state
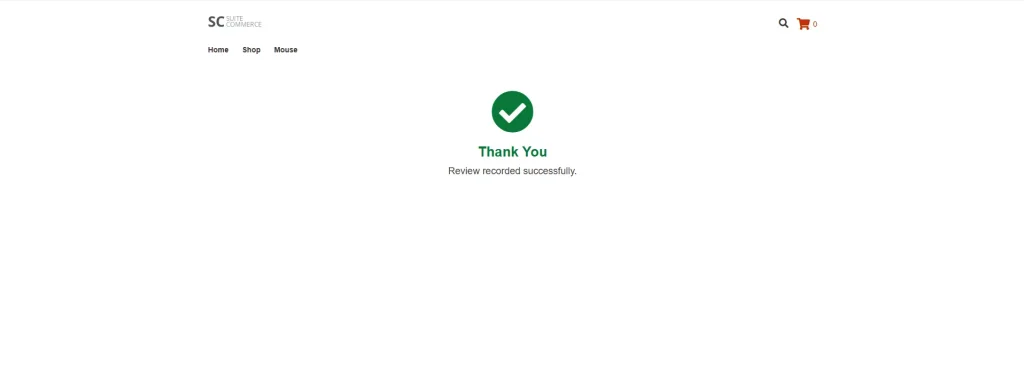
Listen for the model’s save event and inspect the response before displaying a Success Screen. Let the standard FormView path handle field validation and request feedback.
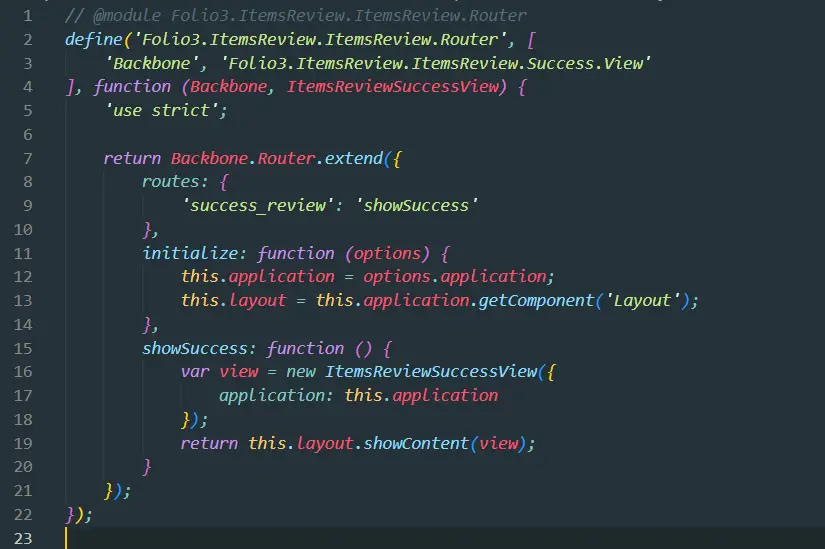
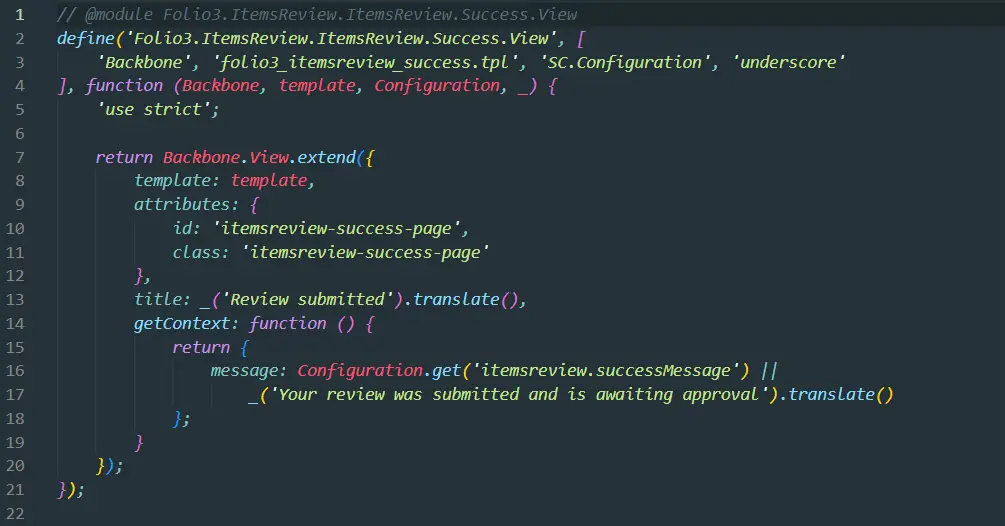

Use {{translate …}} for text rendered directly in a Handlebars template. When a message is created in JavaScript, where the Handlebars helper is not available, use _(…).translate() instead. The attributes object sets HTML attributes on the view’s root element; here, it adds an ID and CSS class so the success page can be styled and selected reliably.
Deploy and activate the extension
To speed up compilation and deployment, use the --source parameter to process and upload only the required source types. For example, the following command deploys only the JavaScript and service files while skipping unrelated resources:
gulp extension:deploy --source javascript,services
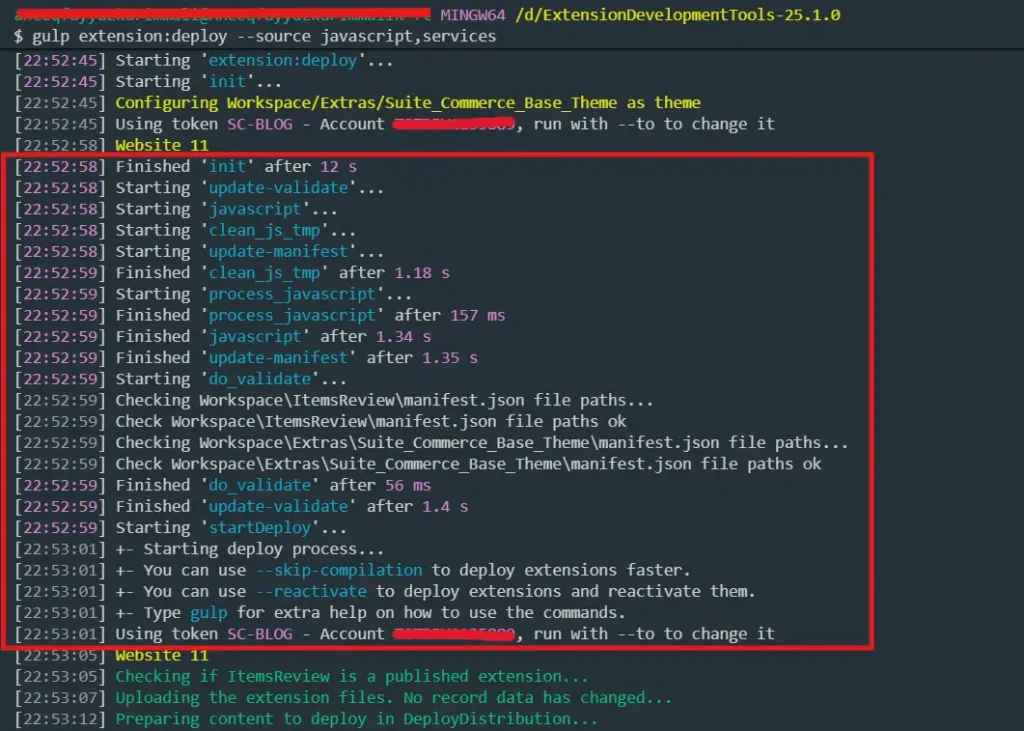
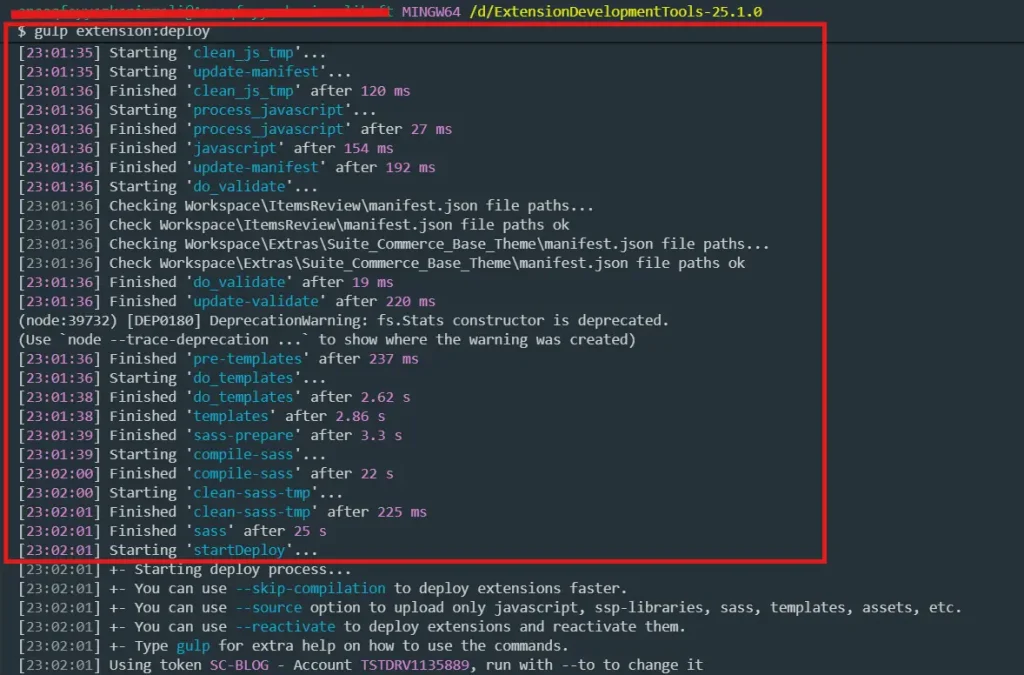
--source flag, deployment performs a full compilation of all extension resourcesgulp extension:deploy --reactivate
The --reactivate flag automatically starts reactivation after deployment using the extension version that is already linked. If you have updated the version, you will still need to manually select and activate the new version. The CLI waits until reactivation is complete, so this adds an unnecessary activation cycle and extra time.
Best Practice:
- Same Version Iteration: Use
--reactivatewhen quickly testing minor code fixes on an existing, already linked extension version. - New Version Release: Omit
--reactivatewhen releasing a new version (incremented in manifest.json). Deploy without the flag and manually select/activate the new version directly in NetSuite Extension Manager.
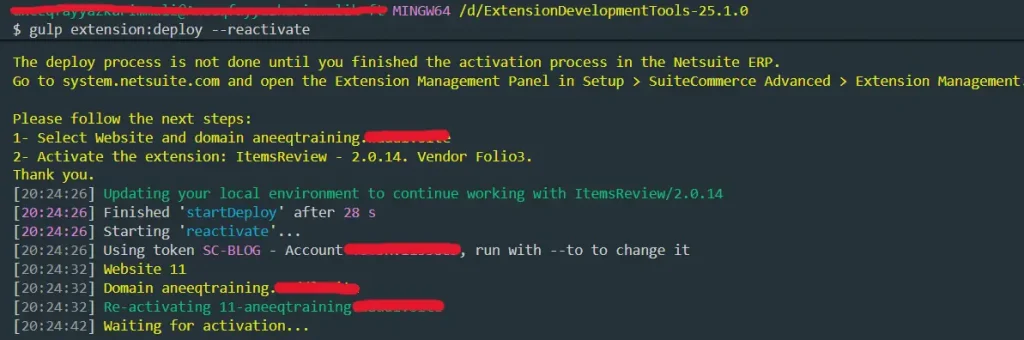
--reactivate option starts the activation workflow after deployment9.1 Verify the File Cabinet upload
The deploy commands uploads the extension source to
Documents > Files > File Cabinet > SuiteScripts > Deploy_Extensions > <VendorName> > <ExtensionName>@<Version>
Open that folder to verify manifest.json and the deployed module files. Deployment does not make the feature live. Use Commerce > Extensions > Extension Manager, create a new activation or edit the existing site/domain activation, select the new ItemsReview version, and choose Activate. Oracle’s Activating Themes and Extensions procedure confirms that activation compiles the domain runtime and applies the selected extensions.
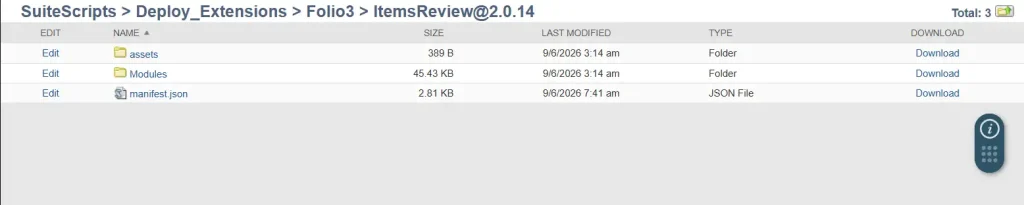
Deployment only uploads the extension and makes that version available in Extension Manager; it does not apply the extension to the website. Oracle: Deploy an Extension to NetSuite.
To apply the deployed extension:
- Navigate to Commerce > Extensions > Extension Manager
- Create a new activation or edit the existing activation for the appropriate website and domain
- Select the newly deployed version of ItemsReview
- Click Activate
- Wait until the activation status is Completed
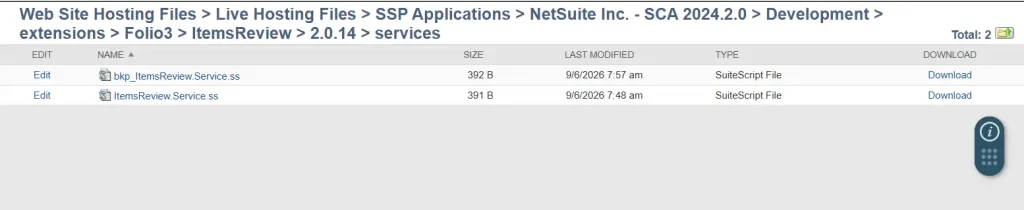
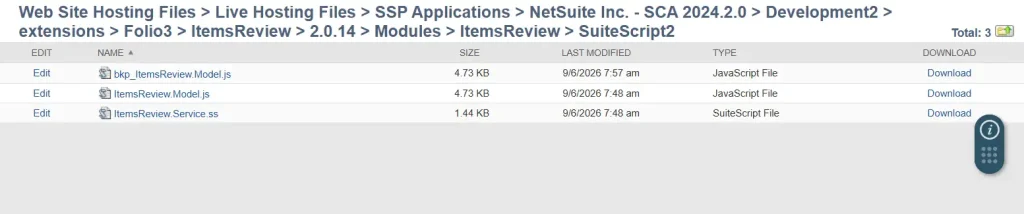
After activation completes, the activated SuiteScript 2.x files can be inspected in the applicable SCA runtime folder. In this account, the path is:
For SuiteScript 1.0 services, navigate to:
Web Site Hosting Files > Live Hosting Files > SSP Applications > NetSuite Inc. – SCA 2024.2.0 > Development > extensions > <VendorName> > <ExtensionName> > <Version> > services
For SuiteScript 2.x services, navigate to:
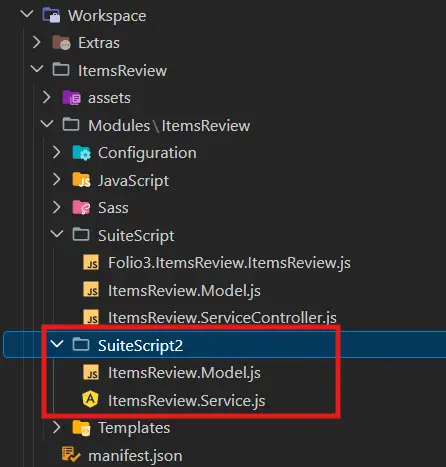
Web Site Hosting Files > Live Hosting Files > SSP Applications > NetSuite Inc. – SCA 2024.2.0 > Development2 > extensions > <VendorName> > <ExtensionName> > <Version> > Modules > <ModuleName> > SuiteScript2
The extension contains separate backend implementations for comparison. The SuiteScript folder contains the SuiteScript 1.0 service controller and model, while SuiteScript2 contains the SuiteScript 2.x model and service. The SuiteScript 2.x implementation uses AMD dependencies and supported N/* modules, whereas the SuiteScript 1.0 implementation uses the legacy service-controller pattern.
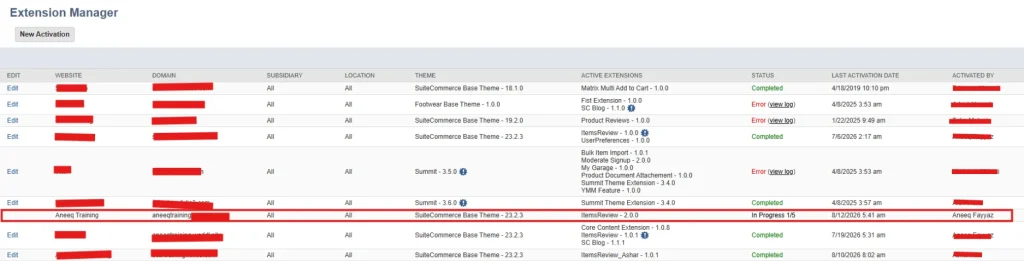
- Increment the extension version before deploying a release that must coexist with or replace an earlier version
- Verify the selected website, domain, subsidiary, and location before activation, the screenshot highlights the intended activation row
- Wait for a completed status, then test a live domain URL while logged out and logged in
- Check the browser network response, NetSuite script logs, and the custom record list when a request fails
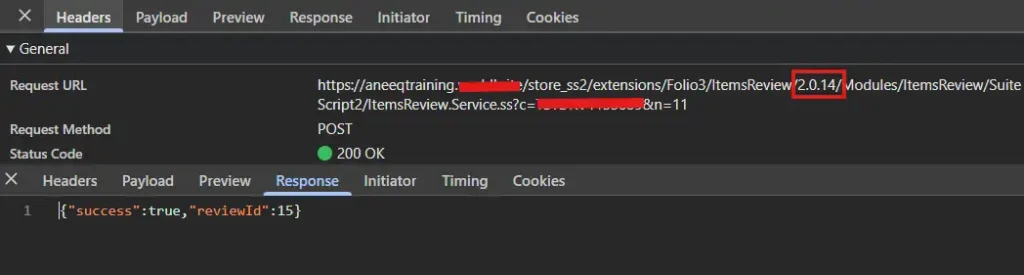
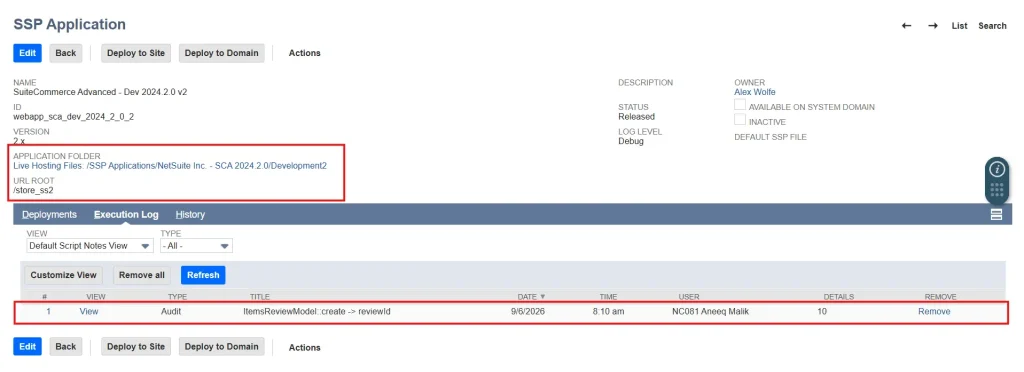
9.2 If changes do not appear: rebuild generated output
If source changes are not reflected, stop the current Gulp process and confirm that you are in the top level Extension Developer Tools directory. Delete only the generated LocalDistribution and DeployDistribution folders. Then run gulp extension:local again for local testing or gulp extension:deploy again for deployment. The tools recreate both folders.
9.3 Increment the extension version for a clean deployment
If updated files have been deployed but the website still appears to use the previous extension package, deploy the changes under a new patch version. Increment the version in the manifest.json file.
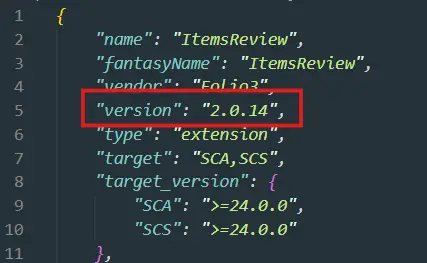
Using a new version gives the updated package a distinct identity and makes it easier to confirm which implementation is deployed and active. This can help when NetSuite still appears to be using files from an earlier deployment. We can even verify it from the network tab. You can check it as the extension version appears on the request url of the service.

Keep generated files and credentials out of Git
Keep the custom extension source under Workspace in Git, including JavaScript, SuiteScript, templates, Sass, configuration files, and manifest.json. This lets the team review changes, collaborate, and restore earlier versions.
Track package.json and package-lock.json. The first declares the dependencies; the second records the resolved dependency tree. Use npm ci when installing an existing project to install from the committed lockfile. This reduces situations where code works on one developer’s machine but fails on another because their dependency versions differ. If the dependency declarations and lockfile disagree, npm ci reports an error instead of updating the lockfile. See the npm ci documentation.
Use the same supported Node.js, npm, and Extension Developer Tools versions across the team. A lockfile makes dependency installation more reproducible, but it does not make the entire development environment identical.
Track gulpfile.js, .yo-rc.json, and any shared .npmrc settings required by the project. Committing .yo-rc.json preserves the Yeoman generator configuration and metadata across team members so Gulp tooling retains workspace context. Never commit passwords or authentication tokens in .npmrc; supply credentials through the team’s approved local or CI configuration.
Exclude installed dependencies, generated build output, deployment payloads, and local authentication files. Keep node_modules, LocalDistribution, DeployDistribution, payload.json, .nsdeploy, and secret-bearing .env files out of Git.
Use the accompanying generic .gitignore sample as a starting point. Its rules are grouped by purpose and contain no customer or project names. Adjust paths to match your repository, and review each exclusion so that required source files remain tracked.
Resource material
Download the ItemsReview sample codebase used throughout this guide. Treat it as reference material and review account-specific IDs, permissions, configuration, and manifest entries before deployment.
Codebase: ItemsReview.zip
The ItemsReview project above is a complete, practical example. For more learning resources, see Oracle’s Extension Tutorials, the NetSuite Commerce sample repository, Develop Your First Extension, and Example Customizations.
Conclusion
By completing this guide, you have followed the complete lifecycle of a SuiteCommerce extension: scaffolding the project, mounting a view on the product details page, preparing data in getContext(), rendering it with Handlebars, sending GET and POST requests through frontend models and collections, validating requests in SuiteScript, storing reviews in a custom record, and finally deploying and activating the extension in NetSuite.
More importantly, the ItemsReview example shows how each layer should remain focused. Views manage storefront behavior and presentation, Handlebars templates render display ready data, models and collections handle communication, and the backend enforces validation, permissions, and record operations. Keeping these responsibilities separate makes the extension easier to debug, maintain, test, and upgrade.
The attached ItemsReview codebase provides a complete implementation example that you can download, deploy, and adapt for your own NetSuite account. Before deployment, create the Item Reviews custom record and fields described in this guide, and ensure that their script IDs match the values referenced by the SuiteScript backend. After confirming the permissions, configuration values, mount points, and activation settings for your environment, you can use this project as a strong foundation for implementing an item-review feature on your website.
Related Reads
Continue building your NetSuite development knowledge with these practical Folio3 guides. They cover API integrations, MCP tools, authentication, development workflows, and real world implementation patterns that complement the SuiteCommerce concepts discussed in this guide.
Getting Started
• A Complete Setup Guide for NetSuite AI Connector
• A Setup Guide for NetSuite AI Connector with Postman: API Integration Tutorial
• Getting Started with NetSuite SuiteTalk REST API in Postman
• NetSuite MCP OAuth 2.0 Token Generator Tool
• SuiteScript Essentials: A Developer’s Getting Started Guide
• Open Source for Dummies: A Beginner’s Open Source Journey
• SuiteCommerce Development: An Illustrated Guide from Setup to Extension Deployment & Troubleshooting
MCP and Client Integrations
• IDE Integration Guide for NetSuite MCP Tools in Cursor & VS Code
• Connecting MCP with ChatGPT: A Complete Guide
• Connecting MCP Tools with Qwen
• Connecting ChatGPT Business with NetSuite via MCP: The Future of Enterprise AI Integration
• OAuth 2.0 in NetSuite: Complete Setup Guide (Client Credentials Flow)
Advanced and Architecture
• Building Custom Tools for NetSuite AI Connector: Development Guide
• Dual API Integration: Using NetSuite MCP Tools with OpenAI and Anthropic
• NetSuite MCP Challenge: Implementation Case Study & Results
• MCP Input Formats Compared: Token Usage Analysis for NetSuite MCP Tools
• Integrating NetSuite MCP Tools with AI-Powered CLI Tools
• WhatsApp Triggered AI Agent for NetSuite Using n8n and MCP Tools
• Advanced NetSuite PDF and HTML Template Tricks
• NetSuite Scriptable Cart in SuiteCommerce Advanced: 6 Problems Developers Actually Need to Solve
• Prompt Studio: From SuiteQL Rows to a Business Summary
• Yup and Joi Validation Guide: Dynamic Schemas, Conditional Rules And React Hook Form Integration
• NetSuite Map/Reduce Script Guide: Concurrency, Governance, Yielding & Restarts